> ## Documentation Index
> Fetch the complete documentation index at: https://help.scribe-mail.com/llms.txt
> Use this file to discover all available pages before exploring further.
# Microsoft 365: Server Side
> Set up server-side email signature deployment for Microsoft 365. Emails route through Scribe's secure servers to add signatures from any device or client.
Server-side installation automatically adds signatures to emails from any device or client.
**Centralized one-click installation.** No teammate action needed. Users don't see signatures when composing emails. Your emails are processed through Scribe's secure servers for signature injection.
**Supported platforms:** Web, Desktop, Apple Mail, iOS, Android
## How it works
Server-side installation changes your mail routing, not your teammates' mailboxes. Nothing is installed on their devices, and no add-in runs in their email client. Instead, the setup below adds one hop to your outbound mail flow, and the signature is added to each message while it is in transit.
1. **A teammate sends an email.** Exchange Online accepts it from whatever client or device they used, so the same rule covers web, desktop, Apple Mail, iOS and Android. Tools that send through a teammate's mailbox are covered too: HubSpot sales emails, and any other CRM or sequencer connected to the mailbox, pick up the signature with no extra setup, as long as the From address belongs to a teammate whose signature you have installed. A tool that sends from its own servers instead of through Exchange Online, such as HubSpot marketing email, never reaches this rule and gets no signature.
2. **Exchange Online routes the message to Scribe.** The mail flow rule you create below matches senders located inside your organization and redirects them to the outbound connector, which routes to the smart host `smtp.server.scribe-mail.com` over TLS.
3. **Scribe adds the signature.** Scribe inserts the teammate's published signature, choosing the right [variant](/en/signature-variants) for the context, then re-signs the message so it still authenticates after the change, and stamps it with an `X-Scribe-Processed` header.
4. **The message returns to Exchange Online.** Scribe hands it back through the inbound connector, which is configured to accept connections only from Scribe's two IP addresses.
5. **Exchange Online delivers it.** The `X-Scribe-Processed` header matches the rule's exception, so the rule does not fire a second time and the message goes out to the recipient the same way any other message does.
Scribe adds the signature and its own headers: `X-Scribe-Processed`, a routing header telling the relay where to hand the message back, a refreshed `DKIM-Signature`, an ARC chain, and the `Content-Type` matching the rewritten body. Your recipients, subject, attachments and the text your teammate wrote are passed through unchanged.
## Installation guide
This is an advanced user feature. IT support is required to set up this integration.
* Users don't see signatures when composing an email.
* Your emails are processed through Scribe's secure servers to install signatures. Scribe cannot read or edit your emails.
* You can combine [cloud-based integration](/en/integrations/signatures/microsoft-365-client-side) with server-side integration. If both are connected, Scribe defaults to cloud-based integration so users can see their signatures when composing emails.
### Prerequisites
* **Microsoft 365 admin access** (Exchange admin center)
* At least one signature created in Scribe
The setup involves four parts: creating an outbound connector, creating an inbound connector, creating a mail flow rule, and configuring DKIM.
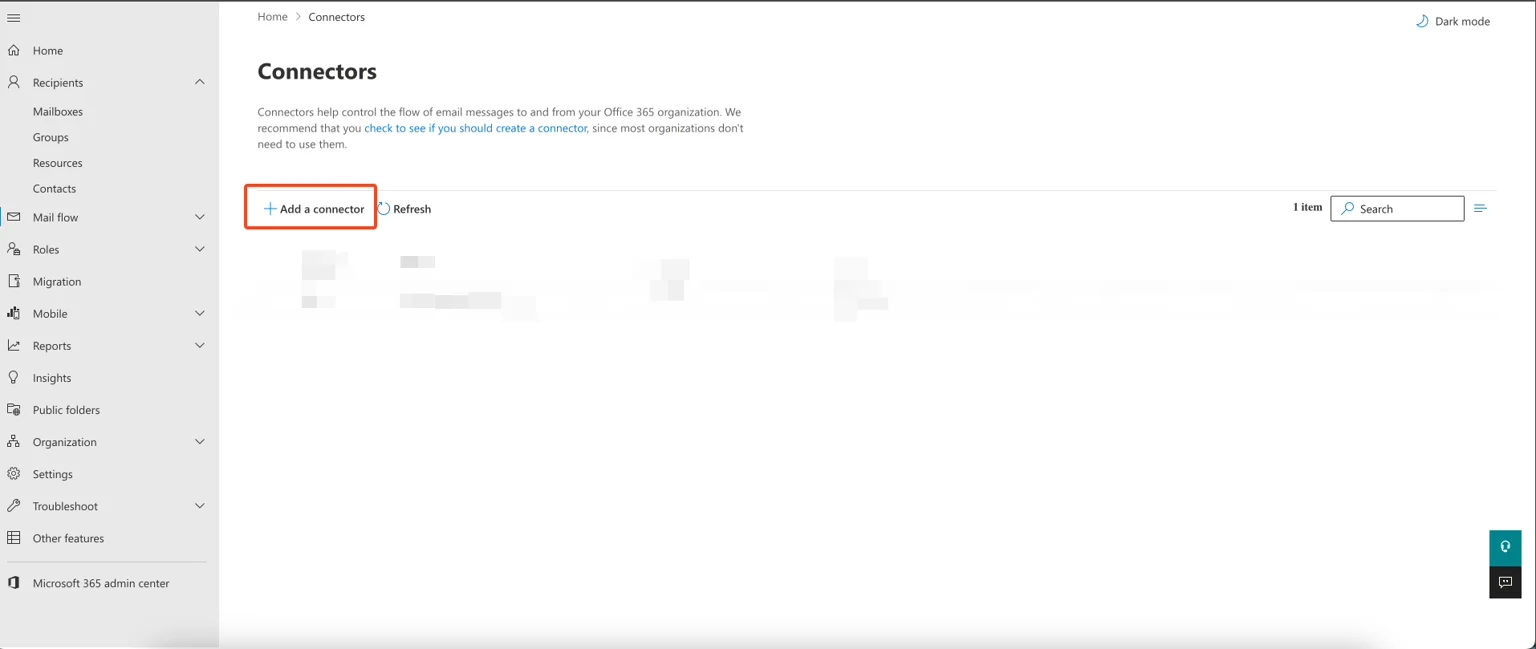
To route emails through Scribe's secure servers, create an outbound connector in your Exchange admin. In the Exchange admin interface, go to **Mail flow → Connectors** and click **"Add a connector."**
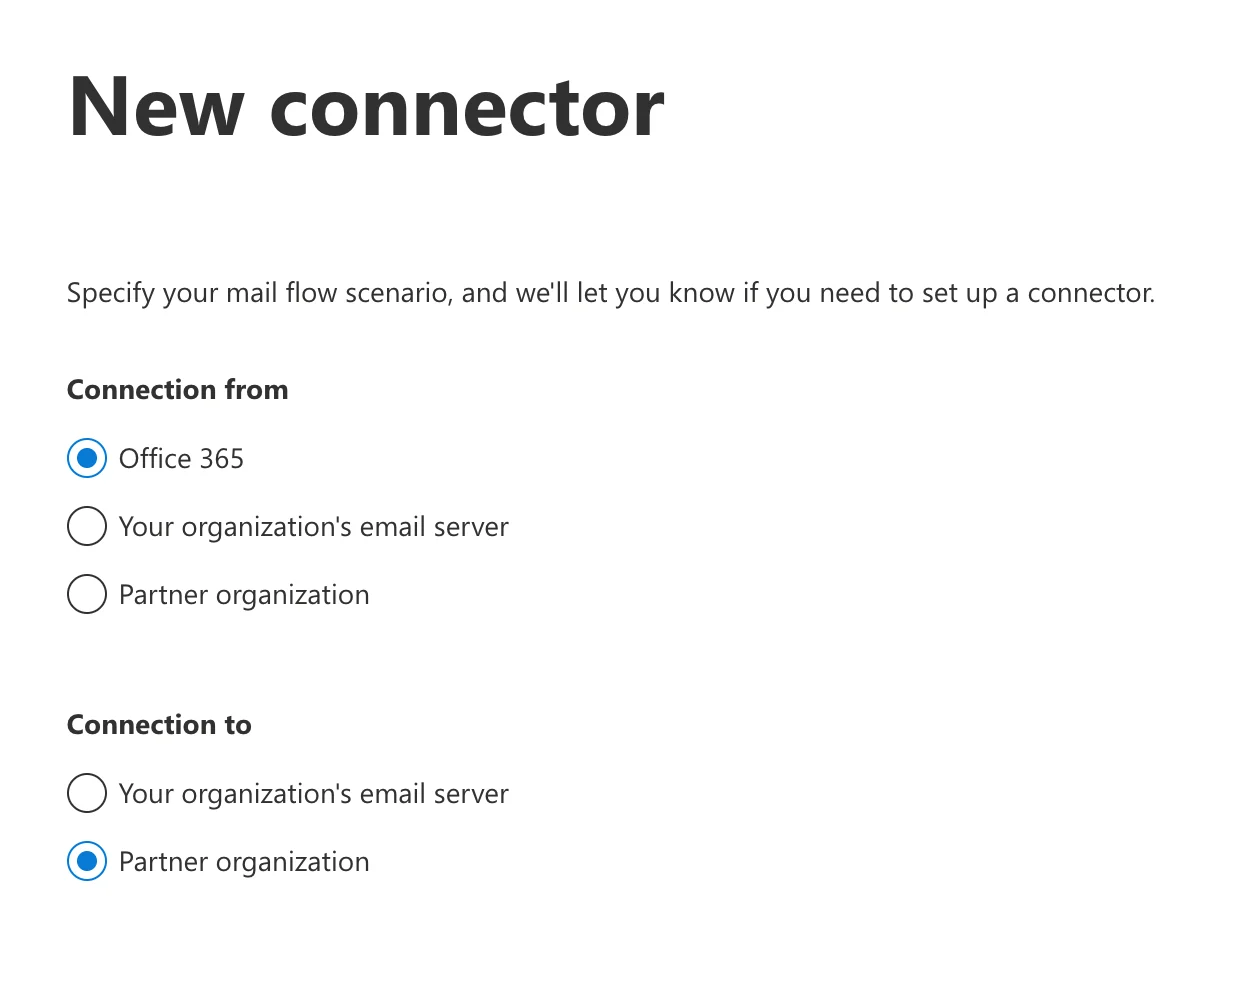
 Select **"Office 365"** for connection from and **"Partner organization"** for connection to.
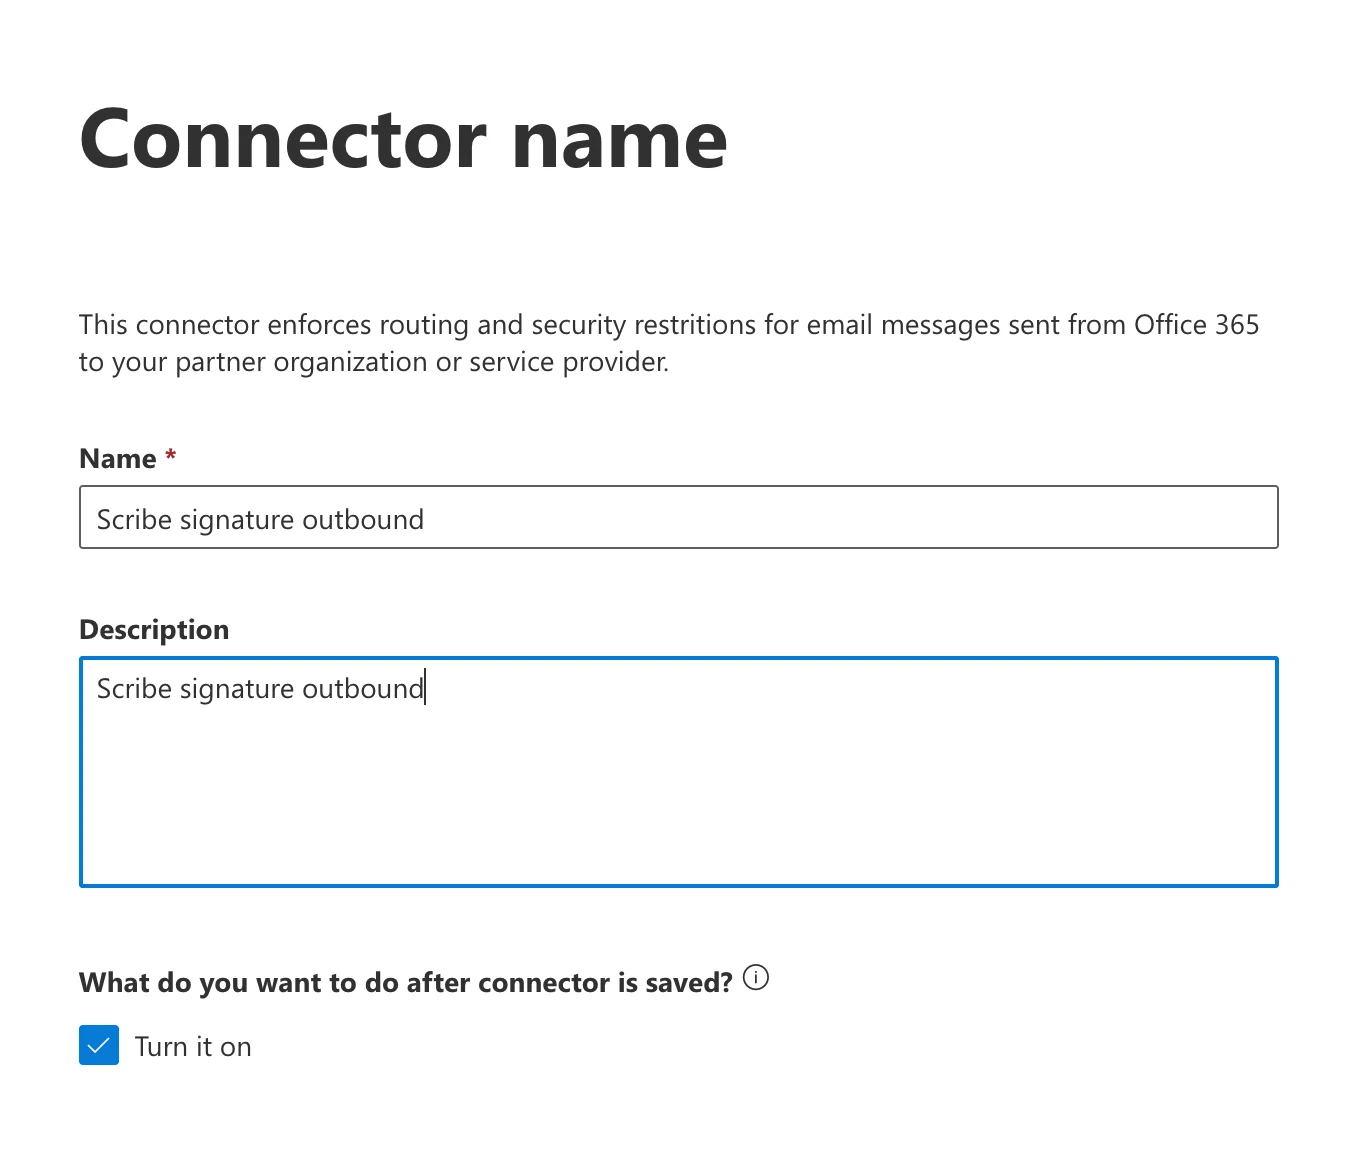
 Enter a connector name and description. Optionally, check **"Turn it on"** to enable immediately.
* **Name:** `Scribe signature outbound`
* **Description:** `Scribe signature outbound`
Enter a connector name and description. Optionally, check **"Turn it on"** to enable immediately.
* **Name:** `Scribe signature outbound`
* **Description:** `Scribe signature outbound`
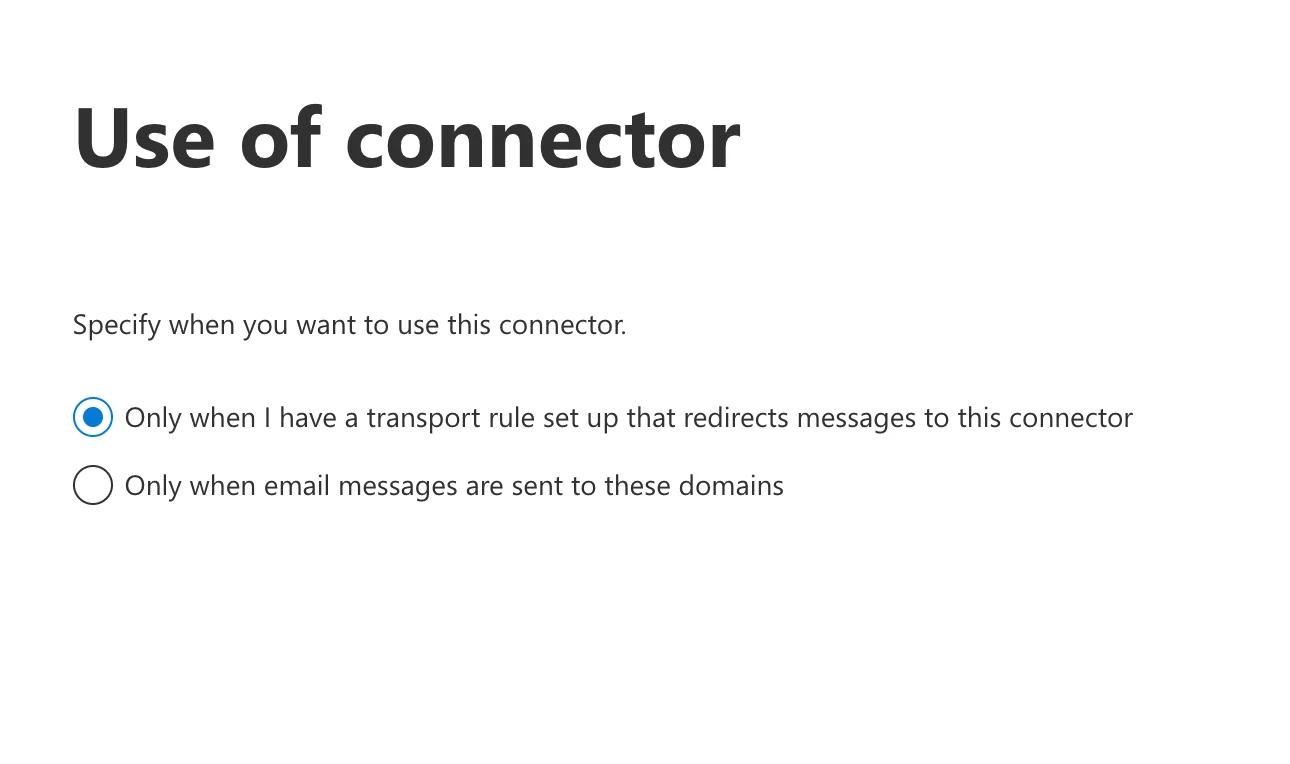
 Select **"Only when I have a transport rule set up that redirects messages to this connector."**
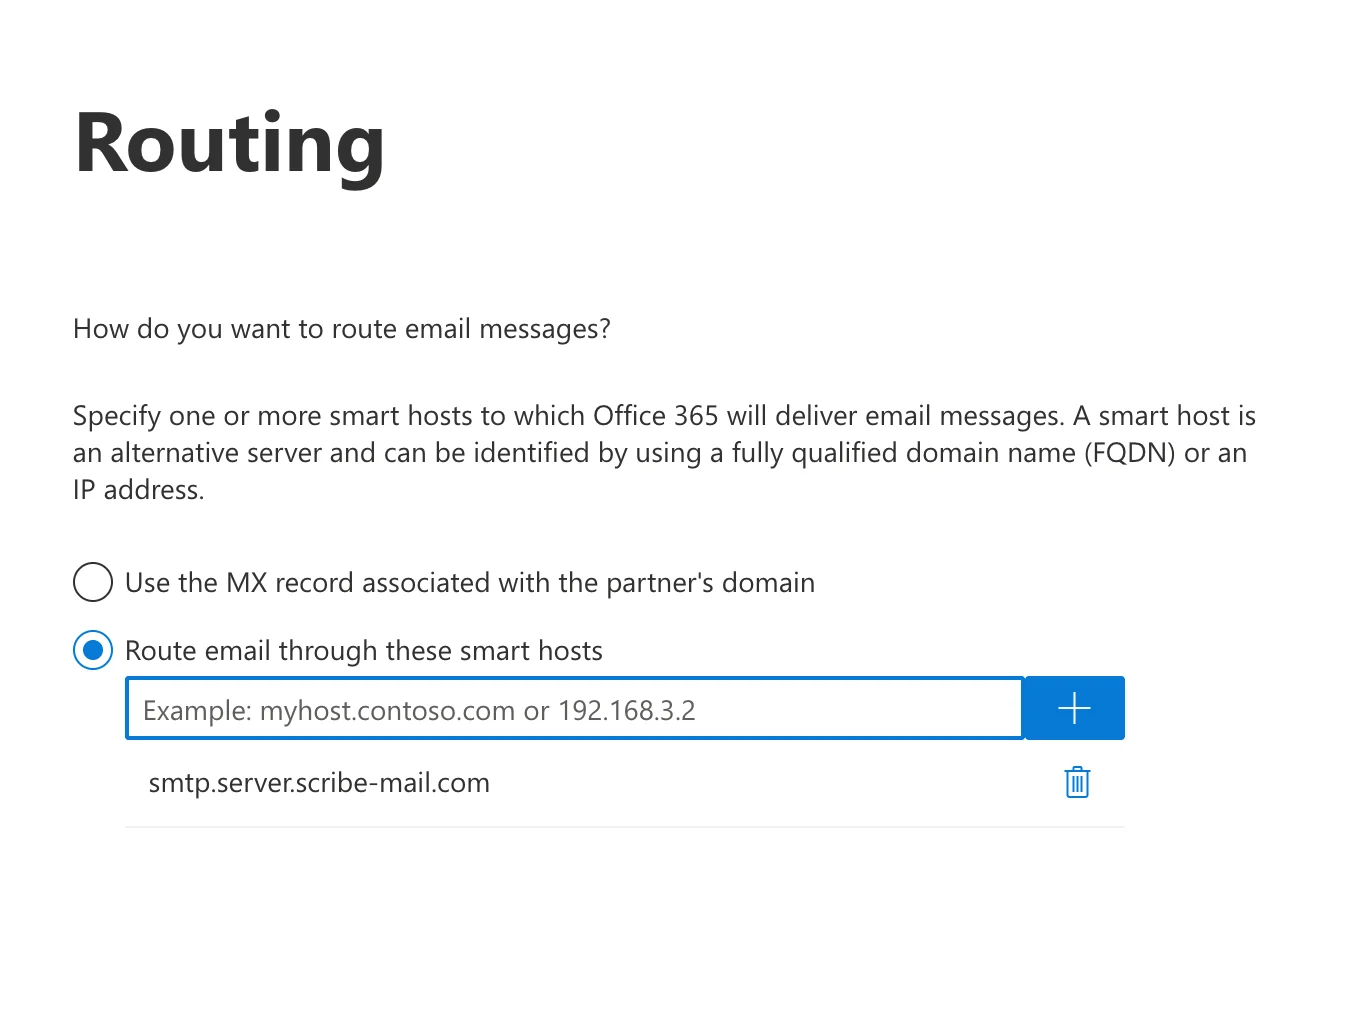
 Select **"Route email through these smart hosts"** and add the following host to the list:
```text theme={null}
smtp.server.scribe-mail.com
```
Select **"Route email through these smart hosts"** and add the following host to the list:
```text theme={null}
smtp.server.scribe-mail.com
```
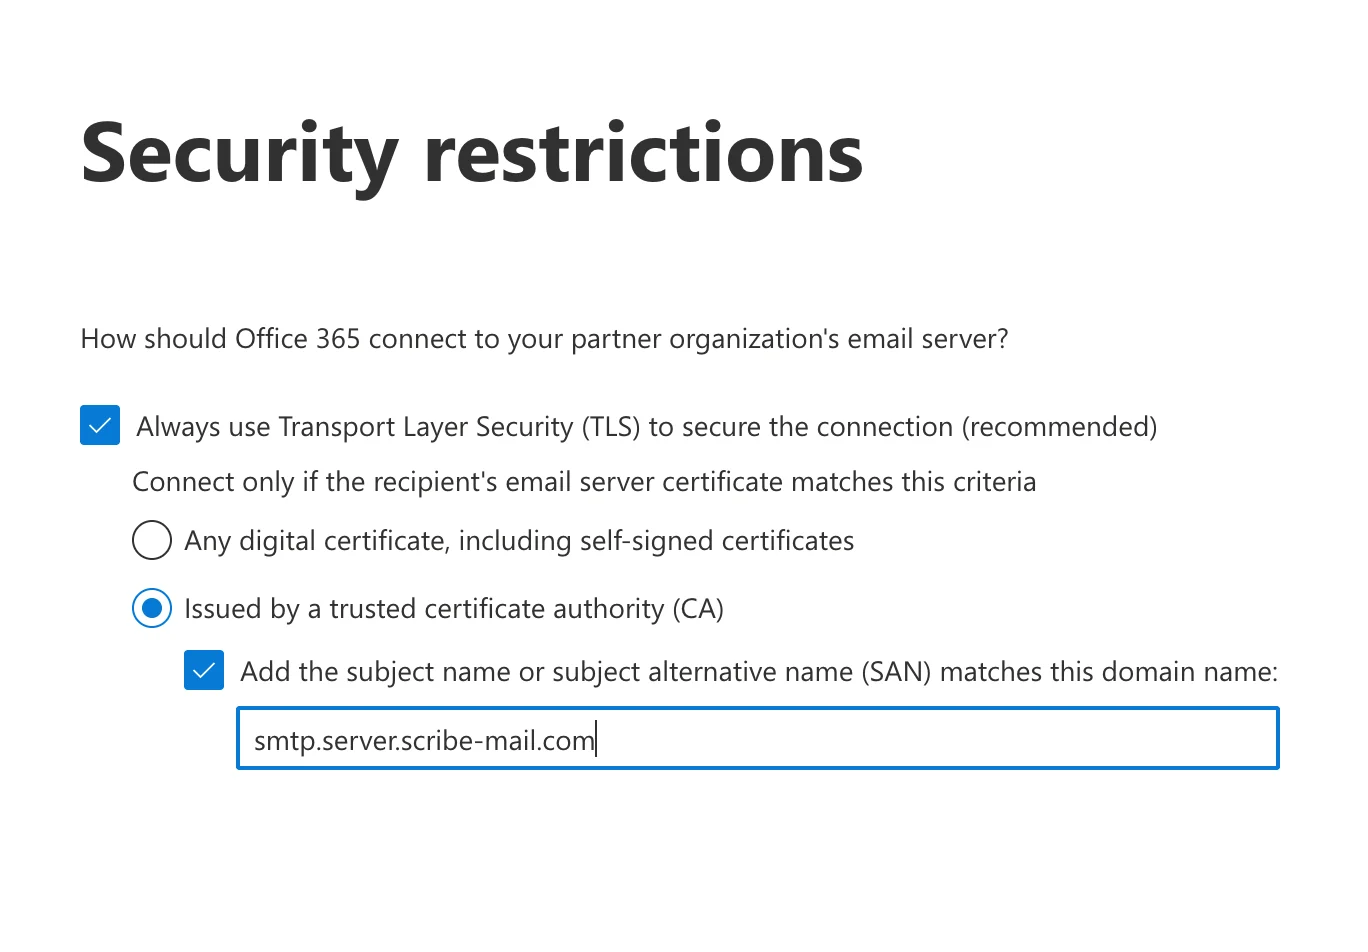
 Select **"Always use Transport Layer Security (TLS) to secure the connection (recommended)"**, then:
**a.** Select: **"Issued by a trusted certificate authority (CA)."**
**b.** Check: **"Add the subject name or subject alternative name (SAN) matches this domain name."**
**c.** Enter the following in the field:
```text theme={null}
smtp.server.scribe-mail.com
```
Select **"Always use Transport Layer Security (TLS) to secure the connection (recommended)"**, then:
**a.** Select: **"Issued by a trusted certificate authority (CA)."**
**b.** Check: **"Add the subject name or subject alternative name (SAN) matches this domain name."**
**c.** Enter the following in the field:
```text theme={null}
smtp.server.scribe-mail.com
```
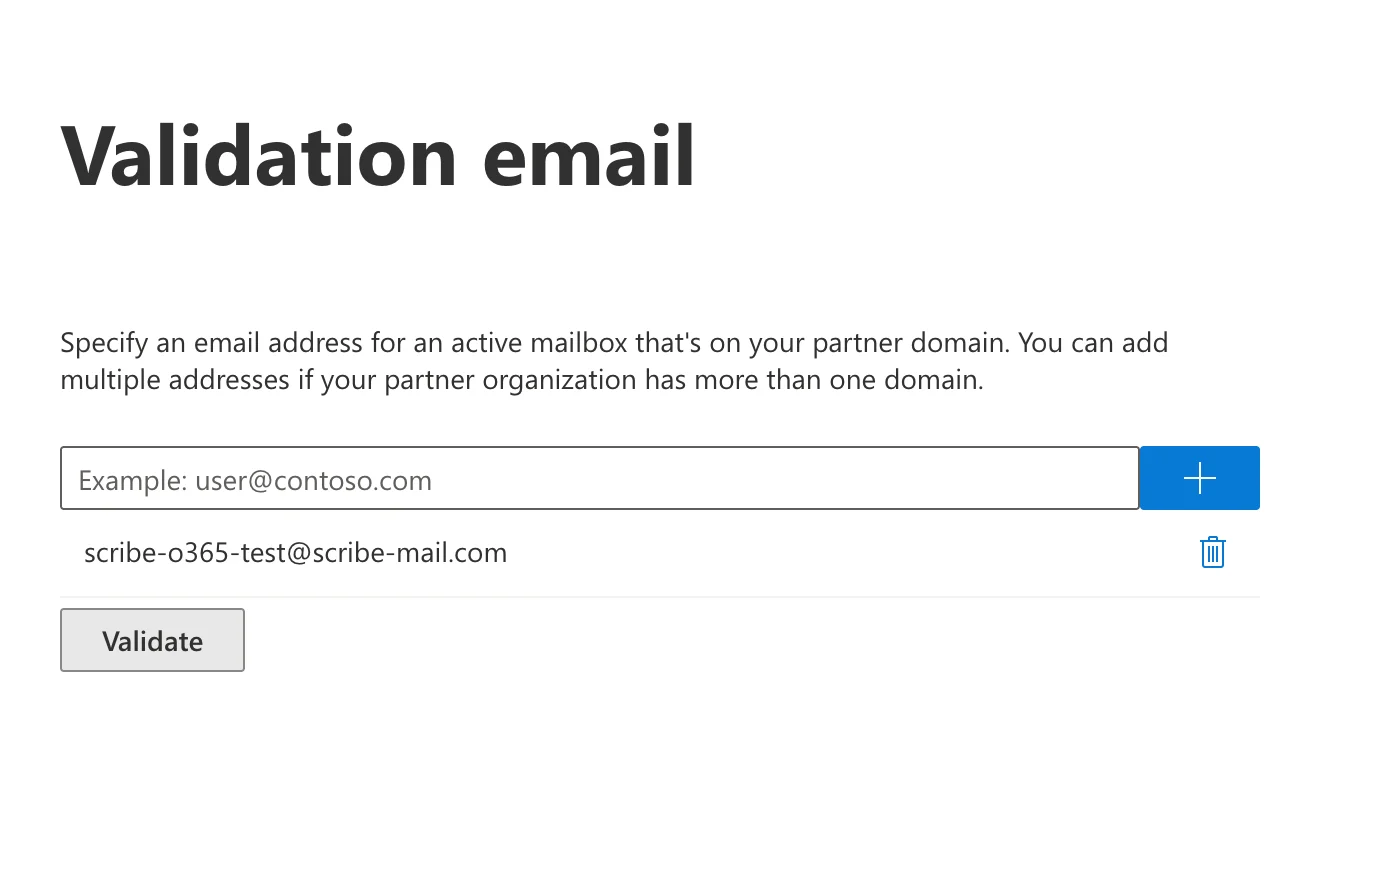
 Enter the following as the test email and start the validation:
```text theme={null}
scribe-o365-test@scribe-mail.com
```
Sometimes the validation fails, but you can safely continue without validating.
Enter the following as the test email and start the validation:
```text theme={null}
scribe-o365-test@scribe-mail.com
```
Sometimes the validation fails, but you can safely continue without validating.
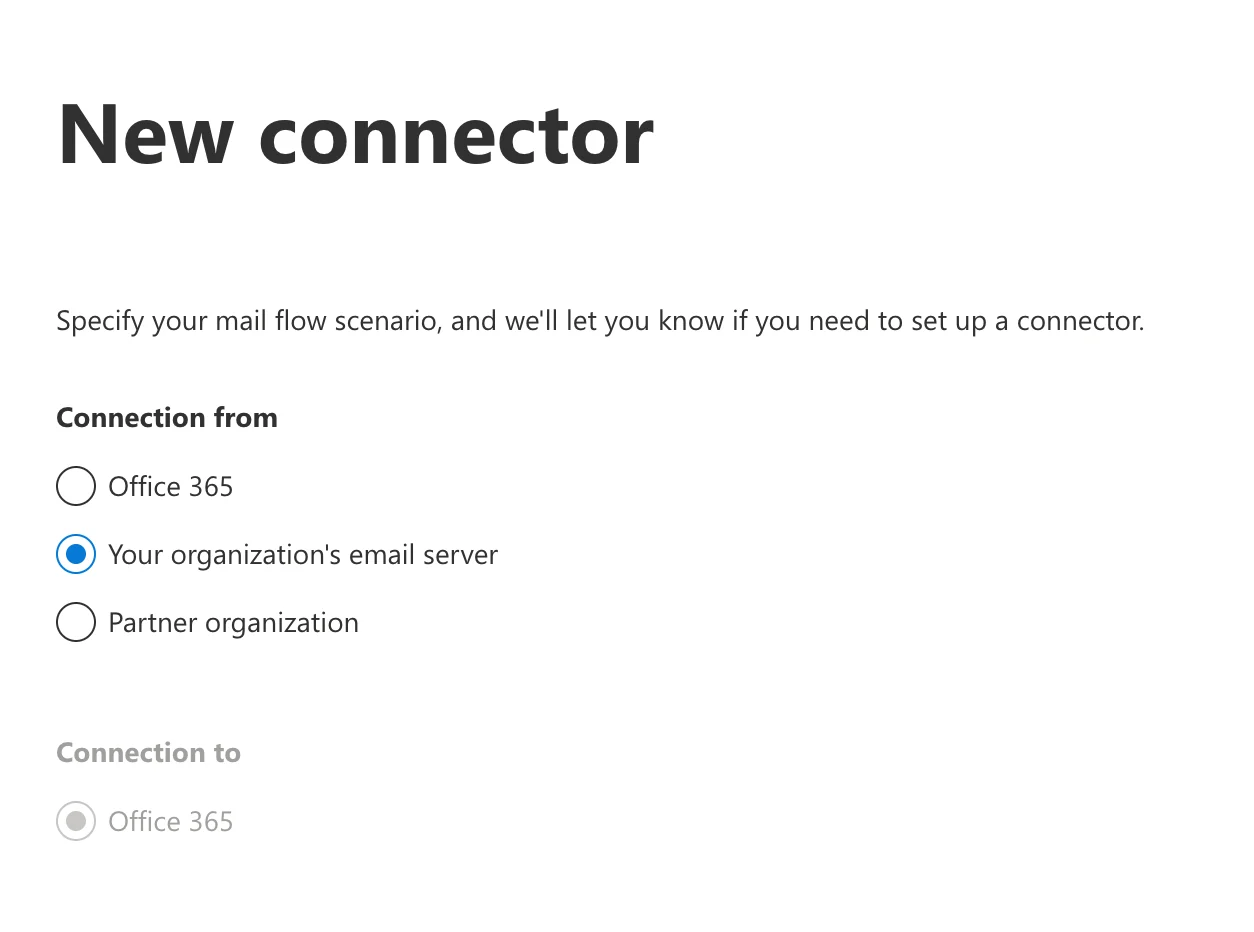
 In your Exchange admin interface, go to **Mail flow → Connectors** and click **"Add connector."** Select connection from **"Your organization's email server"** (connection to will be set to Office 365 automatically).
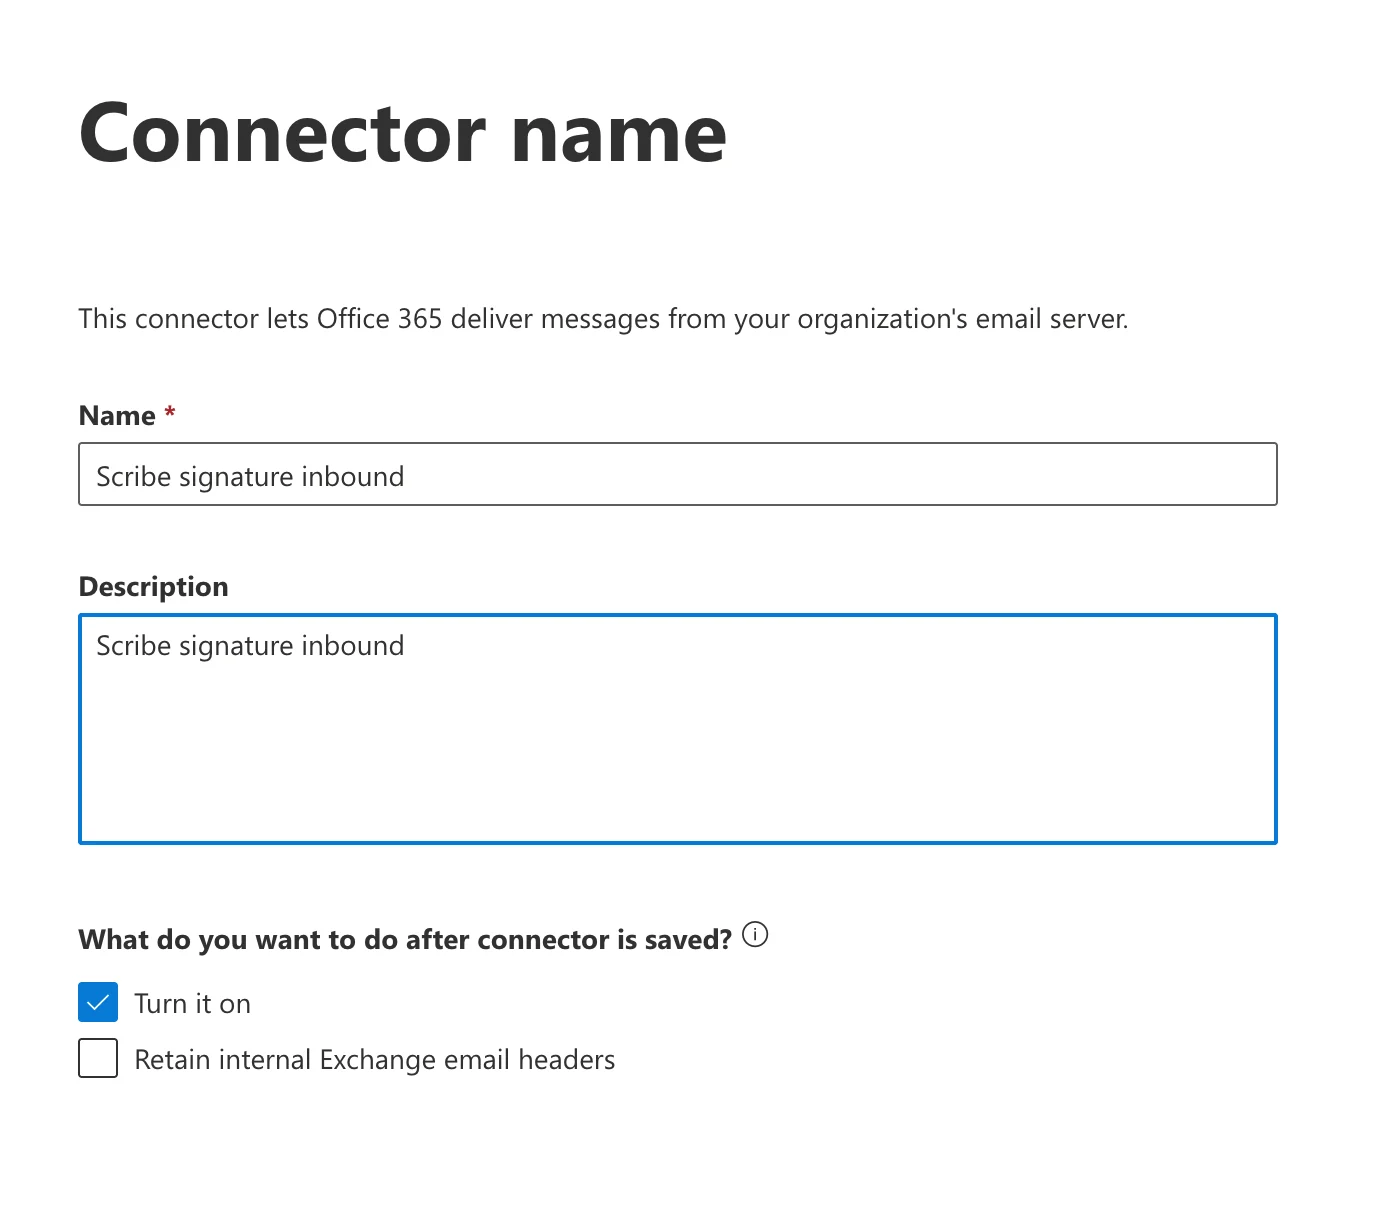
 Enter a name and description. You can also check **"Turn it on"** to enable the connector immediately.
* **Name:** `Scribe signature inbound`
* **Description:** `Scribe signature inbound`
Enter a name and description. You can also check **"Turn it on"** to enable the connector immediately.
* **Name:** `Scribe signature inbound`
* **Description:** `Scribe signature inbound`
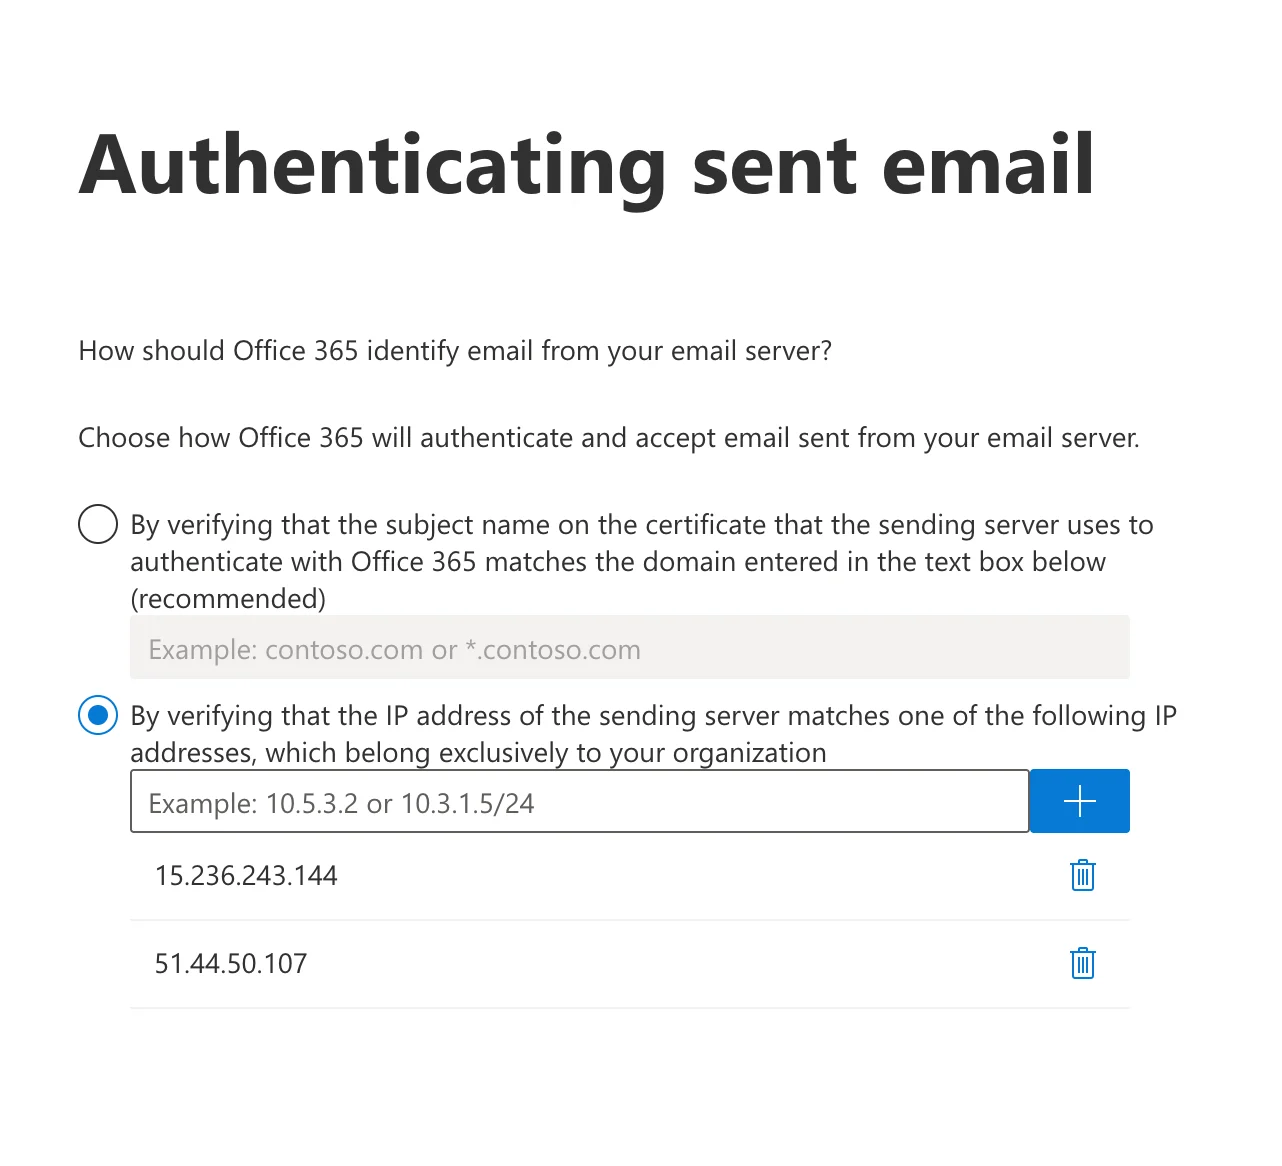
 Select **"By verifying that the IP address of the sending server matches one of the following IP addresses, which belong exclusively to your organization."**
Add the two following IPs to the list:
```text theme={null}
15.236.243.144
```
```text theme={null}
51.44.50.107
```
Select **"By verifying that the IP address of the sending server matches one of the following IP addresses, which belong exclusively to your organization."**
Add the two following IPs to the list:
```text theme={null}
15.236.243.144
```
```text theme={null}
51.44.50.107
```
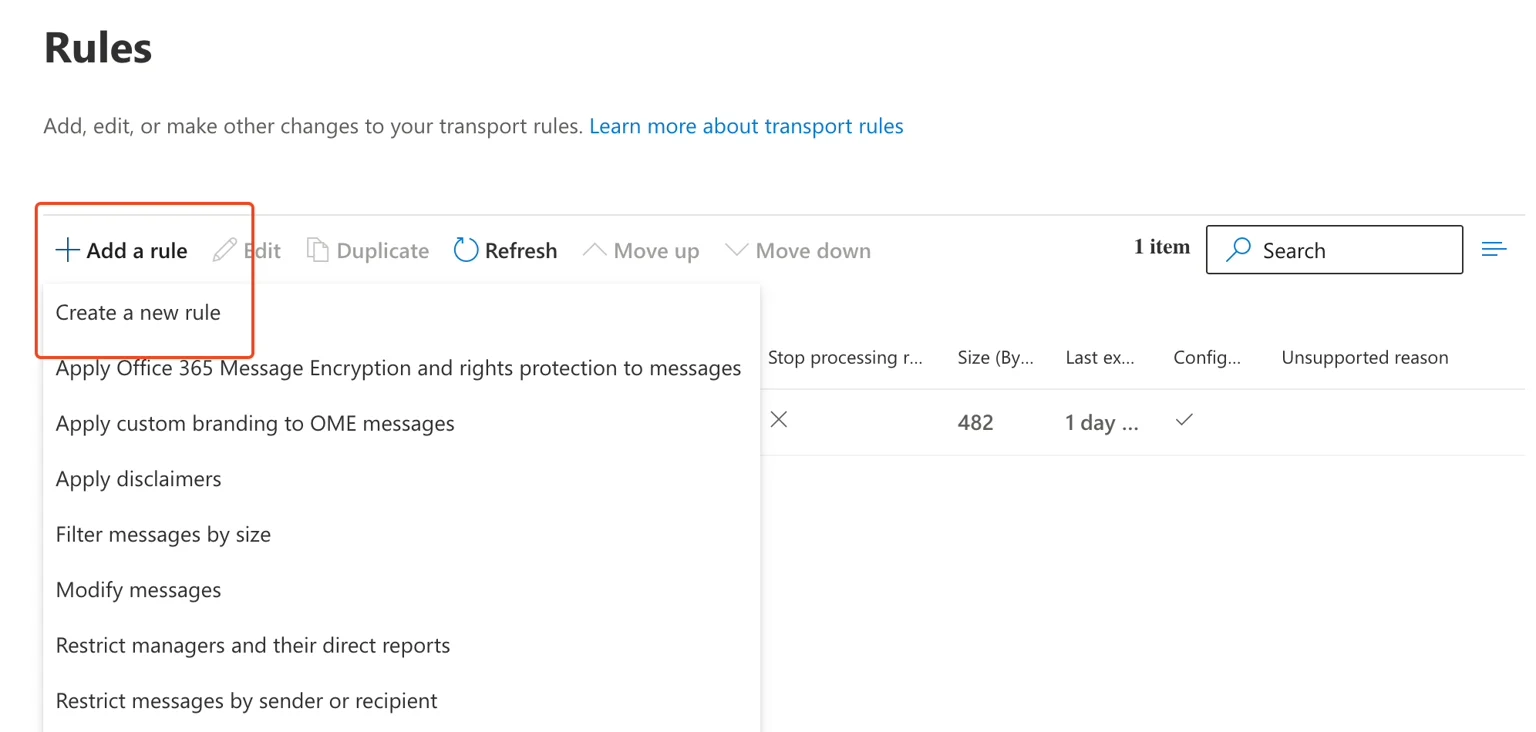
 In your Exchange admin interface, go to **Mail flow → Rules**.
**a.** Click **"Add a rule"**
**b.** Click **"Create a new rule"**
In your Exchange admin interface, go to **Mail flow → Rules**.
**a.** Click **"Add a rule"**
**b.** Click **"Create a new rule"**
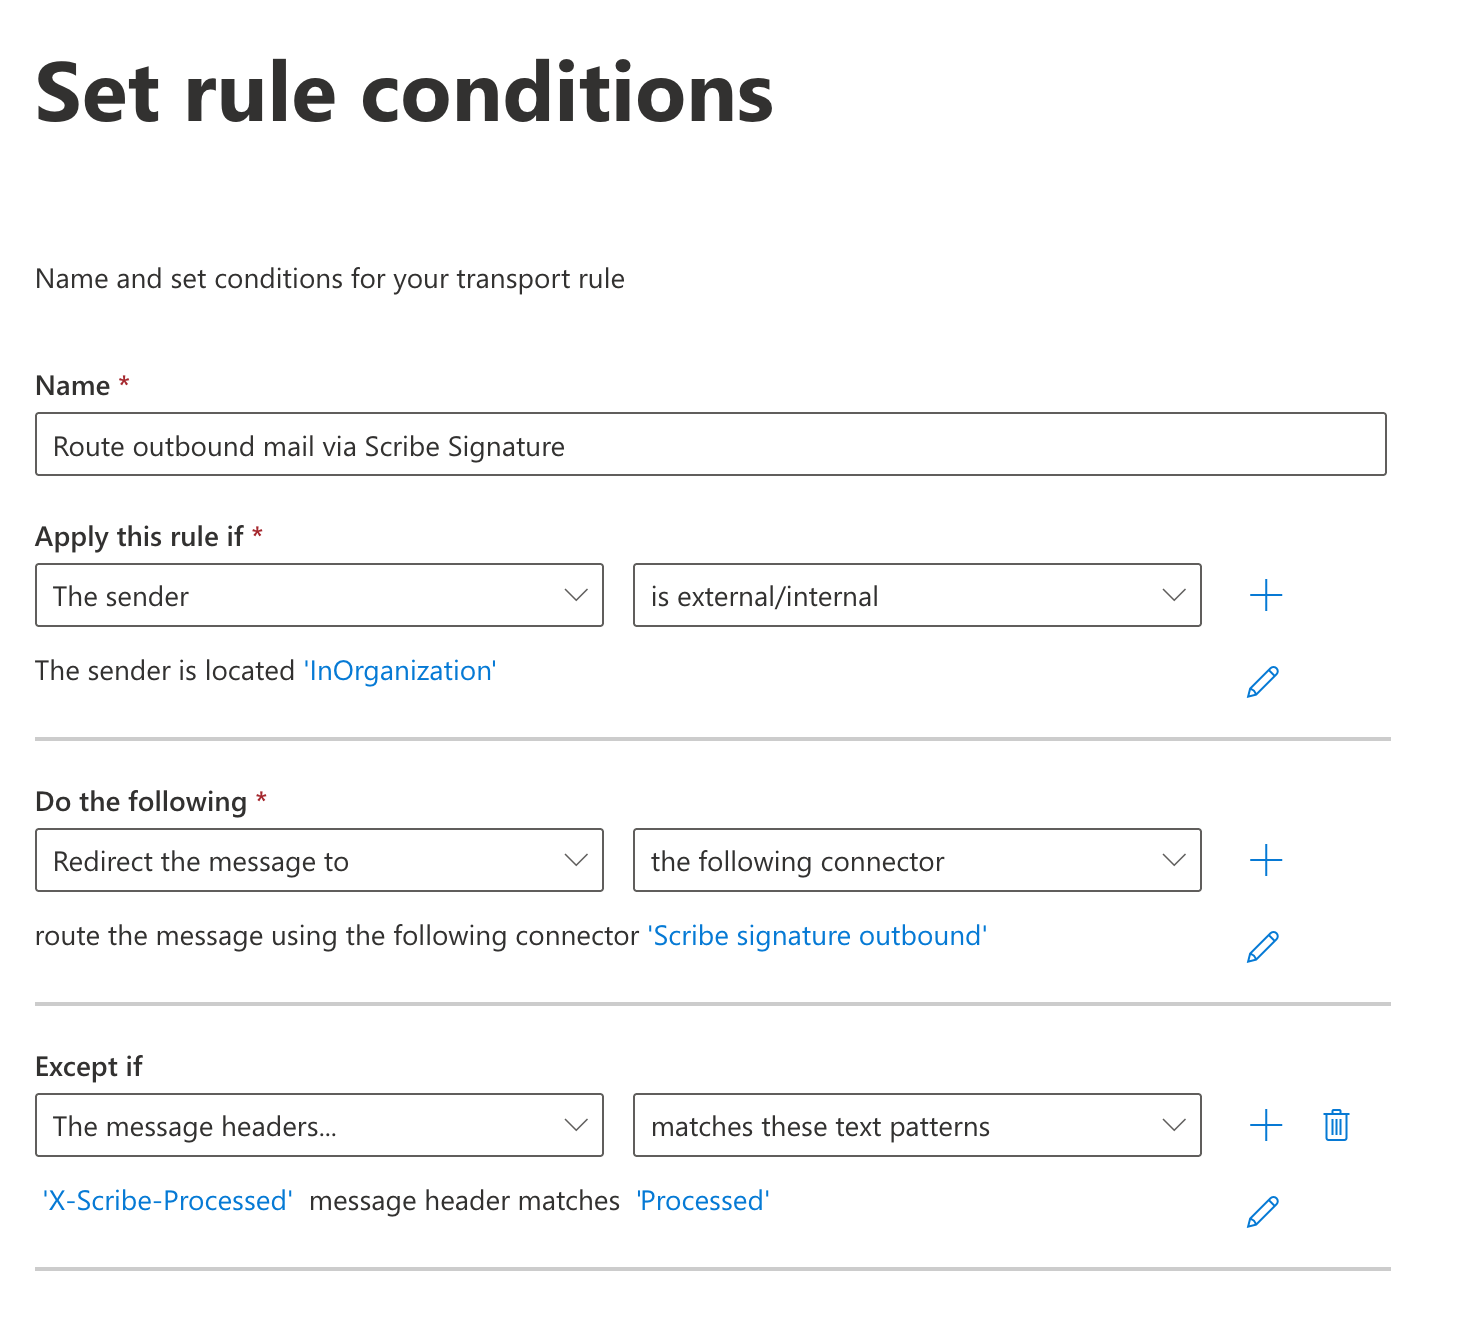
 Fill in the rule form as follows:
* **Name:** `Route outbound mail via Scribe Signature`
* **Apply this rule if:** The sender → is external/internal → The sender is located "InOrganization"
* **Do the following:** Redirect the message to → the following connector → select **"Scribe signature outbound"**
* **Except if:** The message headers → match these text patterns → `X-Scribe-Processed` message header matches `Processed`
The exception prevents Scribe from processing your emails multiple times.
Fill in the rule form as follows:
* **Name:** `Route outbound mail via Scribe Signature`
* **Apply this rule if:** The sender → is external/internal → The sender is located "InOrganization"
* **Do the following:** Redirect the message to → the following connector → select **"Scribe signature outbound"**
* **Except if:** The message headers → match these text patterns → `X-Scribe-Processed` message header matches `Processed`
The exception prevents Scribe from processing your emails multiple times.
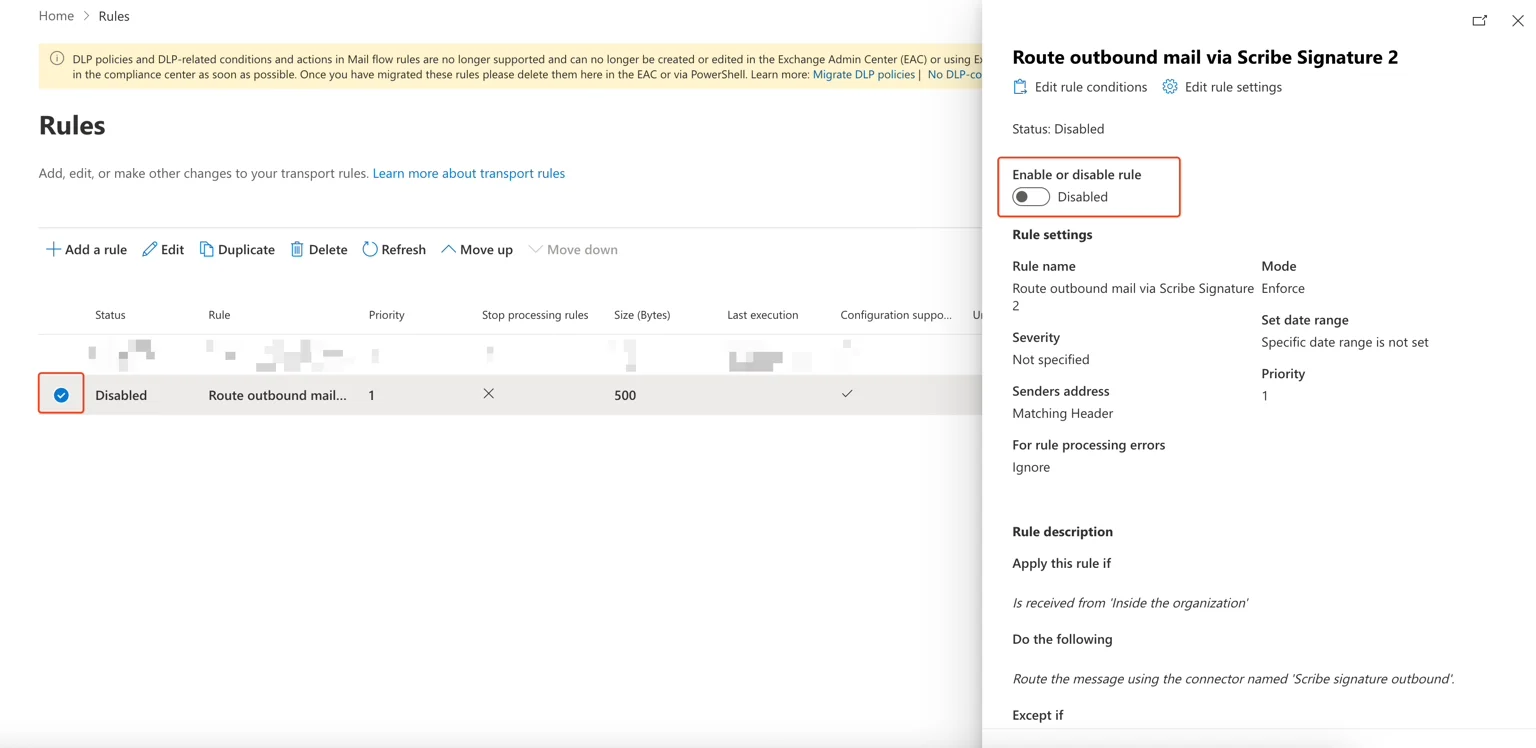
 On the next step, you can leave the rule settings as is. Review your rule and save it. From the rules list, select your rule and enable it.
 Configure DKIM for your [sending domains](/en/configure-your-sending-domain) to keep emails out of spam folders and avoid missing assets such as images and links.
Click **Configure DKIM** in Scribe to start the configuration.
Configure DKIM for your [sending domains](/en/configure-your-sending-domain) to keep emails out of spam folders and avoid missing assets such as images and links.
Click **Configure DKIM** in Scribe to start the configuration.
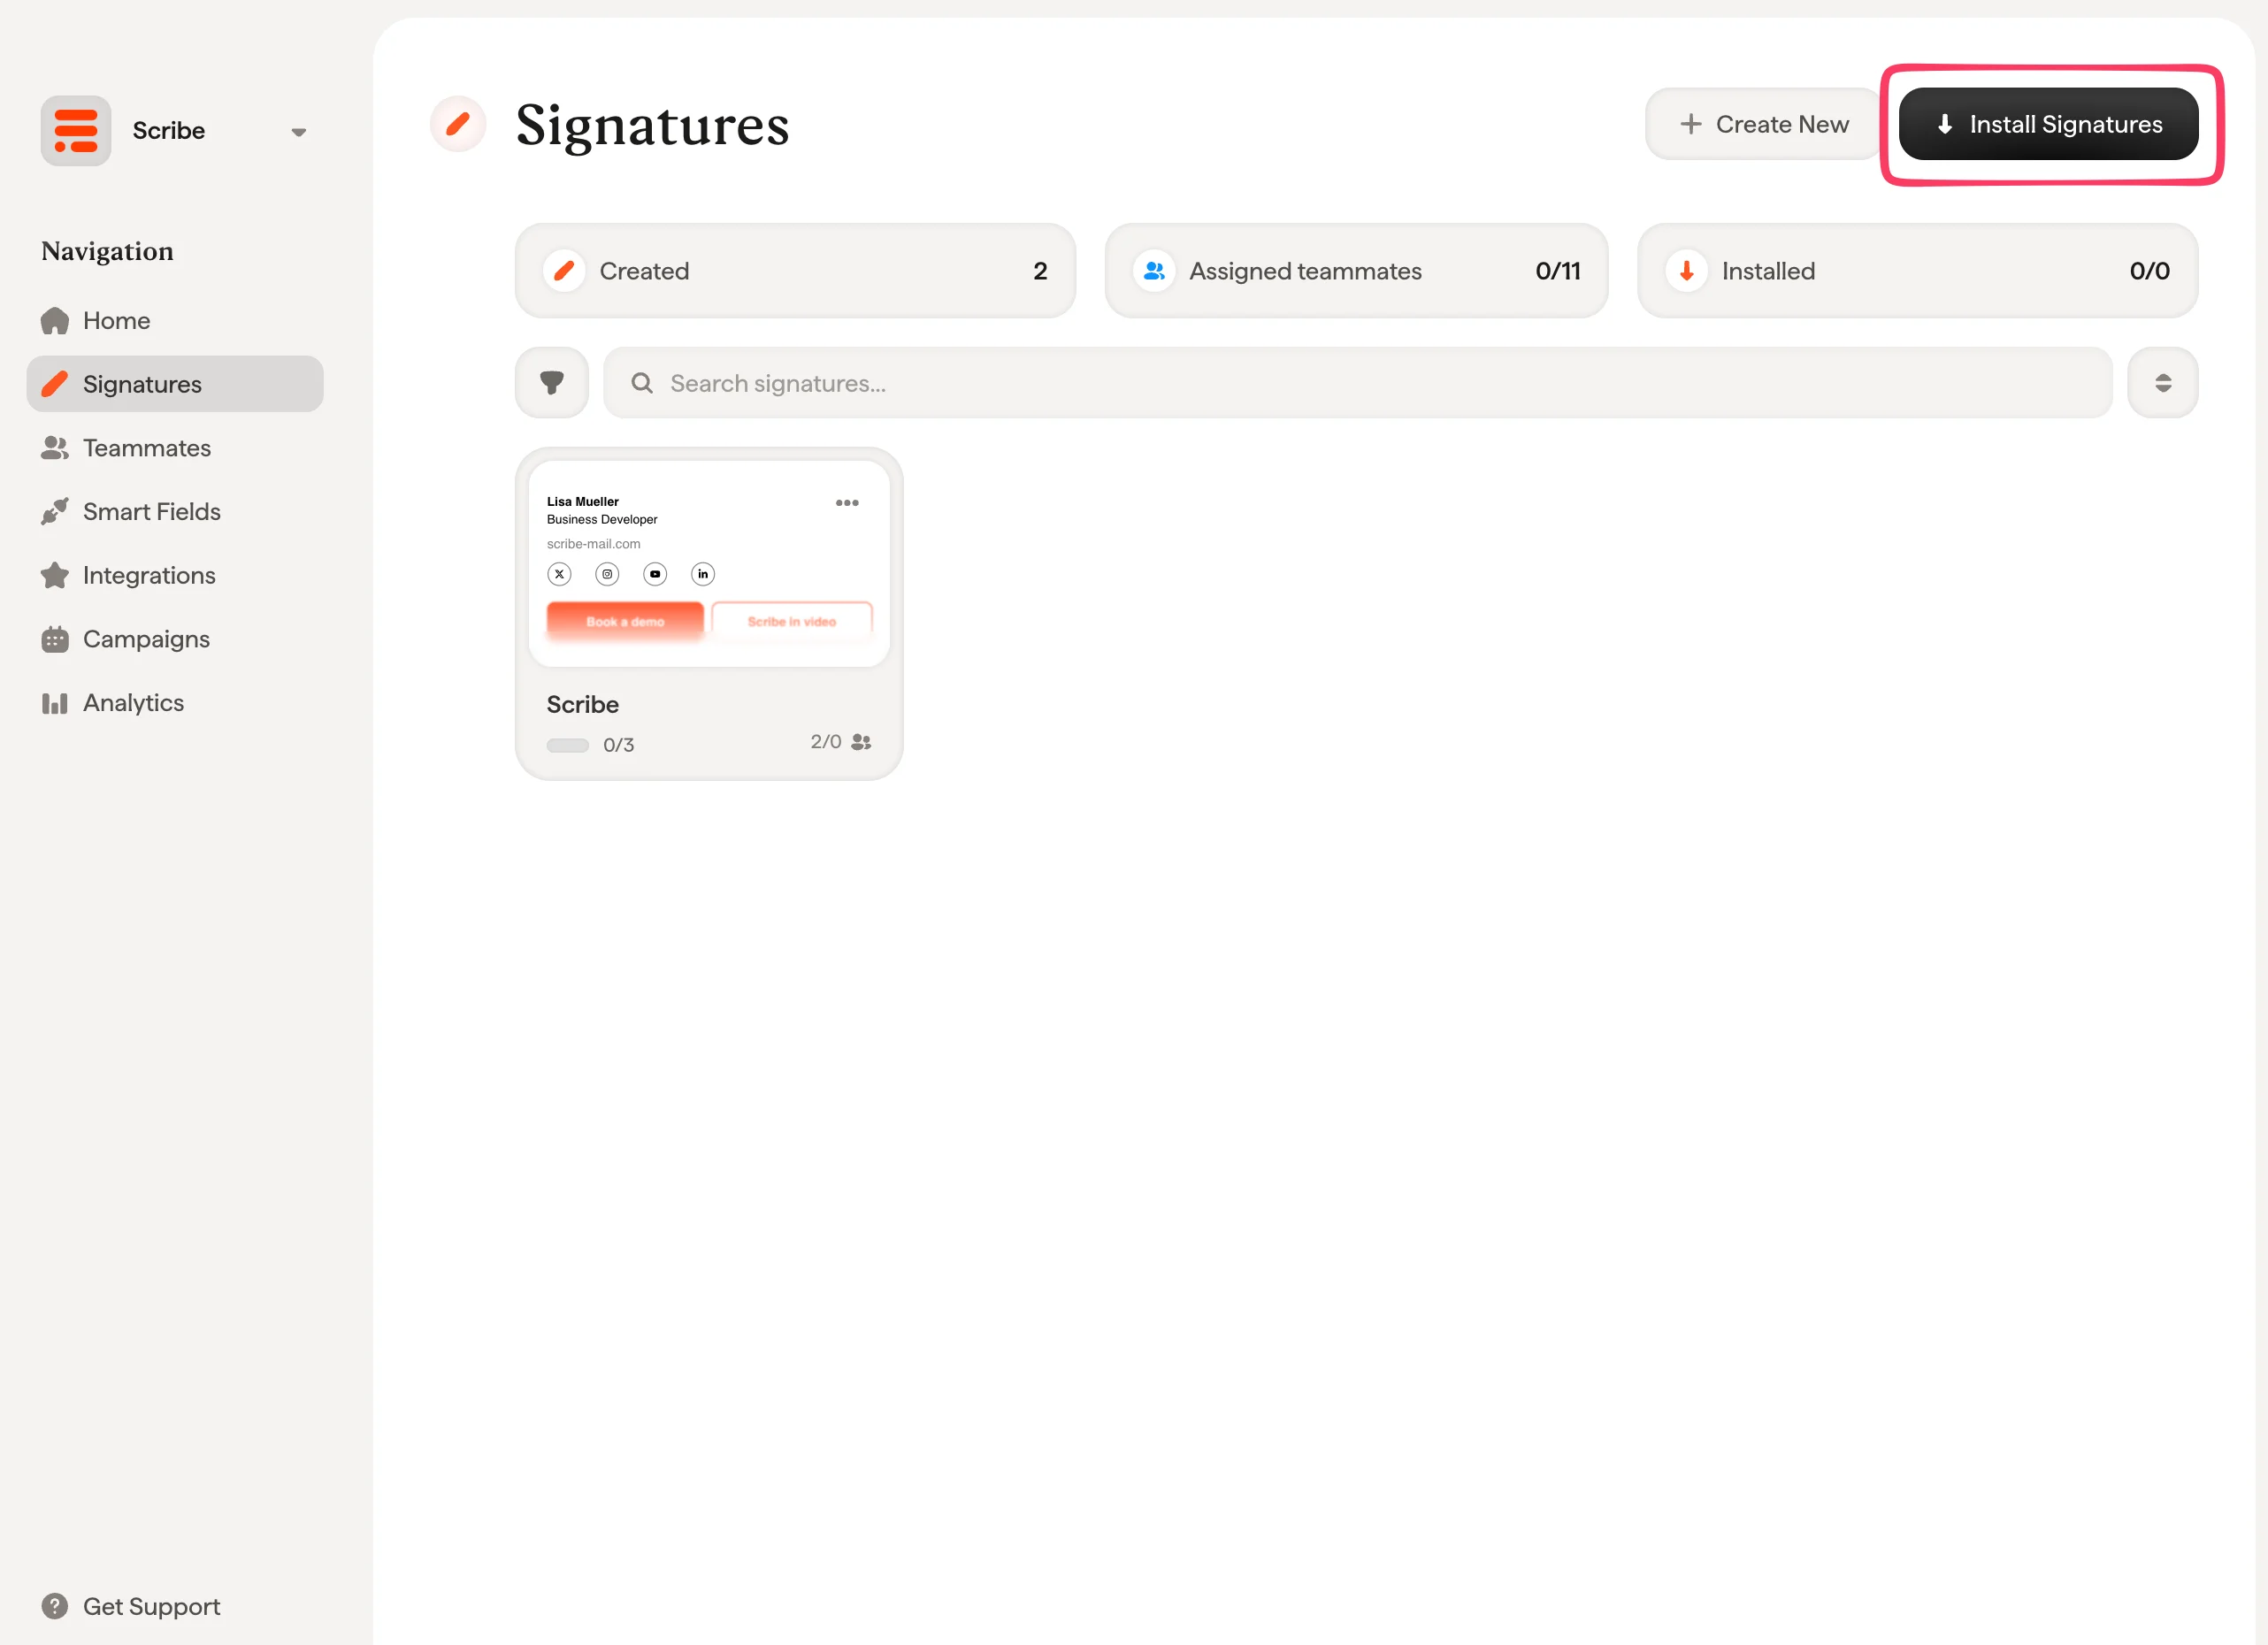
 From your signatures list, [install all signatures at once for your teammates](/en/install-signatures) or install them one by one for a progressive rollout.
 ## IT and security FAQ
Questions that come up most often when an IT team reviews this integration.
Only what the mail flow rule matches: messages whose sender is located `InOrganization`. Mail arriving from outside your tenant is never redirected to Scribe.
The rule also carries one exception, set when you fill in the rule conditions: messages already stamped with the `X-Scribe-Processed` header are skipped, so nothing is processed twice.
Yes, in both directions, and the setup enforces it. The outbound connector uses **Always use Transport Layer Security (TLS)**, requires a certificate issued by a trusted certificate authority, and checks that the subject name or SAN matches `smtp.server.scribe-mail.com`. The inbound connector accepts mail back only from Scribe's own IP addresses.
Outbound, the connector routes to the Scribe smart host:
```text theme={null}
smtp.server.scribe-mail.com
```
Inbound, Scribe returns processed mail from two fixed IP addresses, which are the only ones the inbound connector is configured to accept:
```text theme={null}
15.236.243.144
51.44.50.107
```
It affects DKIM, and the **Configure DKIM** step in the guide is what handles it. Inserting a signature changes the message body, which invalidates the DKIM signature Exchange Online applied before the message left. Scribe therefore re-signs the message on the way back out.
Once DKIM is configured, two things are added to every processed message:
* **A fresh `DKIM-Signature`**, signed with a key Scribe generates for your domain and published as a `scribe._domainkey` record. It covers the `From`, `To`, `Cc`, `Subject` and `Message-ID` headers along with the body.
* **An ARC chain** ([RFC 8617](https://datatracker.ietf.org/doc/html/rfc8617)): `ARC-Authentication-Results`, `ARC-Message-Signature` and `ARC-Seal`. These record the authentication results the message carried when Scribe received it, so a receiving server can tell that an authorized intermediary modified it rather than reading the change as tampering.
SPF is unaffected, because Exchange Online still performs the final delivery and the message reaches your recipient from Microsoft's own sending infrastructure.
Re-signing only happens once your DKIM record is validated, which is why the guide treats that step as required rather than optional. Skip it and your recipients receive mail whose original signature no longer verifies.
Two things. Scribe stamps every message it handles with an `X-Scribe-Processed` header, and the mail flow rule carries an exception for messages whose headers match it, so a message coming back from Scribe no longer triggers the redirect.
As a second guard, Scribe checks whether the body already carries the signature before inserting one. A message that reaches it twice still goes out with a single signature.
Not necessarily. Microsoft's validation sends a probe message to `scribe-o365-test@scribe-mail.com` and it does not always complete, even when routing is correct. You can save the connector and continue. Confirm the setup instead by sending a real email once the mail flow rule is enabled and checking that the recipient sees the signature.
Because the signature is added after the message leaves the mailbox, not in the compose window. For the same reason, the copy saved in the sender's Sent Items folder is the version from before Scribe processed it, so it does not show the signature either. The recipient always receives the full signature.
If compose visibility matters to your teams, connect the [cloud-based integration](/en/integrations/signatures/microsoft-365-client-side) as well. When both are connected, Scribe defaults to cloud-based so teammates see their signature while writing, and server side keeps covering the clients that cloud-based cannot reach.
Yes, if you publish them. [Signature variants](/en/signature-variants) work with server-side installation, and Scribe picks one as it processes each message:
* **On-reply**, when the subject starts with a reply or forward prefix such as `Re:`, `Fw:` or `Fwd:`, including the localized equivalents.
* **Internal**, when every recipient is on the same domain as the sender.
* **Primary** in every other case.
Scribe inserts the signature, re-signs the message and hands it straight back to Exchange Online. It does not act on what your teammates write: the recipients, the subject, the attachments and the body text are passed through unchanged.
Scribe's controls around this are verified as part of its [SOC 2 Type II process](/en/what-scribe-does-concerning-security). See [Product security](/en/security/product-security) and [Infrastructure security](/en/security/infrastructure-security) for the detail your security review will ask for, or the [Trust Center](https://security.scribe-mail.com) for the certifications themselves.
Disable the mail flow rule in the Exchange admin center. Mail then leaves Exchange Online directly again, with no Scribe hop and no signature added. The two connectors can stay in place, unused, until you decide whether to remove them.
## Related articles
* [Integrations overview](/en/integrations-overview): all the ways to deploy Scribe signatures, cloud or server side.
* [Google Workspace (server side)](/en/integrations/signatures/google-workspace-server-side): route mail through Scribe for all-device coverage.
* [Signature variants](/en/signature-variants): on-reply and internal variants for Outlook and server side.
This documentation is built and hosted on [Mintlify](https://mintlify.com), a developer documentation platform.
## IT and security FAQ
Questions that come up most often when an IT team reviews this integration.
Only what the mail flow rule matches: messages whose sender is located `InOrganization`. Mail arriving from outside your tenant is never redirected to Scribe.
The rule also carries one exception, set when you fill in the rule conditions: messages already stamped with the `X-Scribe-Processed` header are skipped, so nothing is processed twice.
Yes, in both directions, and the setup enforces it. The outbound connector uses **Always use Transport Layer Security (TLS)**, requires a certificate issued by a trusted certificate authority, and checks that the subject name or SAN matches `smtp.server.scribe-mail.com`. The inbound connector accepts mail back only from Scribe's own IP addresses.
Outbound, the connector routes to the Scribe smart host:
```text theme={null}
smtp.server.scribe-mail.com
```
Inbound, Scribe returns processed mail from two fixed IP addresses, which are the only ones the inbound connector is configured to accept:
```text theme={null}
15.236.243.144
51.44.50.107
```
It affects DKIM, and the **Configure DKIM** step in the guide is what handles it. Inserting a signature changes the message body, which invalidates the DKIM signature Exchange Online applied before the message left. Scribe therefore re-signs the message on the way back out.
Once DKIM is configured, two things are added to every processed message:
* **A fresh `DKIM-Signature`**, signed with a key Scribe generates for your domain and published as a `scribe._domainkey` record. It covers the `From`, `To`, `Cc`, `Subject` and `Message-ID` headers along with the body.
* **An ARC chain** ([RFC 8617](https://datatracker.ietf.org/doc/html/rfc8617)): `ARC-Authentication-Results`, `ARC-Message-Signature` and `ARC-Seal`. These record the authentication results the message carried when Scribe received it, so a receiving server can tell that an authorized intermediary modified it rather than reading the change as tampering.
SPF is unaffected, because Exchange Online still performs the final delivery and the message reaches your recipient from Microsoft's own sending infrastructure.
Re-signing only happens once your DKIM record is validated, which is why the guide treats that step as required rather than optional. Skip it and your recipients receive mail whose original signature no longer verifies.
Two things. Scribe stamps every message it handles with an `X-Scribe-Processed` header, and the mail flow rule carries an exception for messages whose headers match it, so a message coming back from Scribe no longer triggers the redirect.
As a second guard, Scribe checks whether the body already carries the signature before inserting one. A message that reaches it twice still goes out with a single signature.
Not necessarily. Microsoft's validation sends a probe message to `scribe-o365-test@scribe-mail.com` and it does not always complete, even when routing is correct. You can save the connector and continue. Confirm the setup instead by sending a real email once the mail flow rule is enabled and checking that the recipient sees the signature.
Because the signature is added after the message leaves the mailbox, not in the compose window. For the same reason, the copy saved in the sender's Sent Items folder is the version from before Scribe processed it, so it does not show the signature either. The recipient always receives the full signature.
If compose visibility matters to your teams, connect the [cloud-based integration](/en/integrations/signatures/microsoft-365-client-side) as well. When both are connected, Scribe defaults to cloud-based so teammates see their signature while writing, and server side keeps covering the clients that cloud-based cannot reach.
Yes, if you publish them. [Signature variants](/en/signature-variants) work with server-side installation, and Scribe picks one as it processes each message:
* **On-reply**, when the subject starts with a reply or forward prefix such as `Re:`, `Fw:` or `Fwd:`, including the localized equivalents.
* **Internal**, when every recipient is on the same domain as the sender.
* **Primary** in every other case.
Scribe inserts the signature, re-signs the message and hands it straight back to Exchange Online. It does not act on what your teammates write: the recipients, the subject, the attachments and the body text are passed through unchanged.
Scribe's controls around this are verified as part of its [SOC 2 Type II process](/en/what-scribe-does-concerning-security). See [Product security](/en/security/product-security) and [Infrastructure security](/en/security/infrastructure-security) for the detail your security review will ask for, or the [Trust Center](https://security.scribe-mail.com) for the certifications themselves.
Disable the mail flow rule in the Exchange admin center. Mail then leaves Exchange Online directly again, with no Scribe hop and no signature added. The two connectors can stay in place, unused, until you decide whether to remove them.
## Related articles
* [Integrations overview](/en/integrations-overview): all the ways to deploy Scribe signatures, cloud or server side.
* [Google Workspace (server side)](/en/integrations/signatures/google-workspace-server-side): route mail through Scribe for all-device coverage.
* [Signature variants](/en/signature-variants): on-reply and internal variants for Outlook and server side.
This documentation is built and hosted on [Mintlify](https://mintlify.com), a developer documentation platform.