> ## Documentation Index
> Fetch the complete documentation index at: https://help.scribe-mail.com/llms.txt
> Use this file to discover all available pages before exploring further.
# Connect your AI assistant to Scribe
> Add Scribe from the Claude directory or ChatGPT plugin store in one click, or connect Cursor, Codex, and any MCP client to the Scribe MCP server.
Connect any MCP-capable assistant to Scribe in a couple of minutes. Claude and ChatGPT users install Scribe in one click from the [Claude directory](https://claude.ai/directory/scribe-mail) and the [ChatGPT plugin store](https://chatgpt.com/plugins/plugin_asdk_app_6a511673beb08191964b117ec2730e24). Every other client uses the endpoint below, which is the same everywhere. In every case you sign in with your Scribe account (OAuth), so no API key is pasted in.
```text theme={null}
https://mcp.scribe-mail.com/mcp
```
Read actions run automatically once connected. Write actions ask you to confirm first. For what the connection can access, see the [FAQ](/en/ai-agents/faq).
## Chat assistants
### Connect Claude to Scribe
Scribe is listed in the Claude directory as **Scribe Mail**, so there is nothing to type. Works on all Claude plans, on web and desktop.
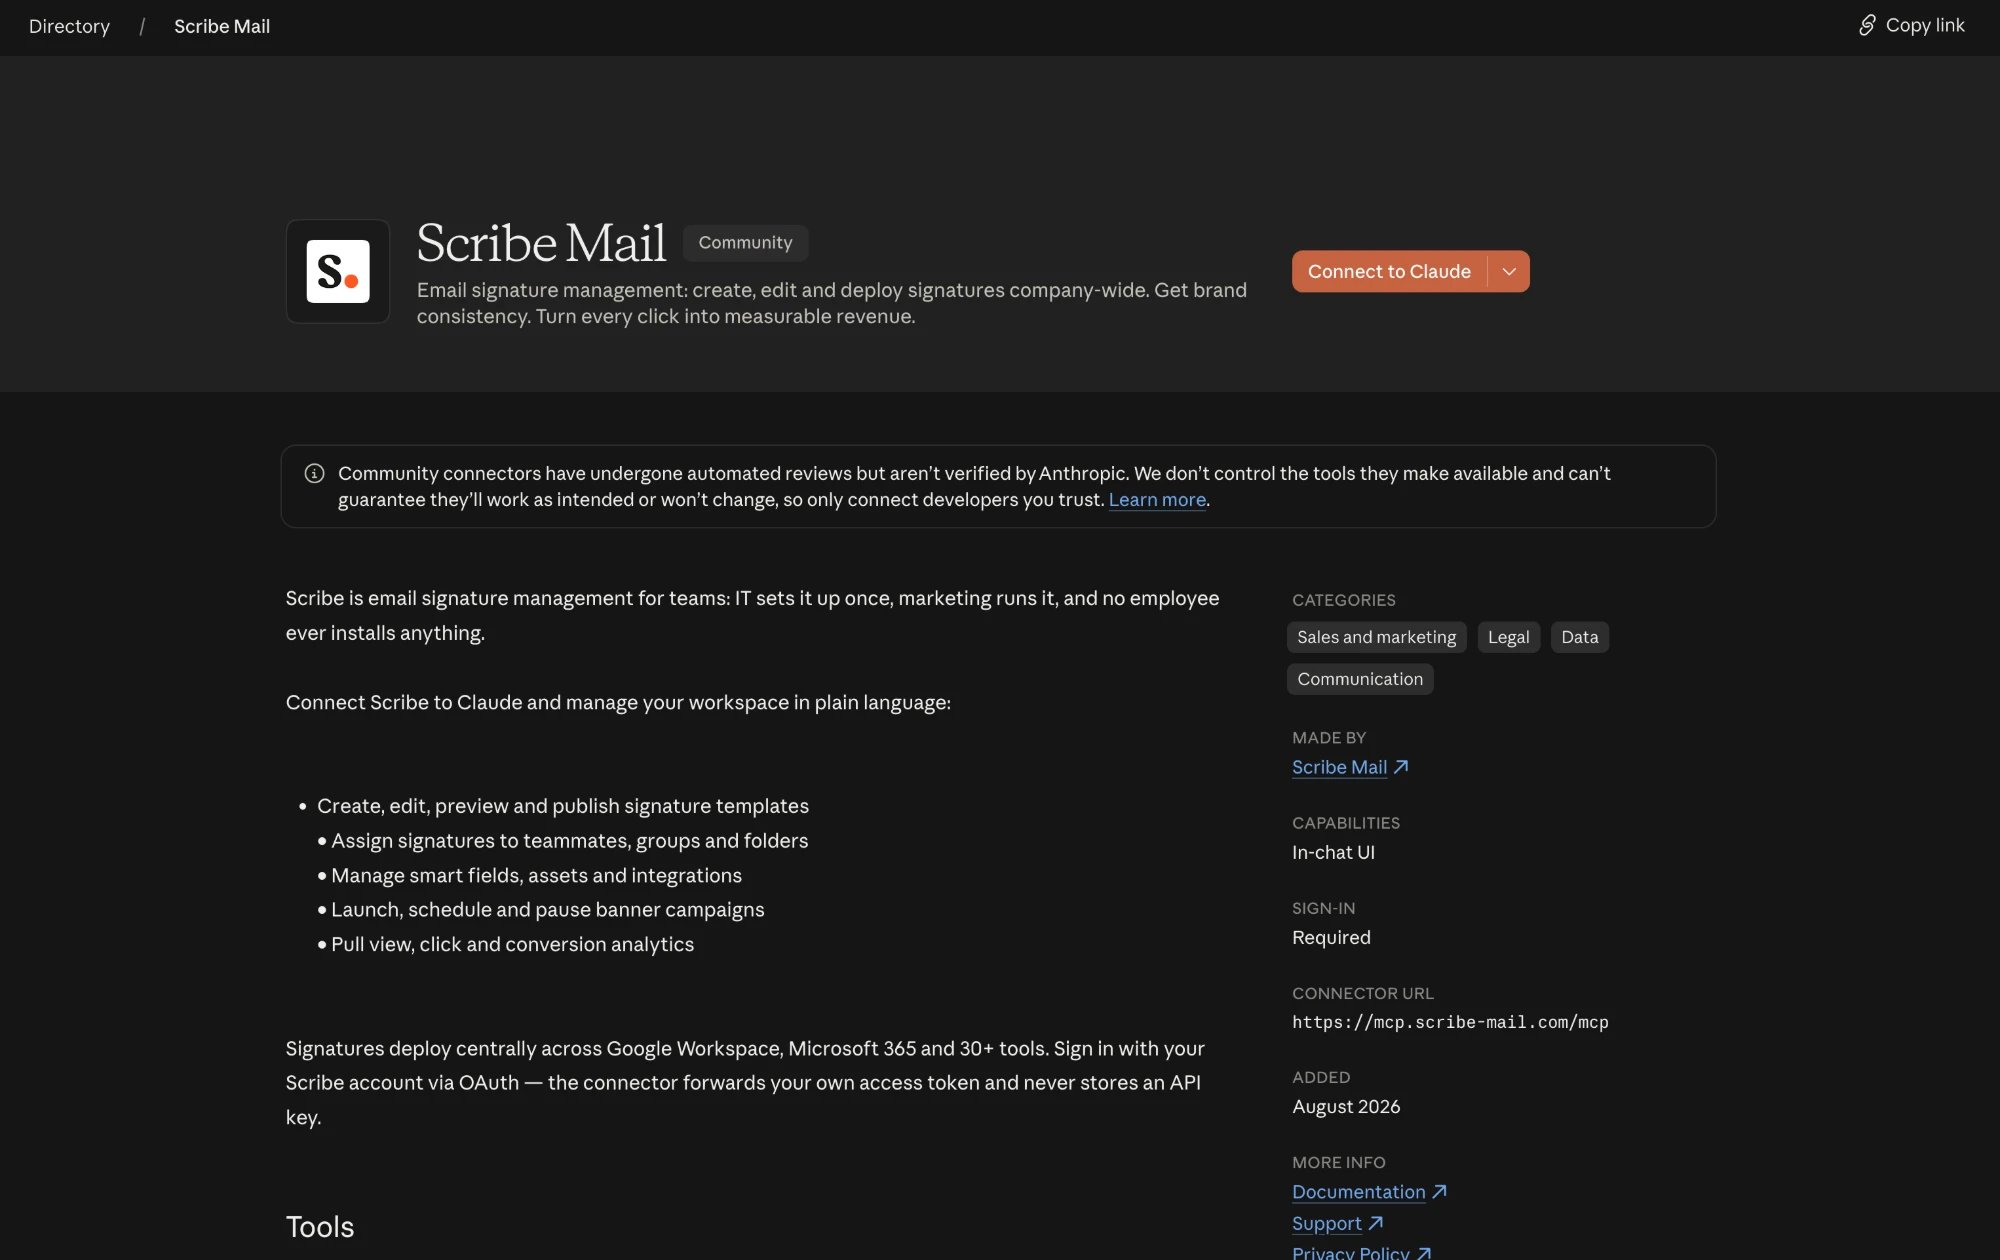
1. Open the [Scribe Mail listing](https://claude.ai/directory/scribe-mail) in the Claude directory, then click **Connect to Claude**.
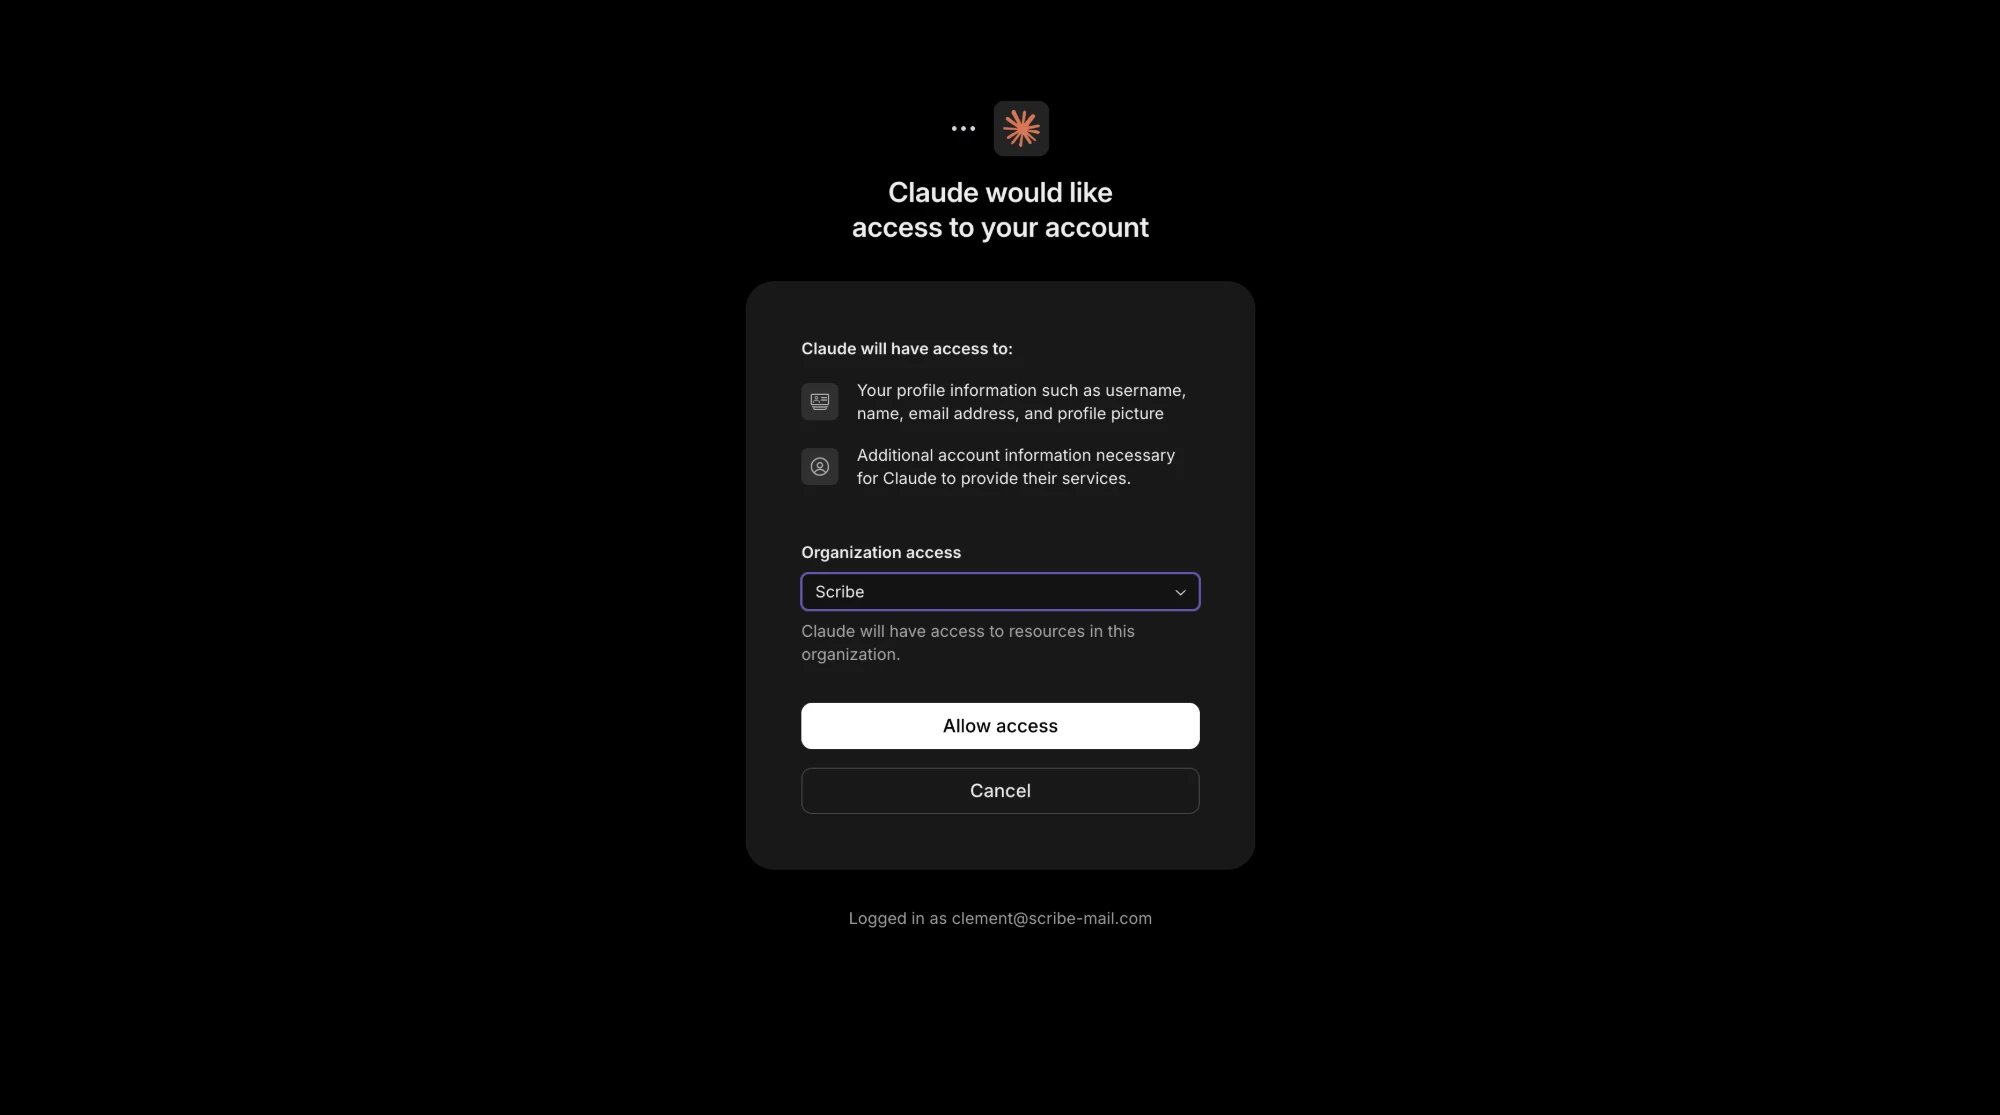
 2. Sign in with your Scribe account if prompted, choose the organization to connect, review the access, then click **Allow access**.
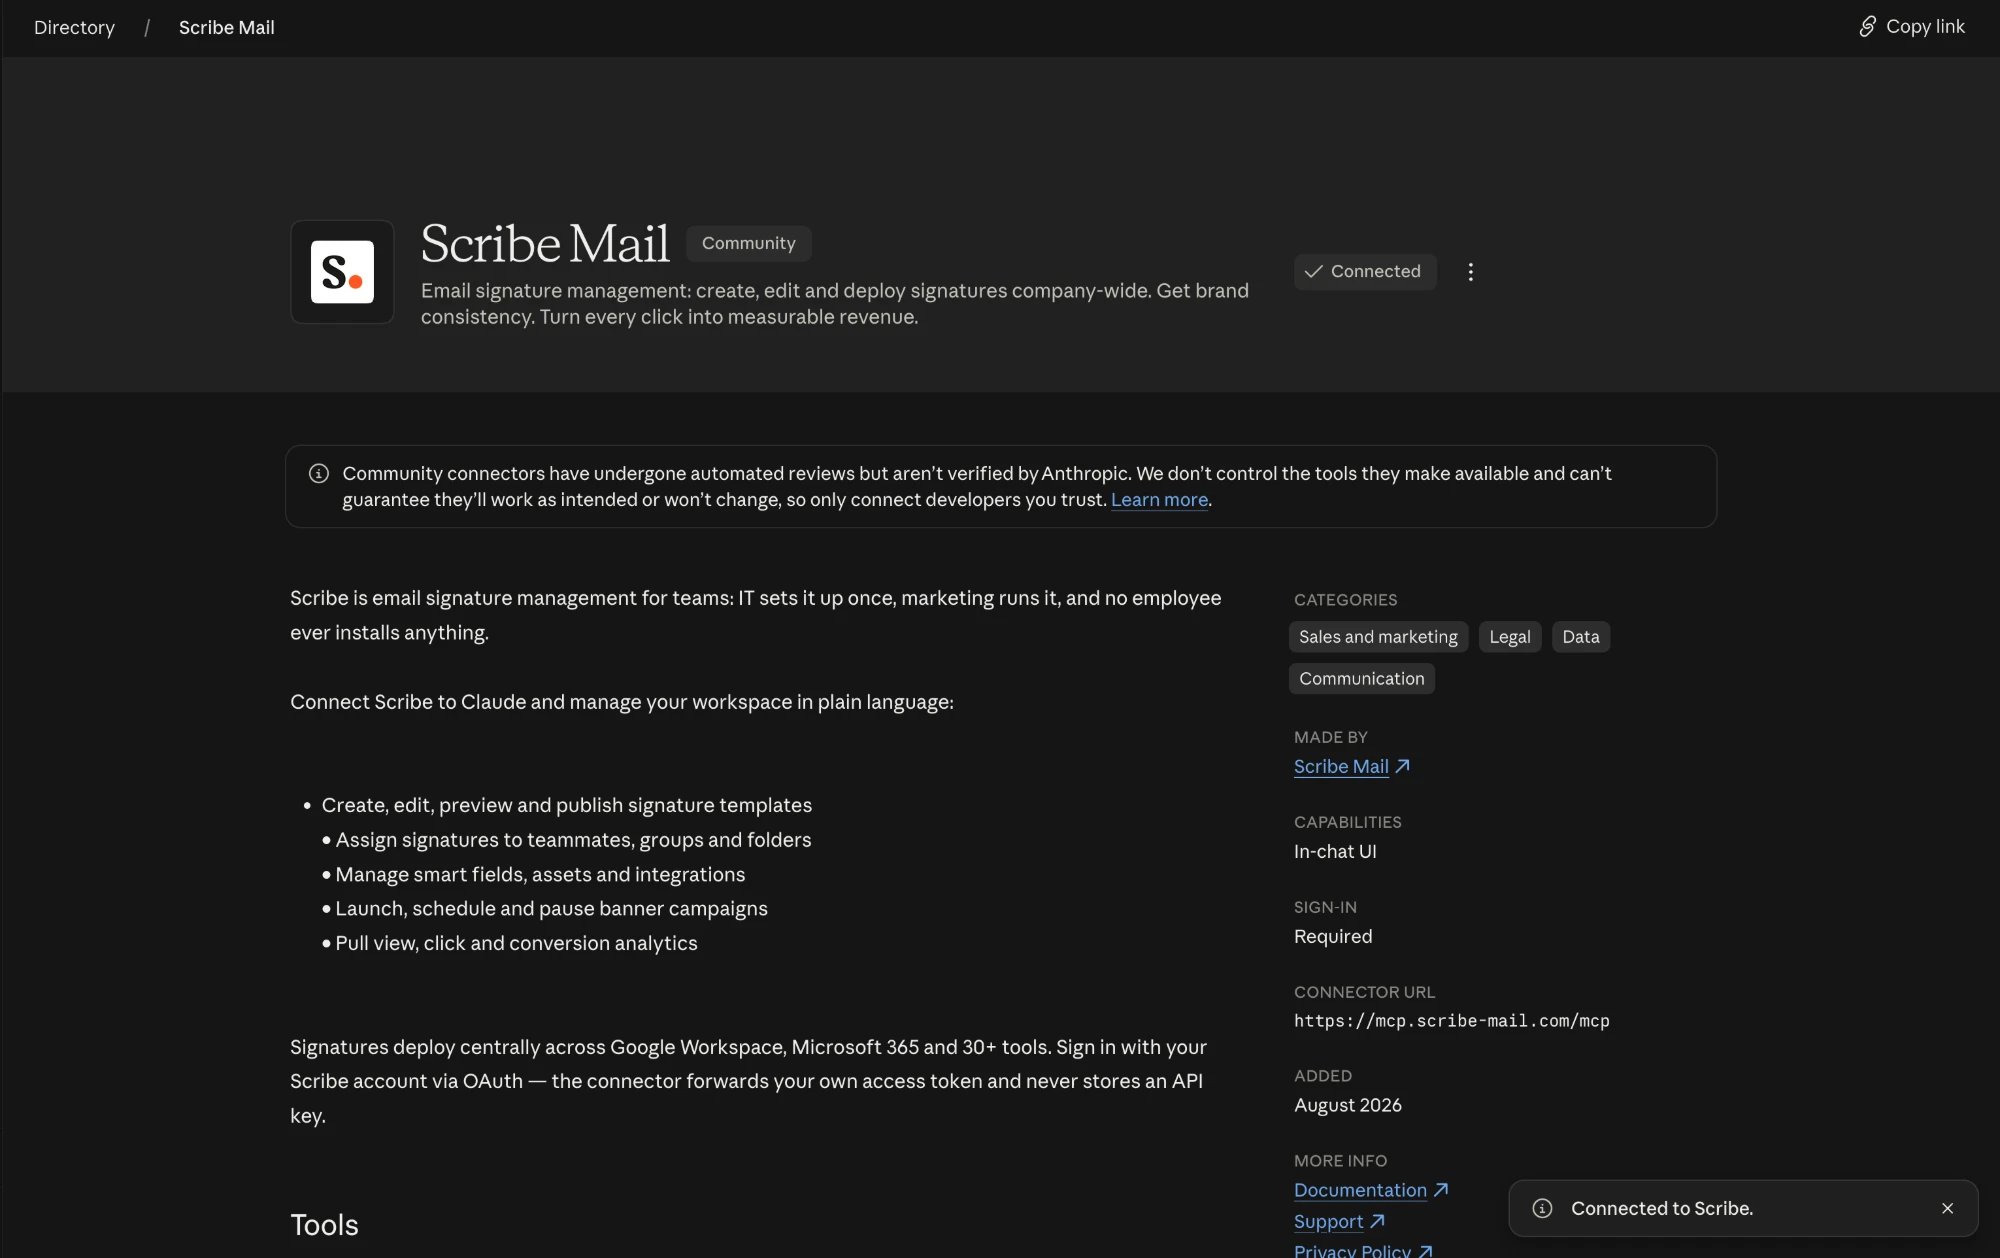
 3. Done. The listing now shows **Connected**, and Scribe appears in your connectors.
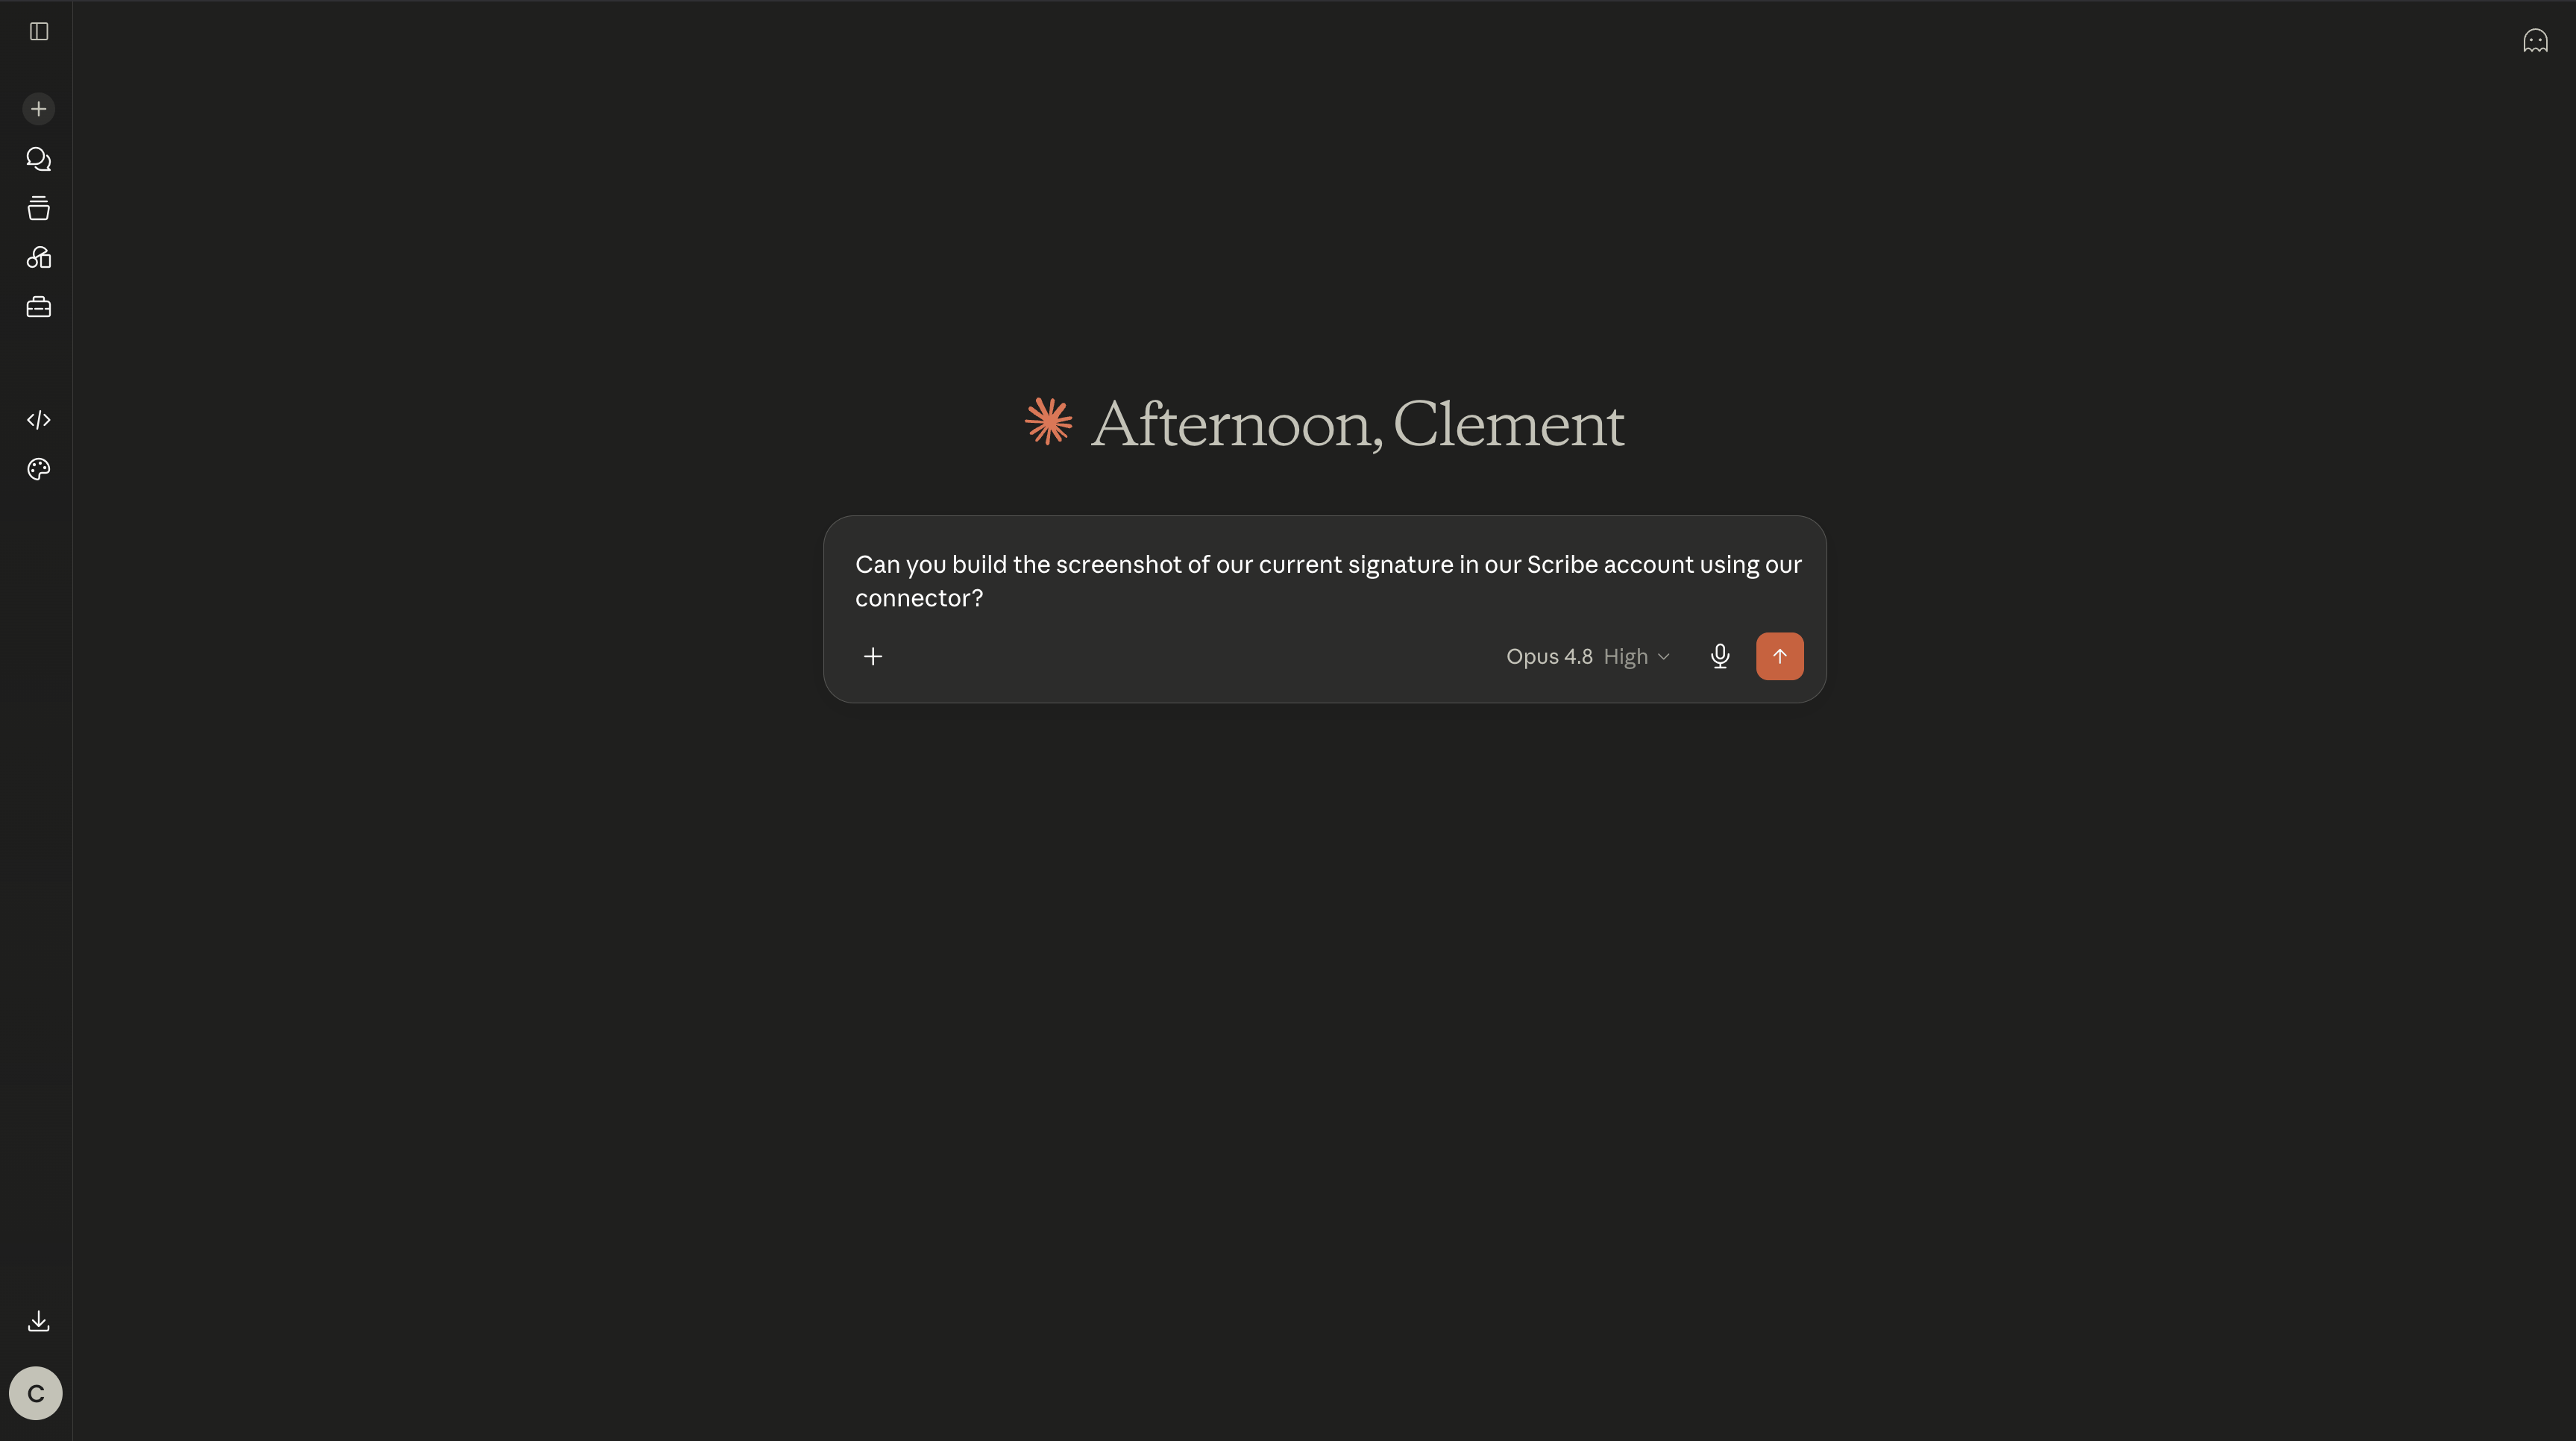
 Open a new chat and ask Claude to manage your account through the Scribe connector, from creating a signature to pulling your analytics.
 ### Connect ChatGPT to Scribe
Scribe is listed in the ChatGPT plugin store, so you install it like any other ChatGPT app, with no Developer Mode needed. Sign in to ChatGPT on the web first.
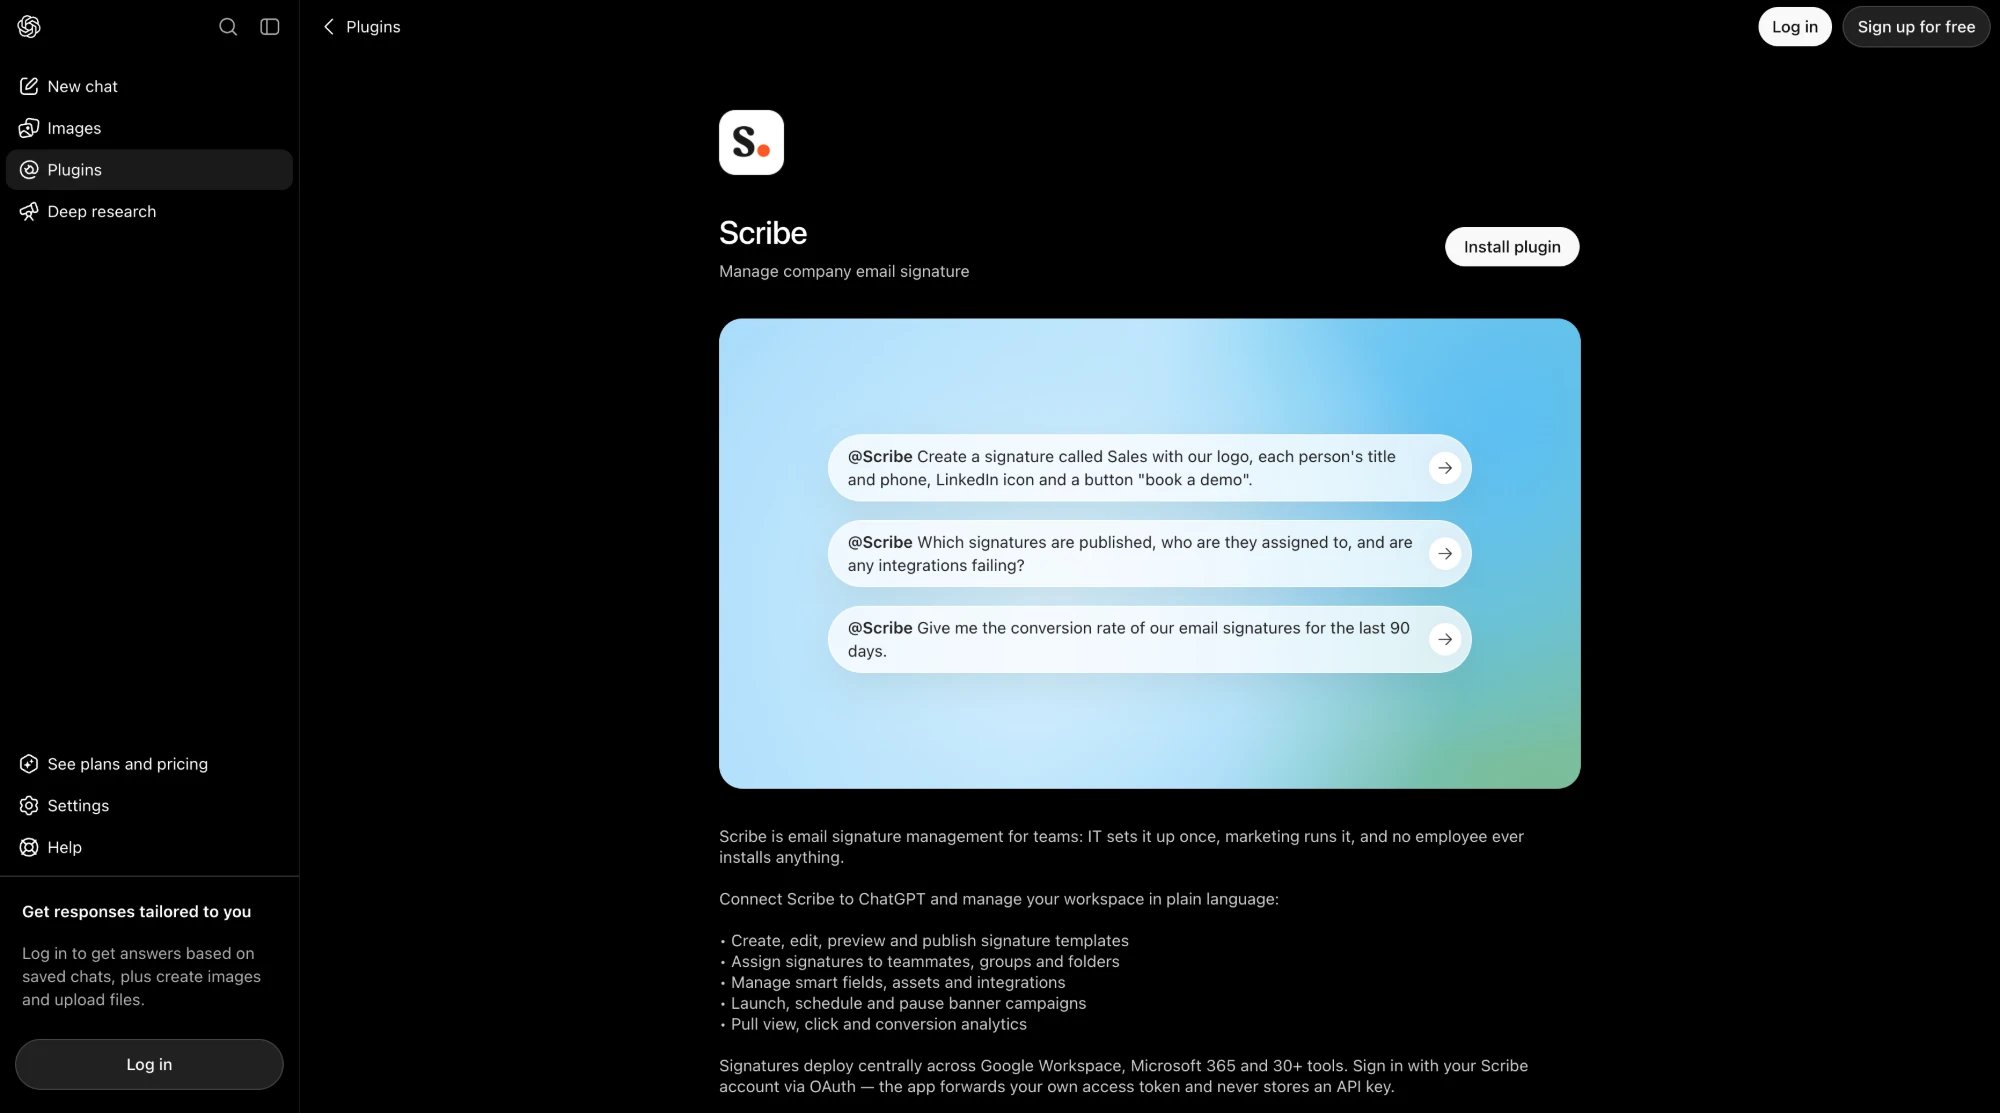
1. Open the [Scribe plugin page](https://chatgpt.com/plugins/plugin_asdk_app_6a511673beb08191964b117ec2730e24), or open **Plugins** in the sidebar and search for Scribe, then click **Install plugin**.
### Connect ChatGPT to Scribe
Scribe is listed in the ChatGPT plugin store, so you install it like any other ChatGPT app, with no Developer Mode needed. Sign in to ChatGPT on the web first.
1. Open the [Scribe plugin page](https://chatgpt.com/plugins/plugin_asdk_app_6a511673beb08191964b117ec2730e24), or open **Plugins** in the sidebar and search for Scribe, then click **Install plugin**.
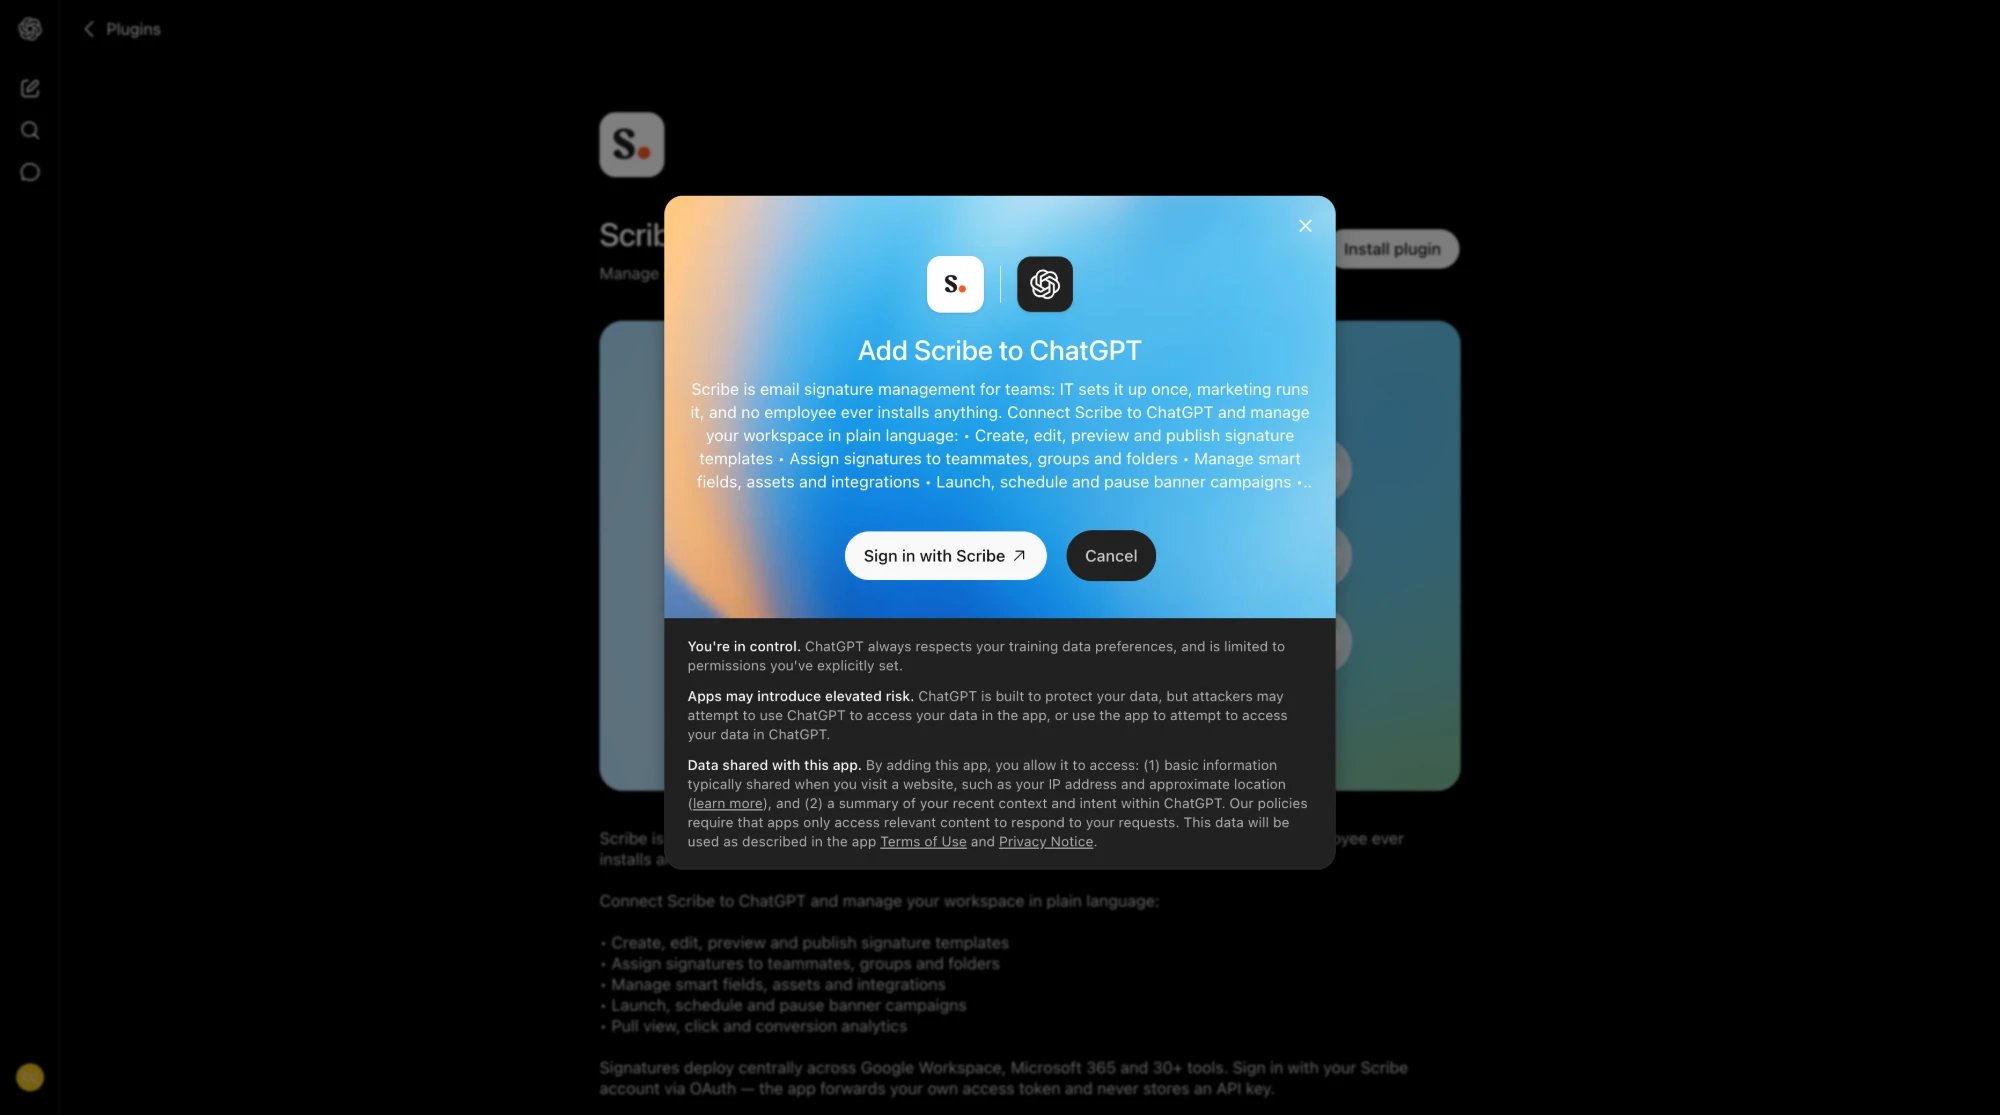
 2. In the **Add Scribe to ChatGPT** dialog, click **Sign in with Scribe**.
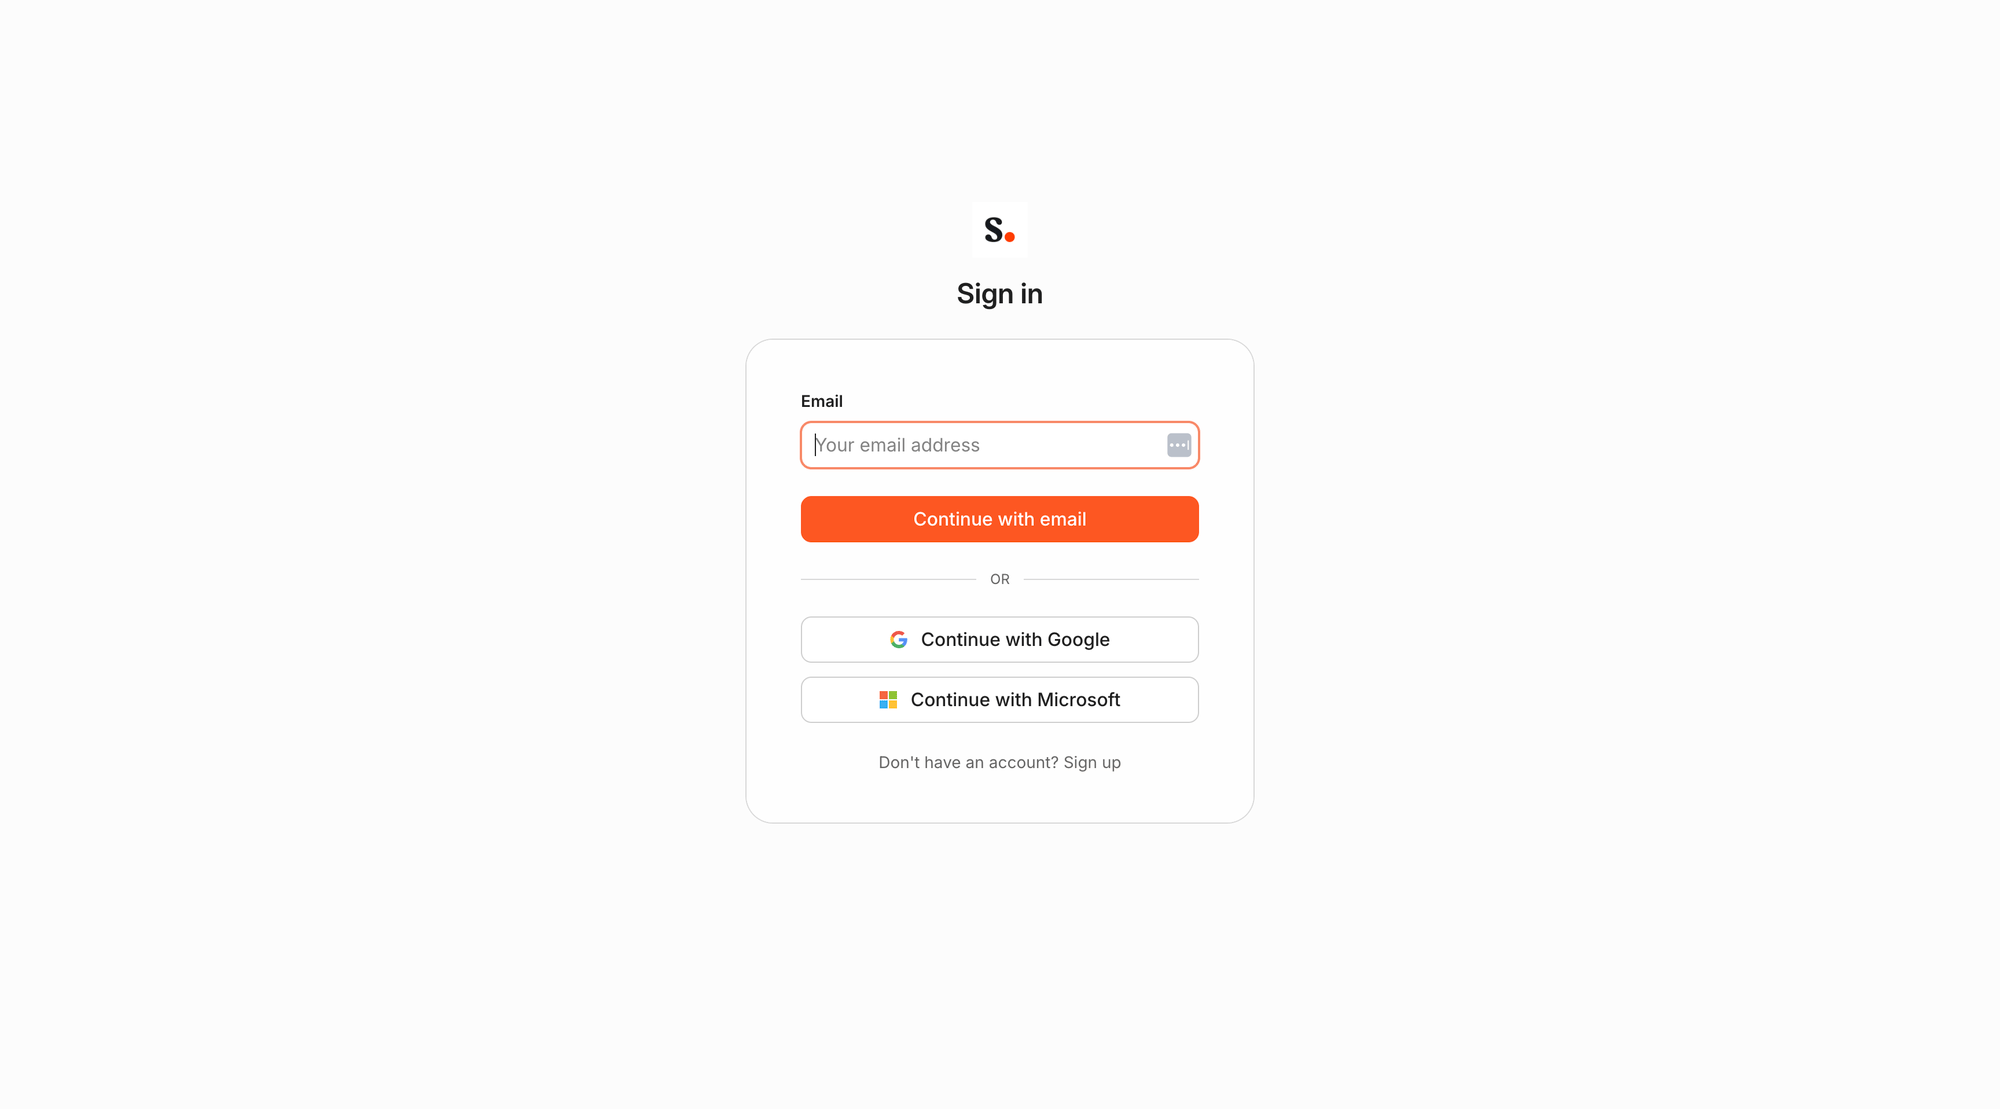
 3. Sign in with your Scribe account, review the access, then click **Allow access**.
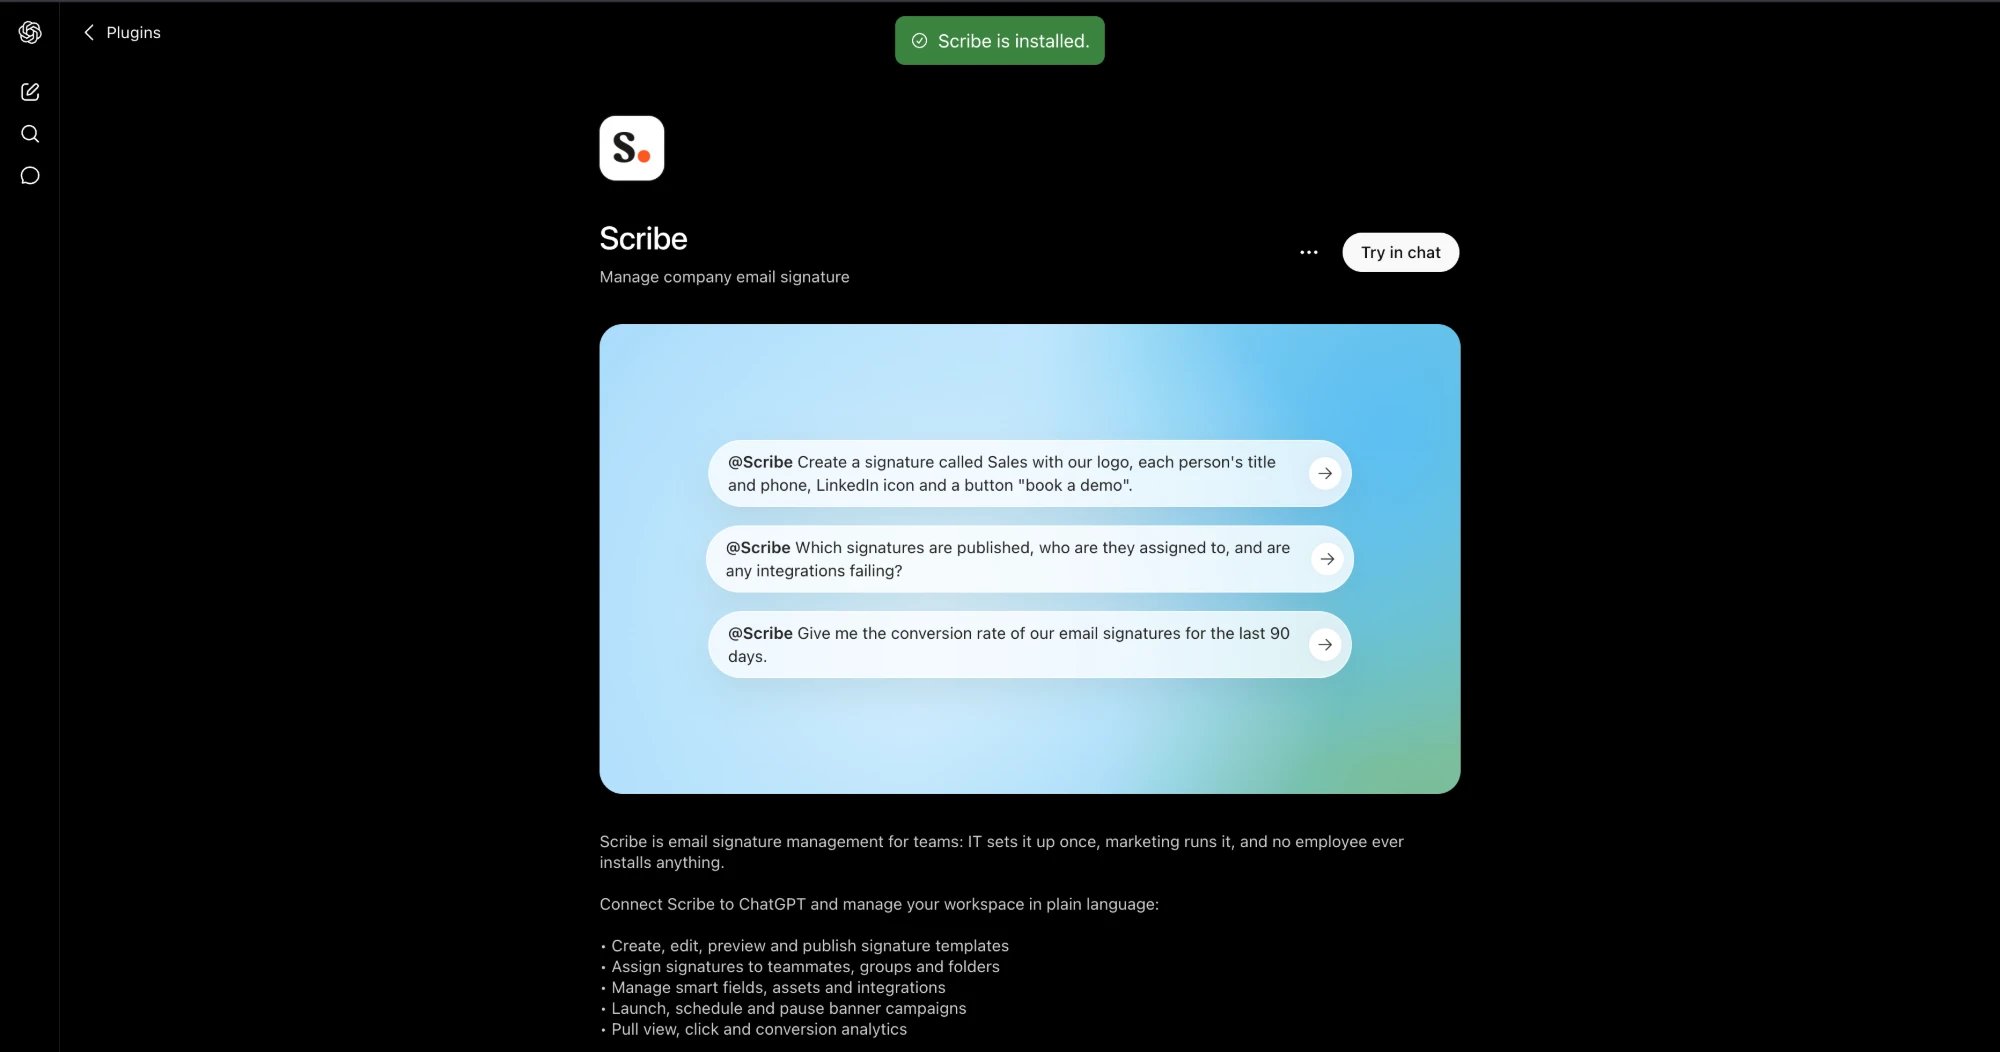
 4. Scribe is installed. Click **Try in chat**, or pick one of the example prompts on the listing.
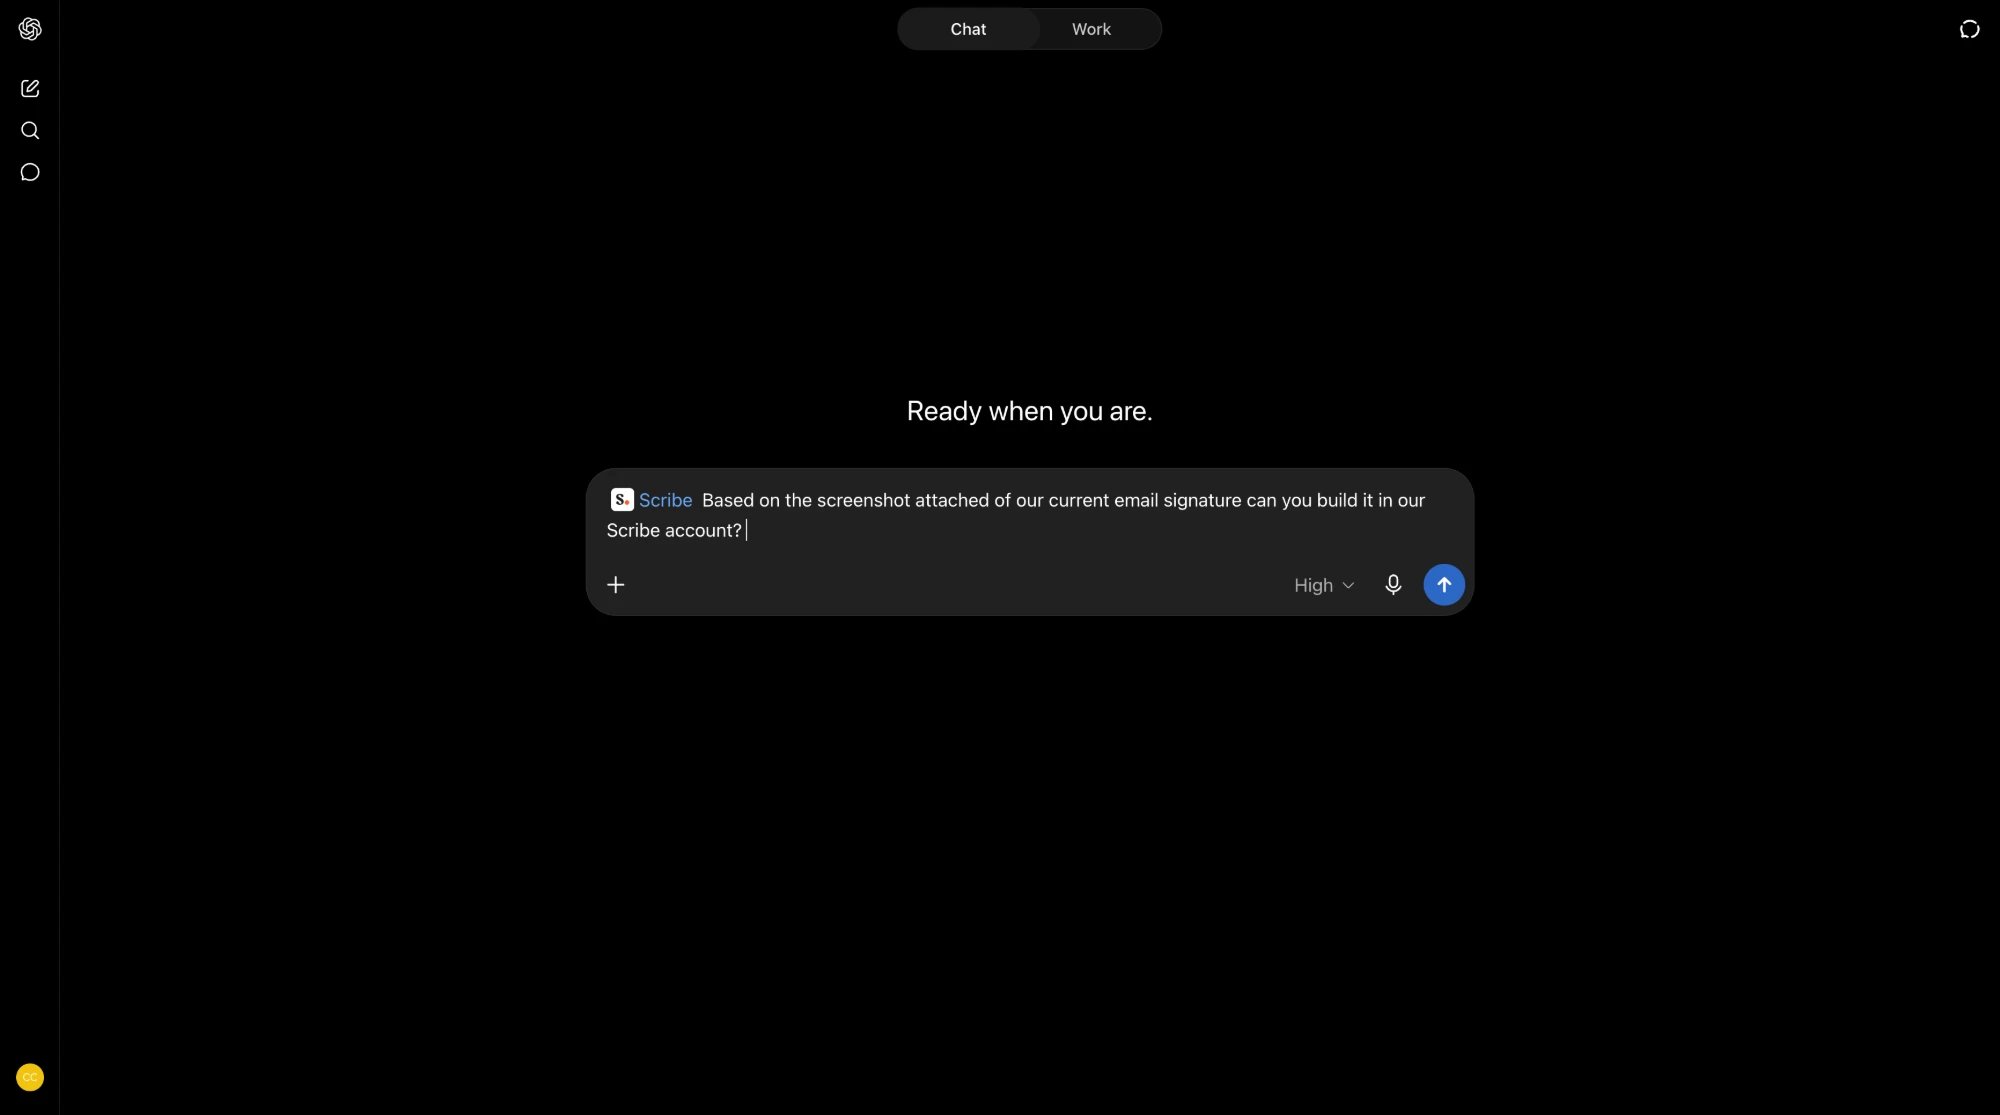
 5. In any chat, type `@Scribe` followed by your request, or open the plus menu and select the **Scribe** plugin.
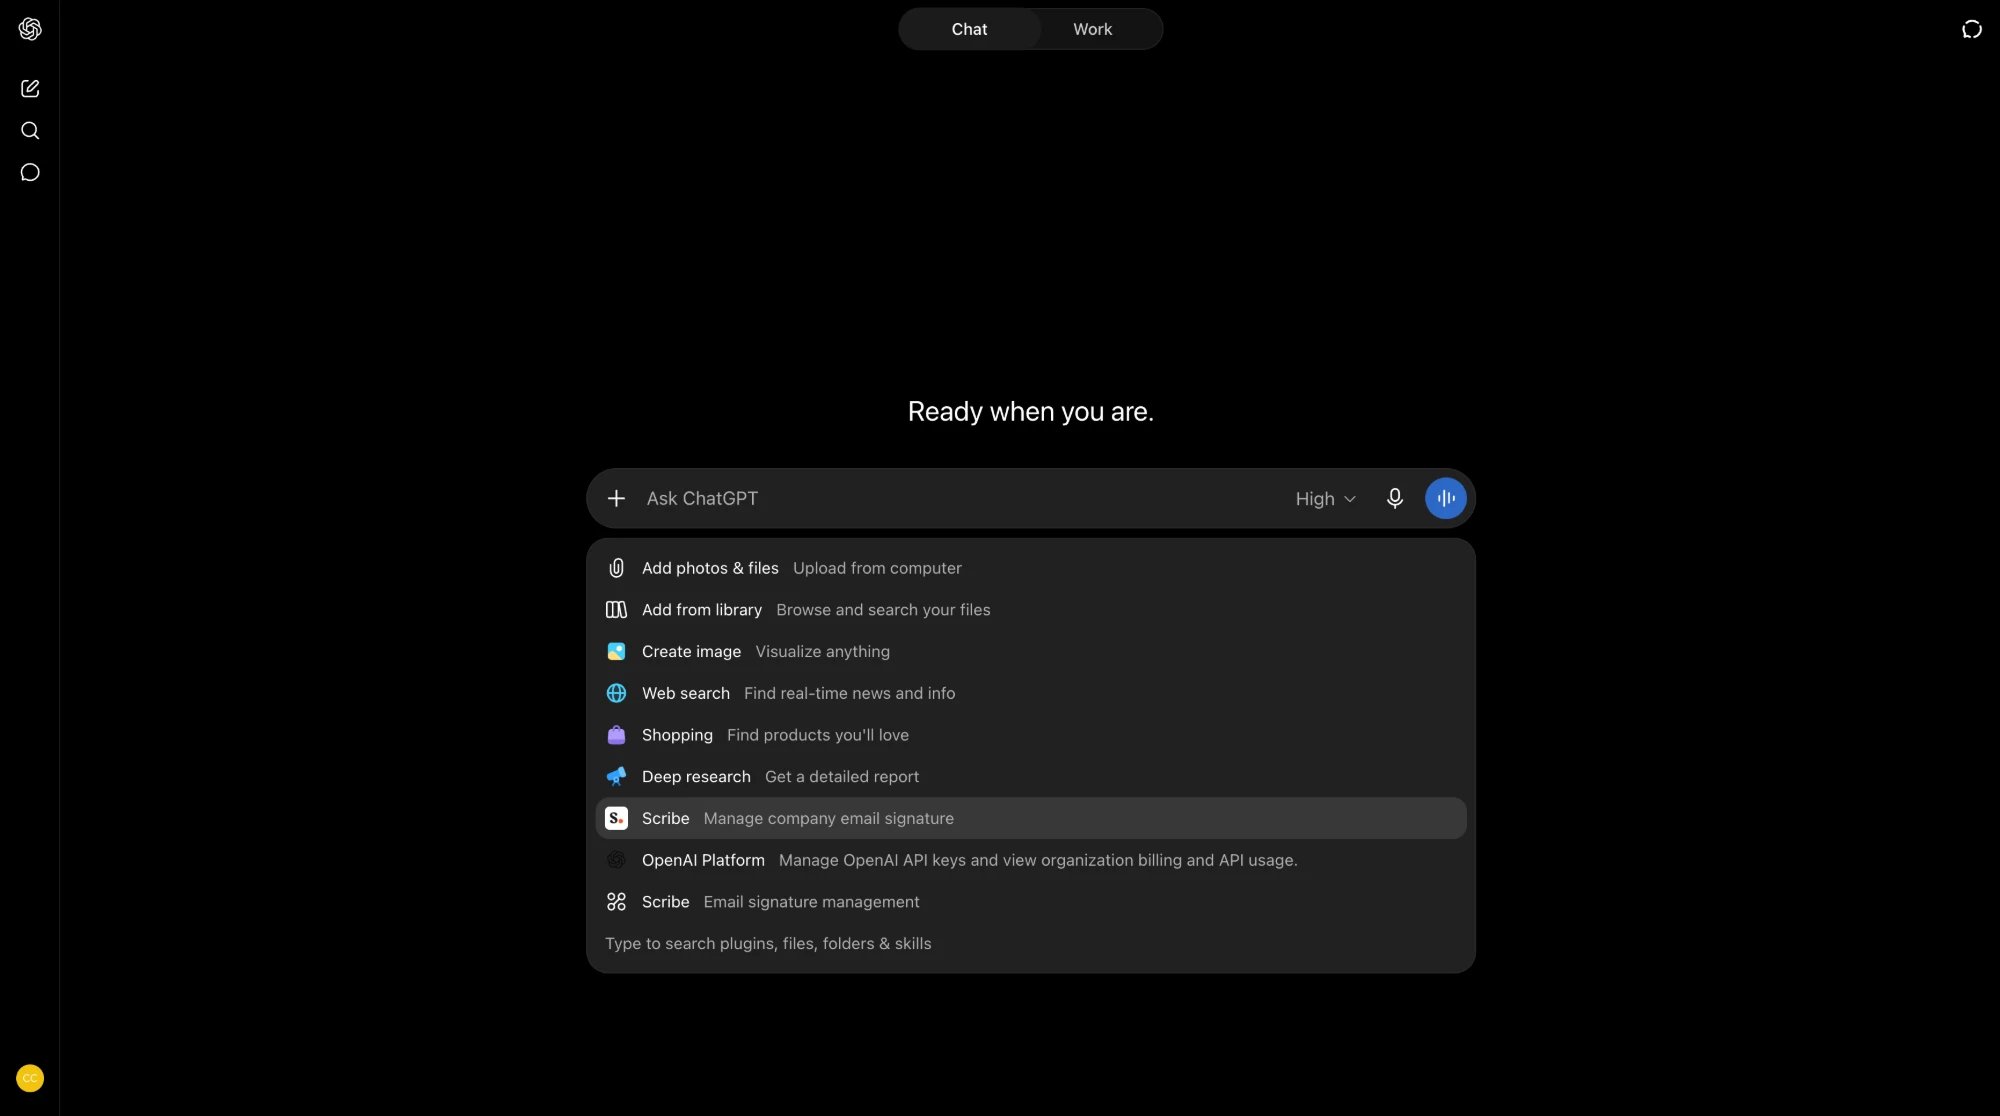 6. Ask ChatGPT to manage your Scribe account, from creating a signature to pulling your analytics.
 ### Connect Mistral Vibe to Scribe
Works on the free plan.
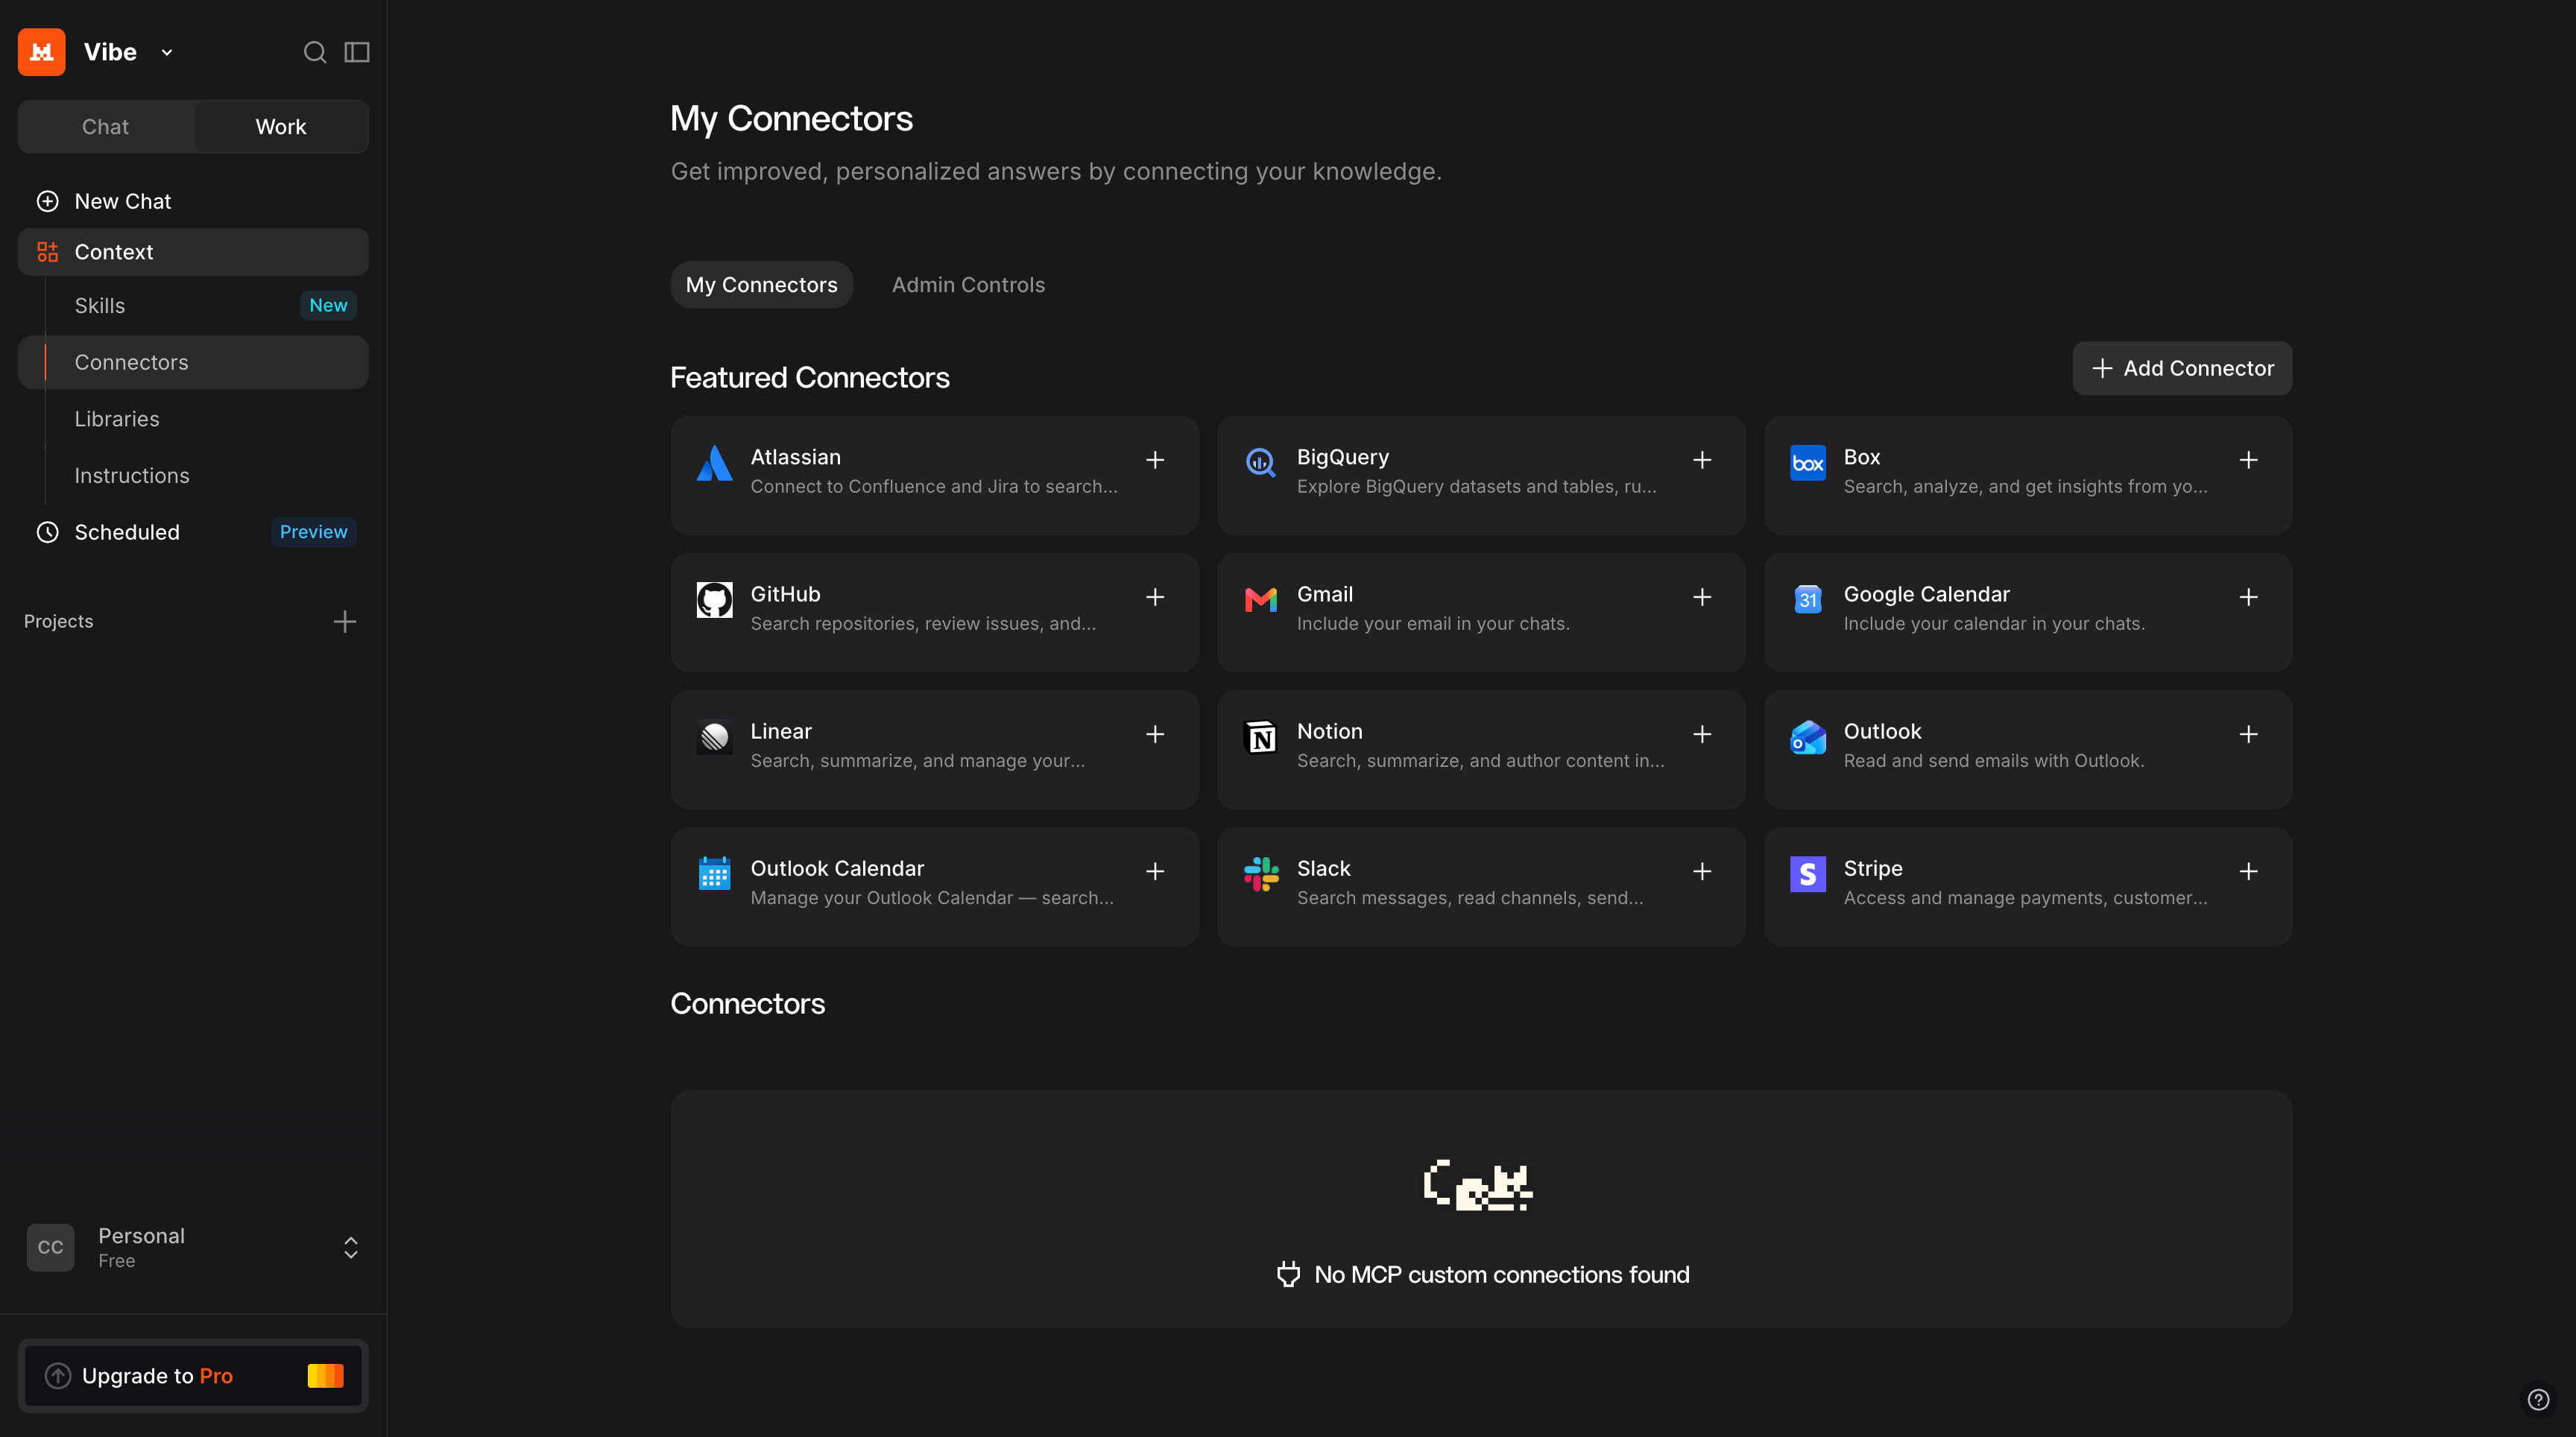
1. In Mistral Vibe, open **Context**, go to **Connectors**, then click **Add Connector**.
### Connect Mistral Vibe to Scribe
Works on the free plan.
1. In Mistral Vibe, open **Context**, go to **Connectors**, then click **Add Connector**.
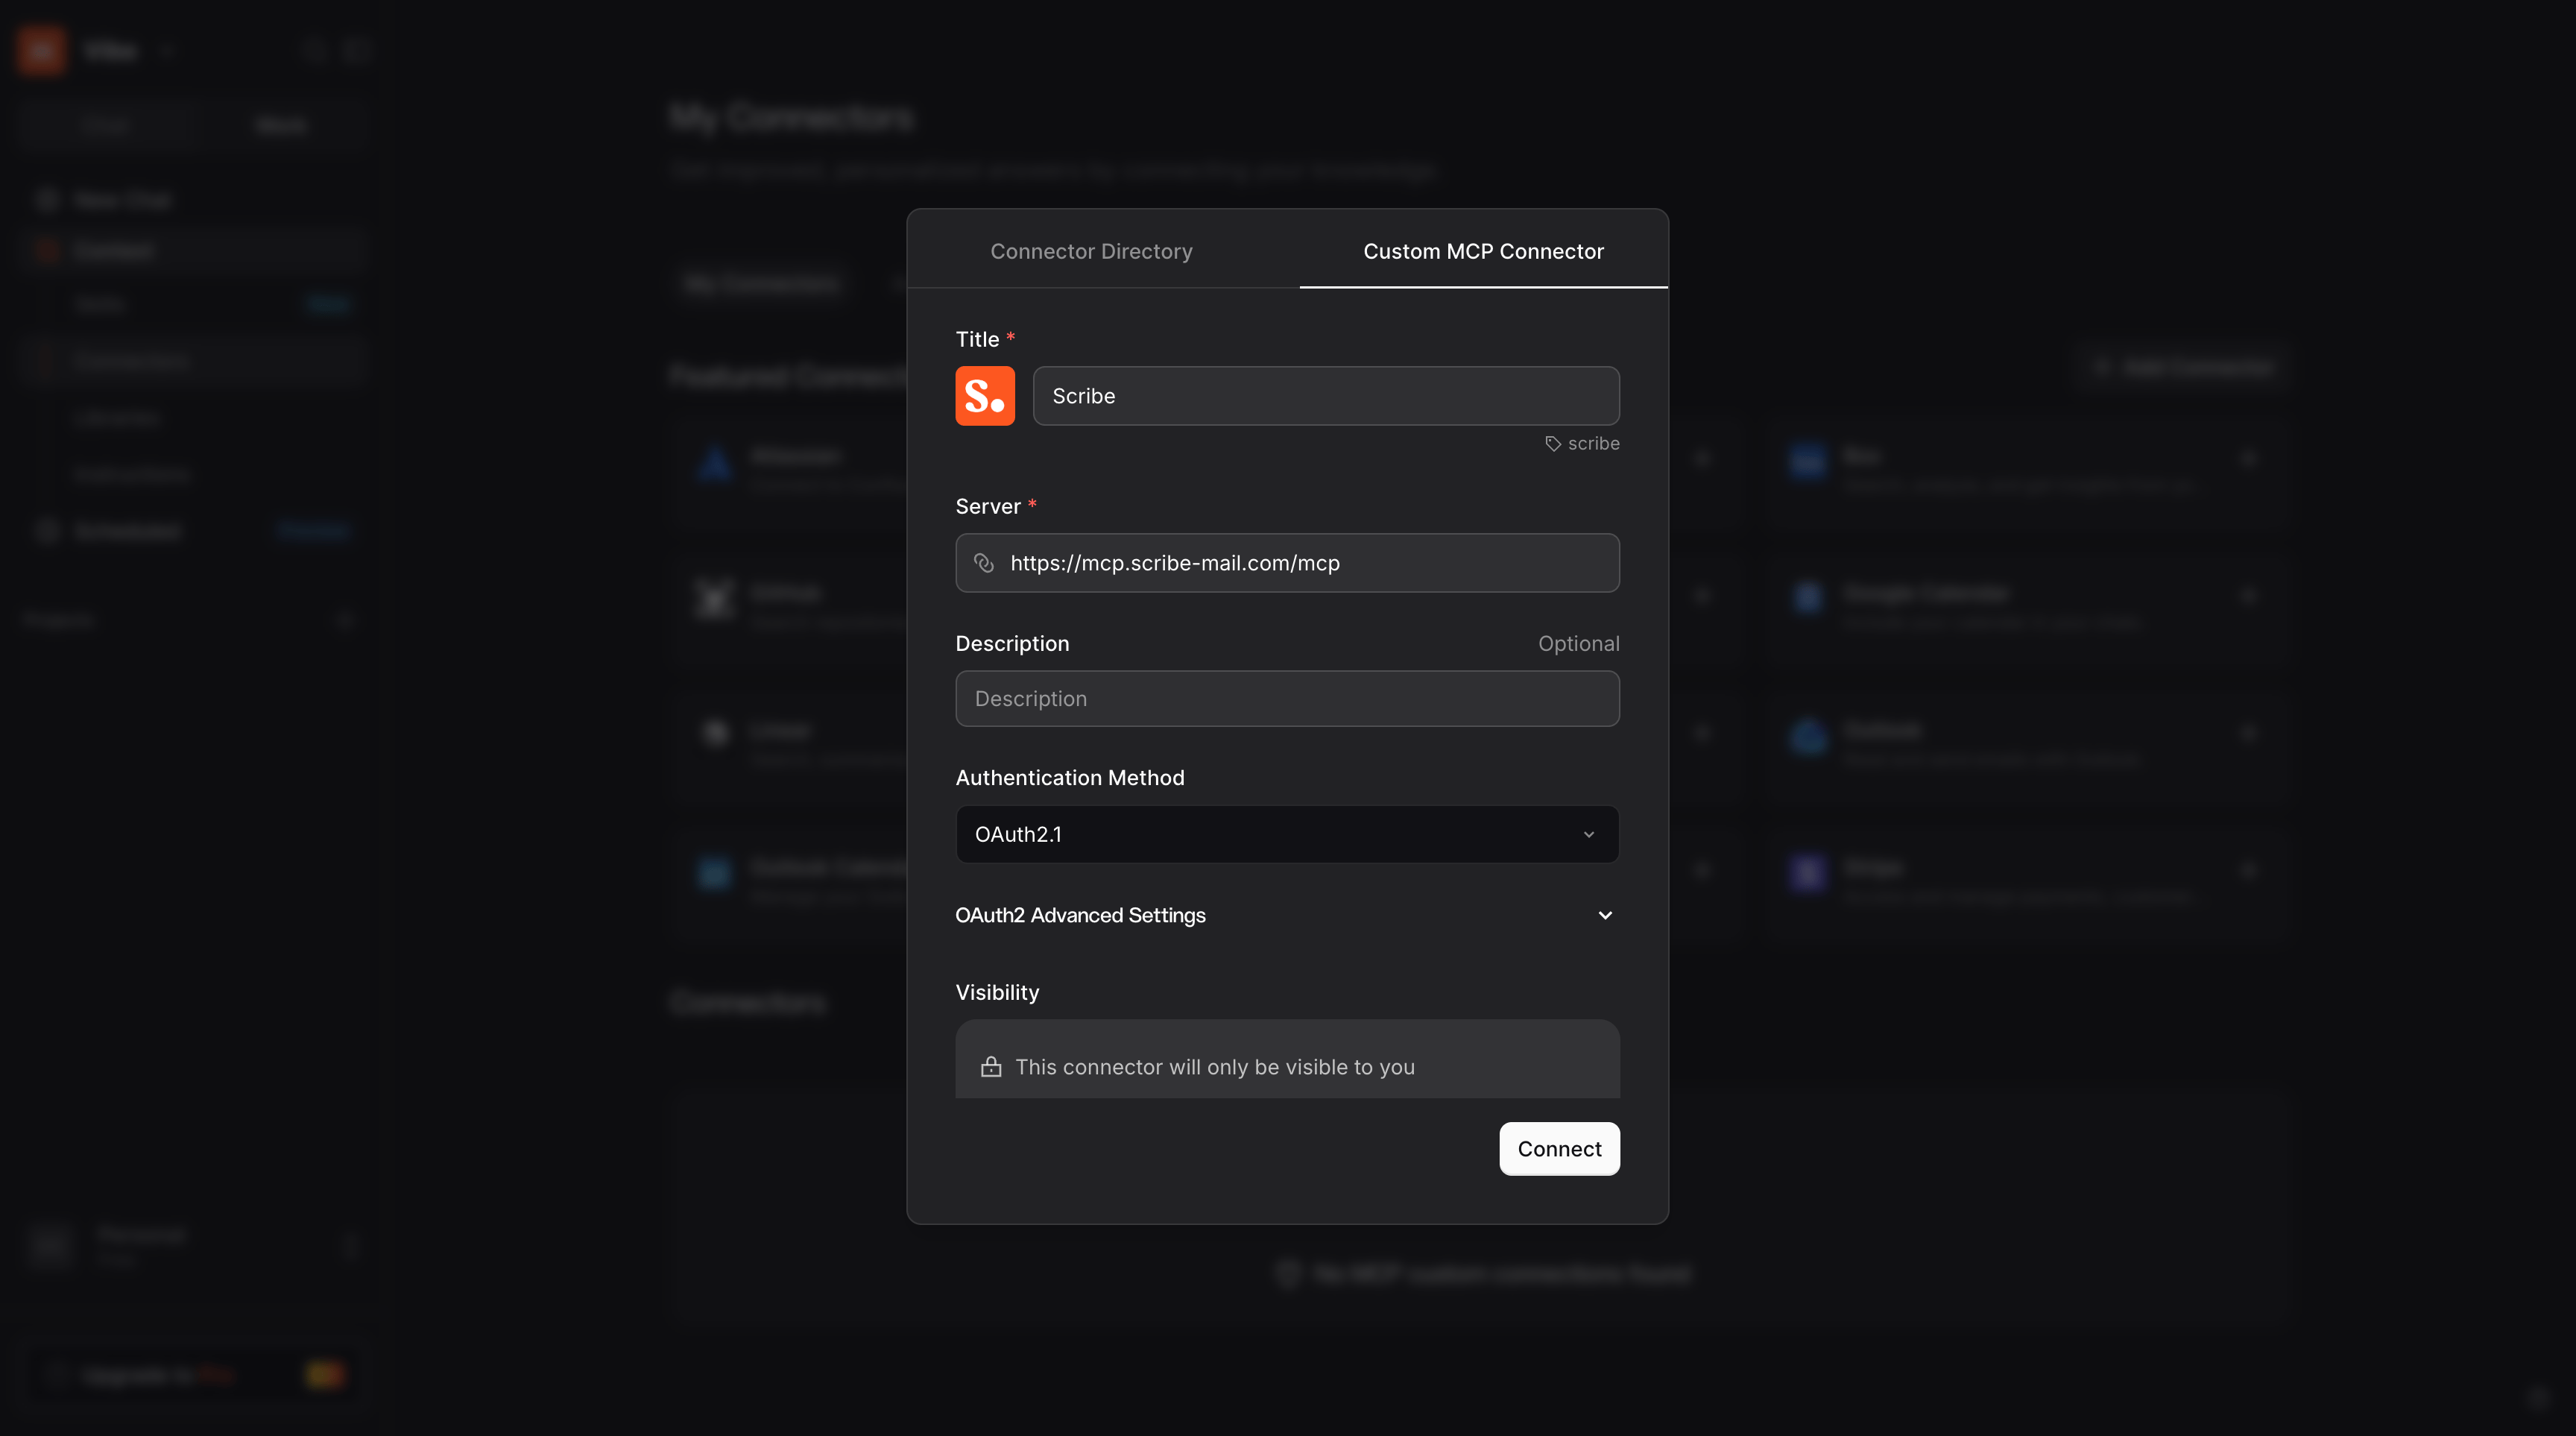
 2. Open the **Custom MCP Connector** tab. Name it `Scribe`, paste the URL below into **Server**, leave the authentication method on **OAuth2.1**, then click **Connect**:
```text theme={null}
https://mcp.scribe-mail.com/mcp
```
2. Open the **Custom MCP Connector** tab. Name it `Scribe`, paste the URL below into **Server**, leave the authentication method on **OAuth2.1**, then click **Connect**:
```text theme={null}
https://mcp.scribe-mail.com/mcp
```
 3. Sign in with your Scribe account if prompted, review the access, then click **Allow access**.
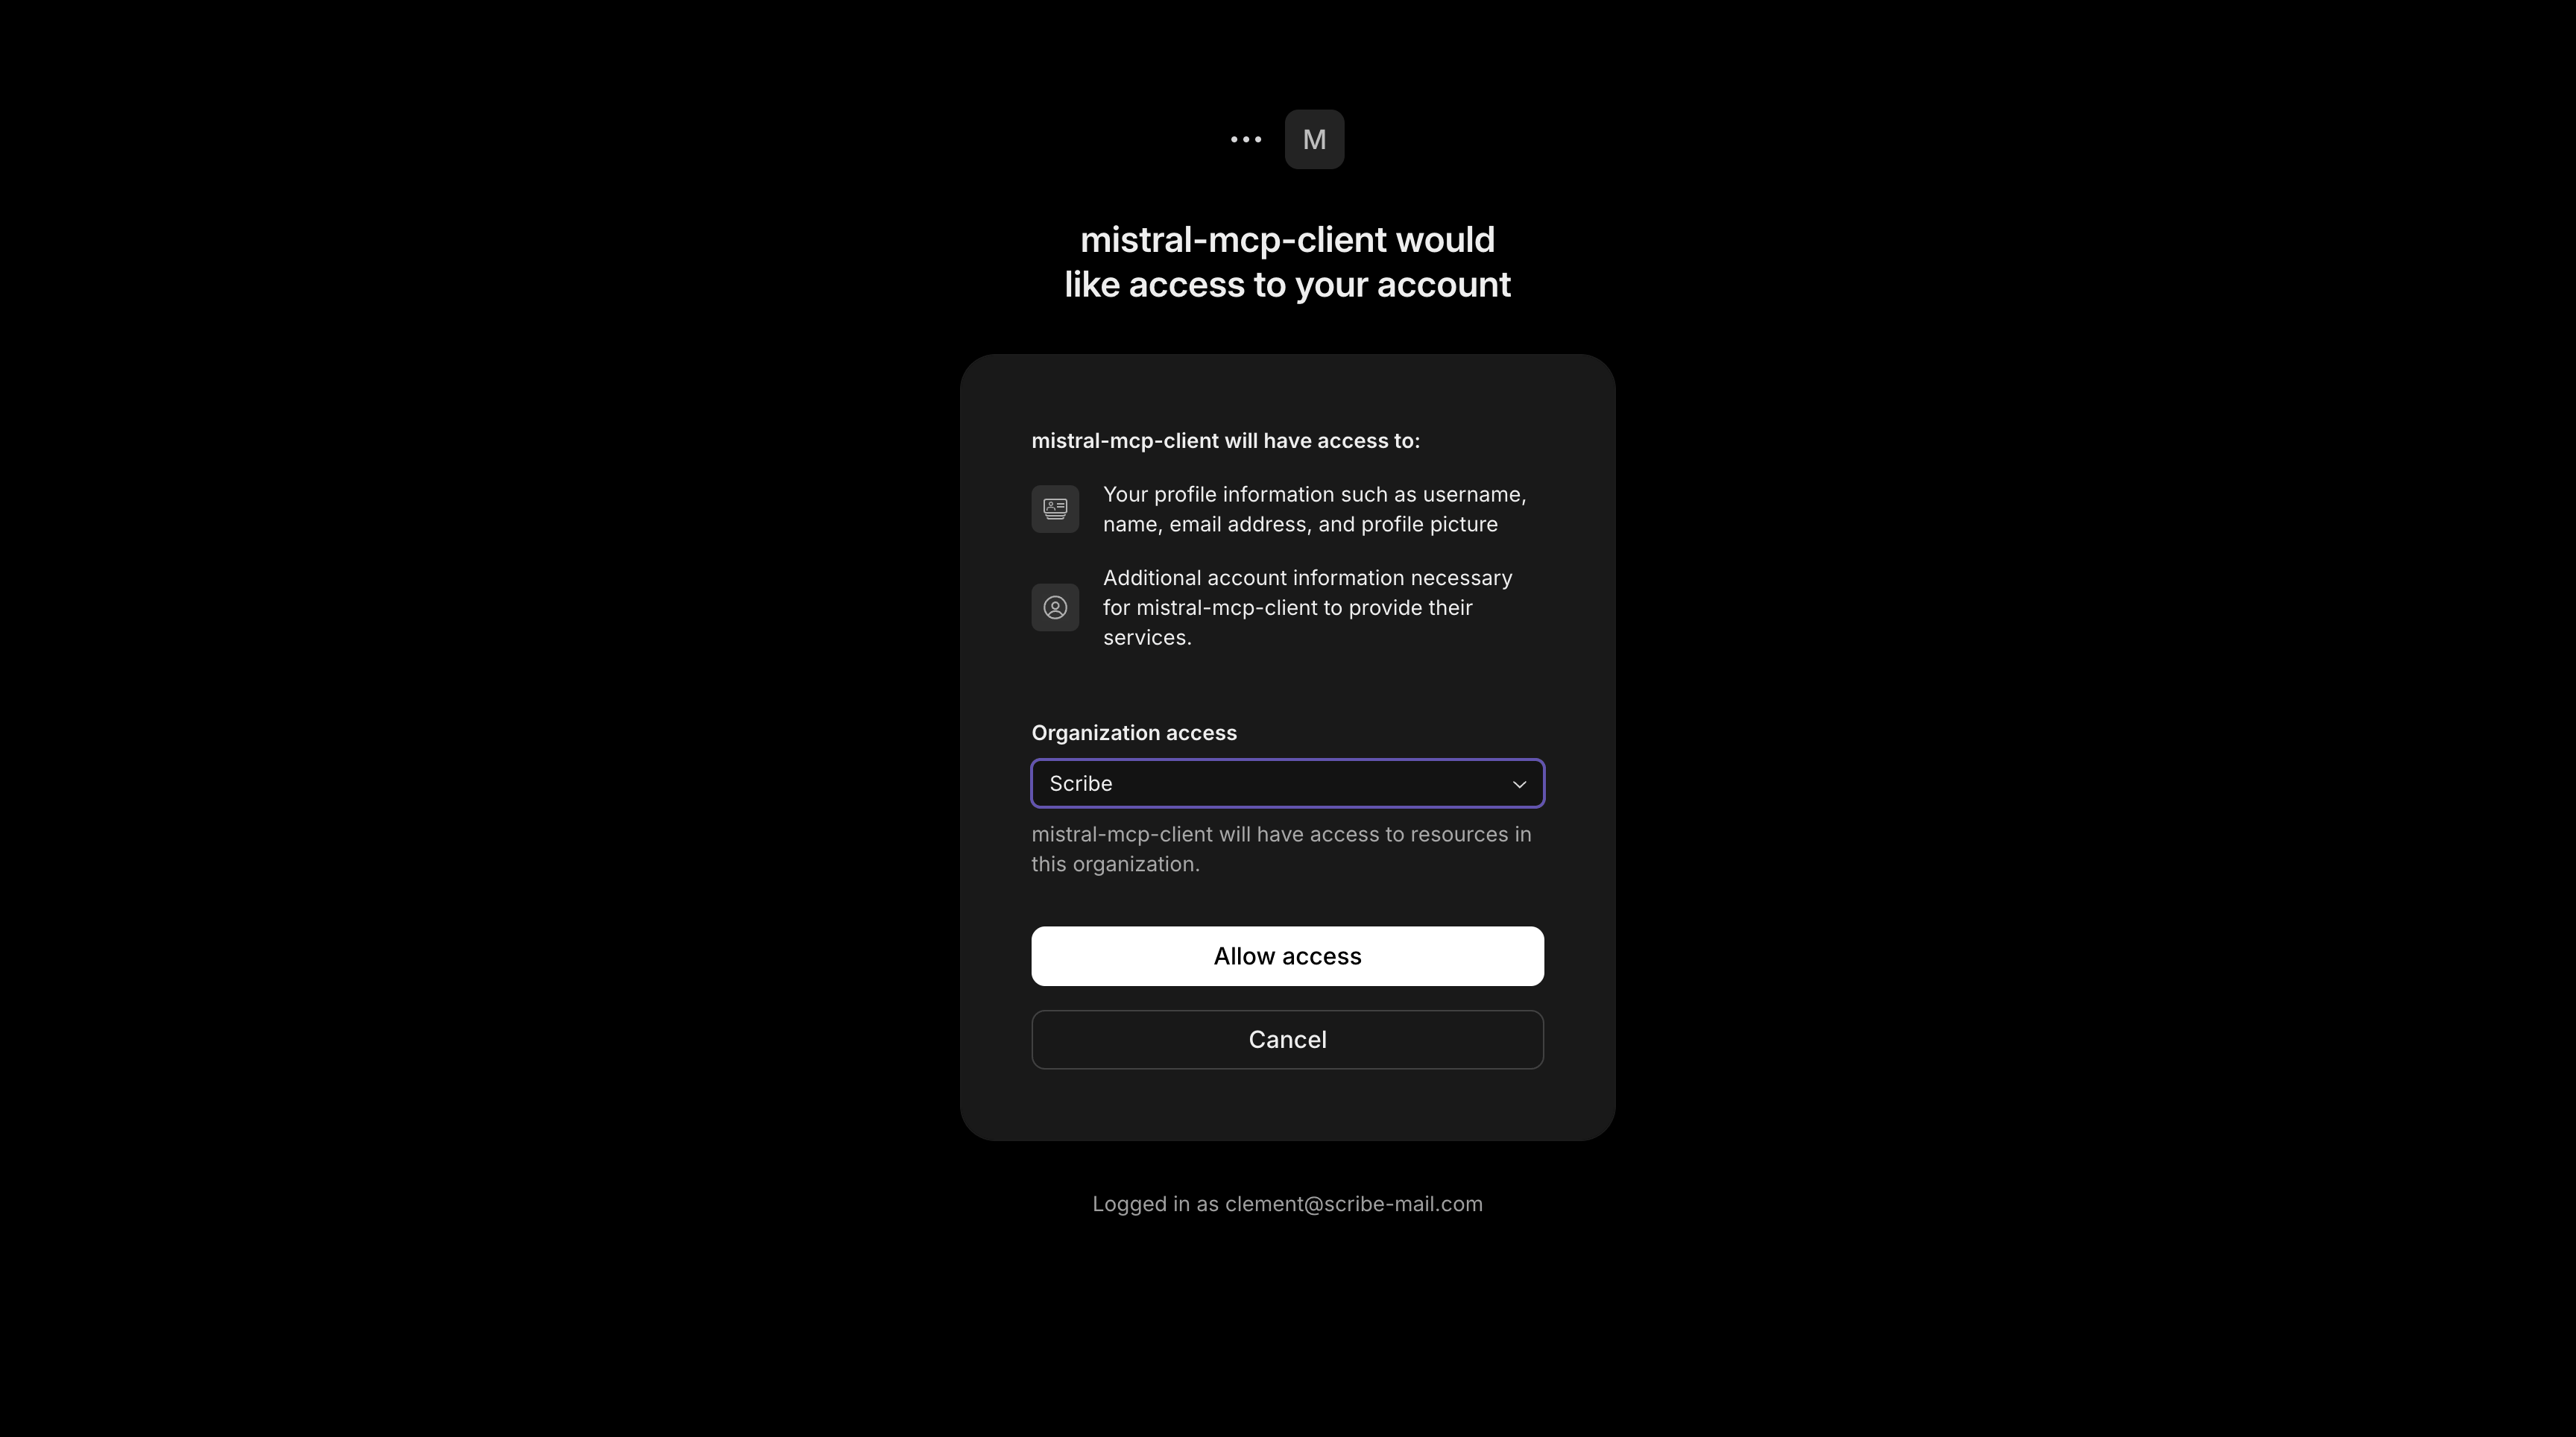 4. Done. Scribe is connected, and you can review its tools under **Functions** whenever you need.
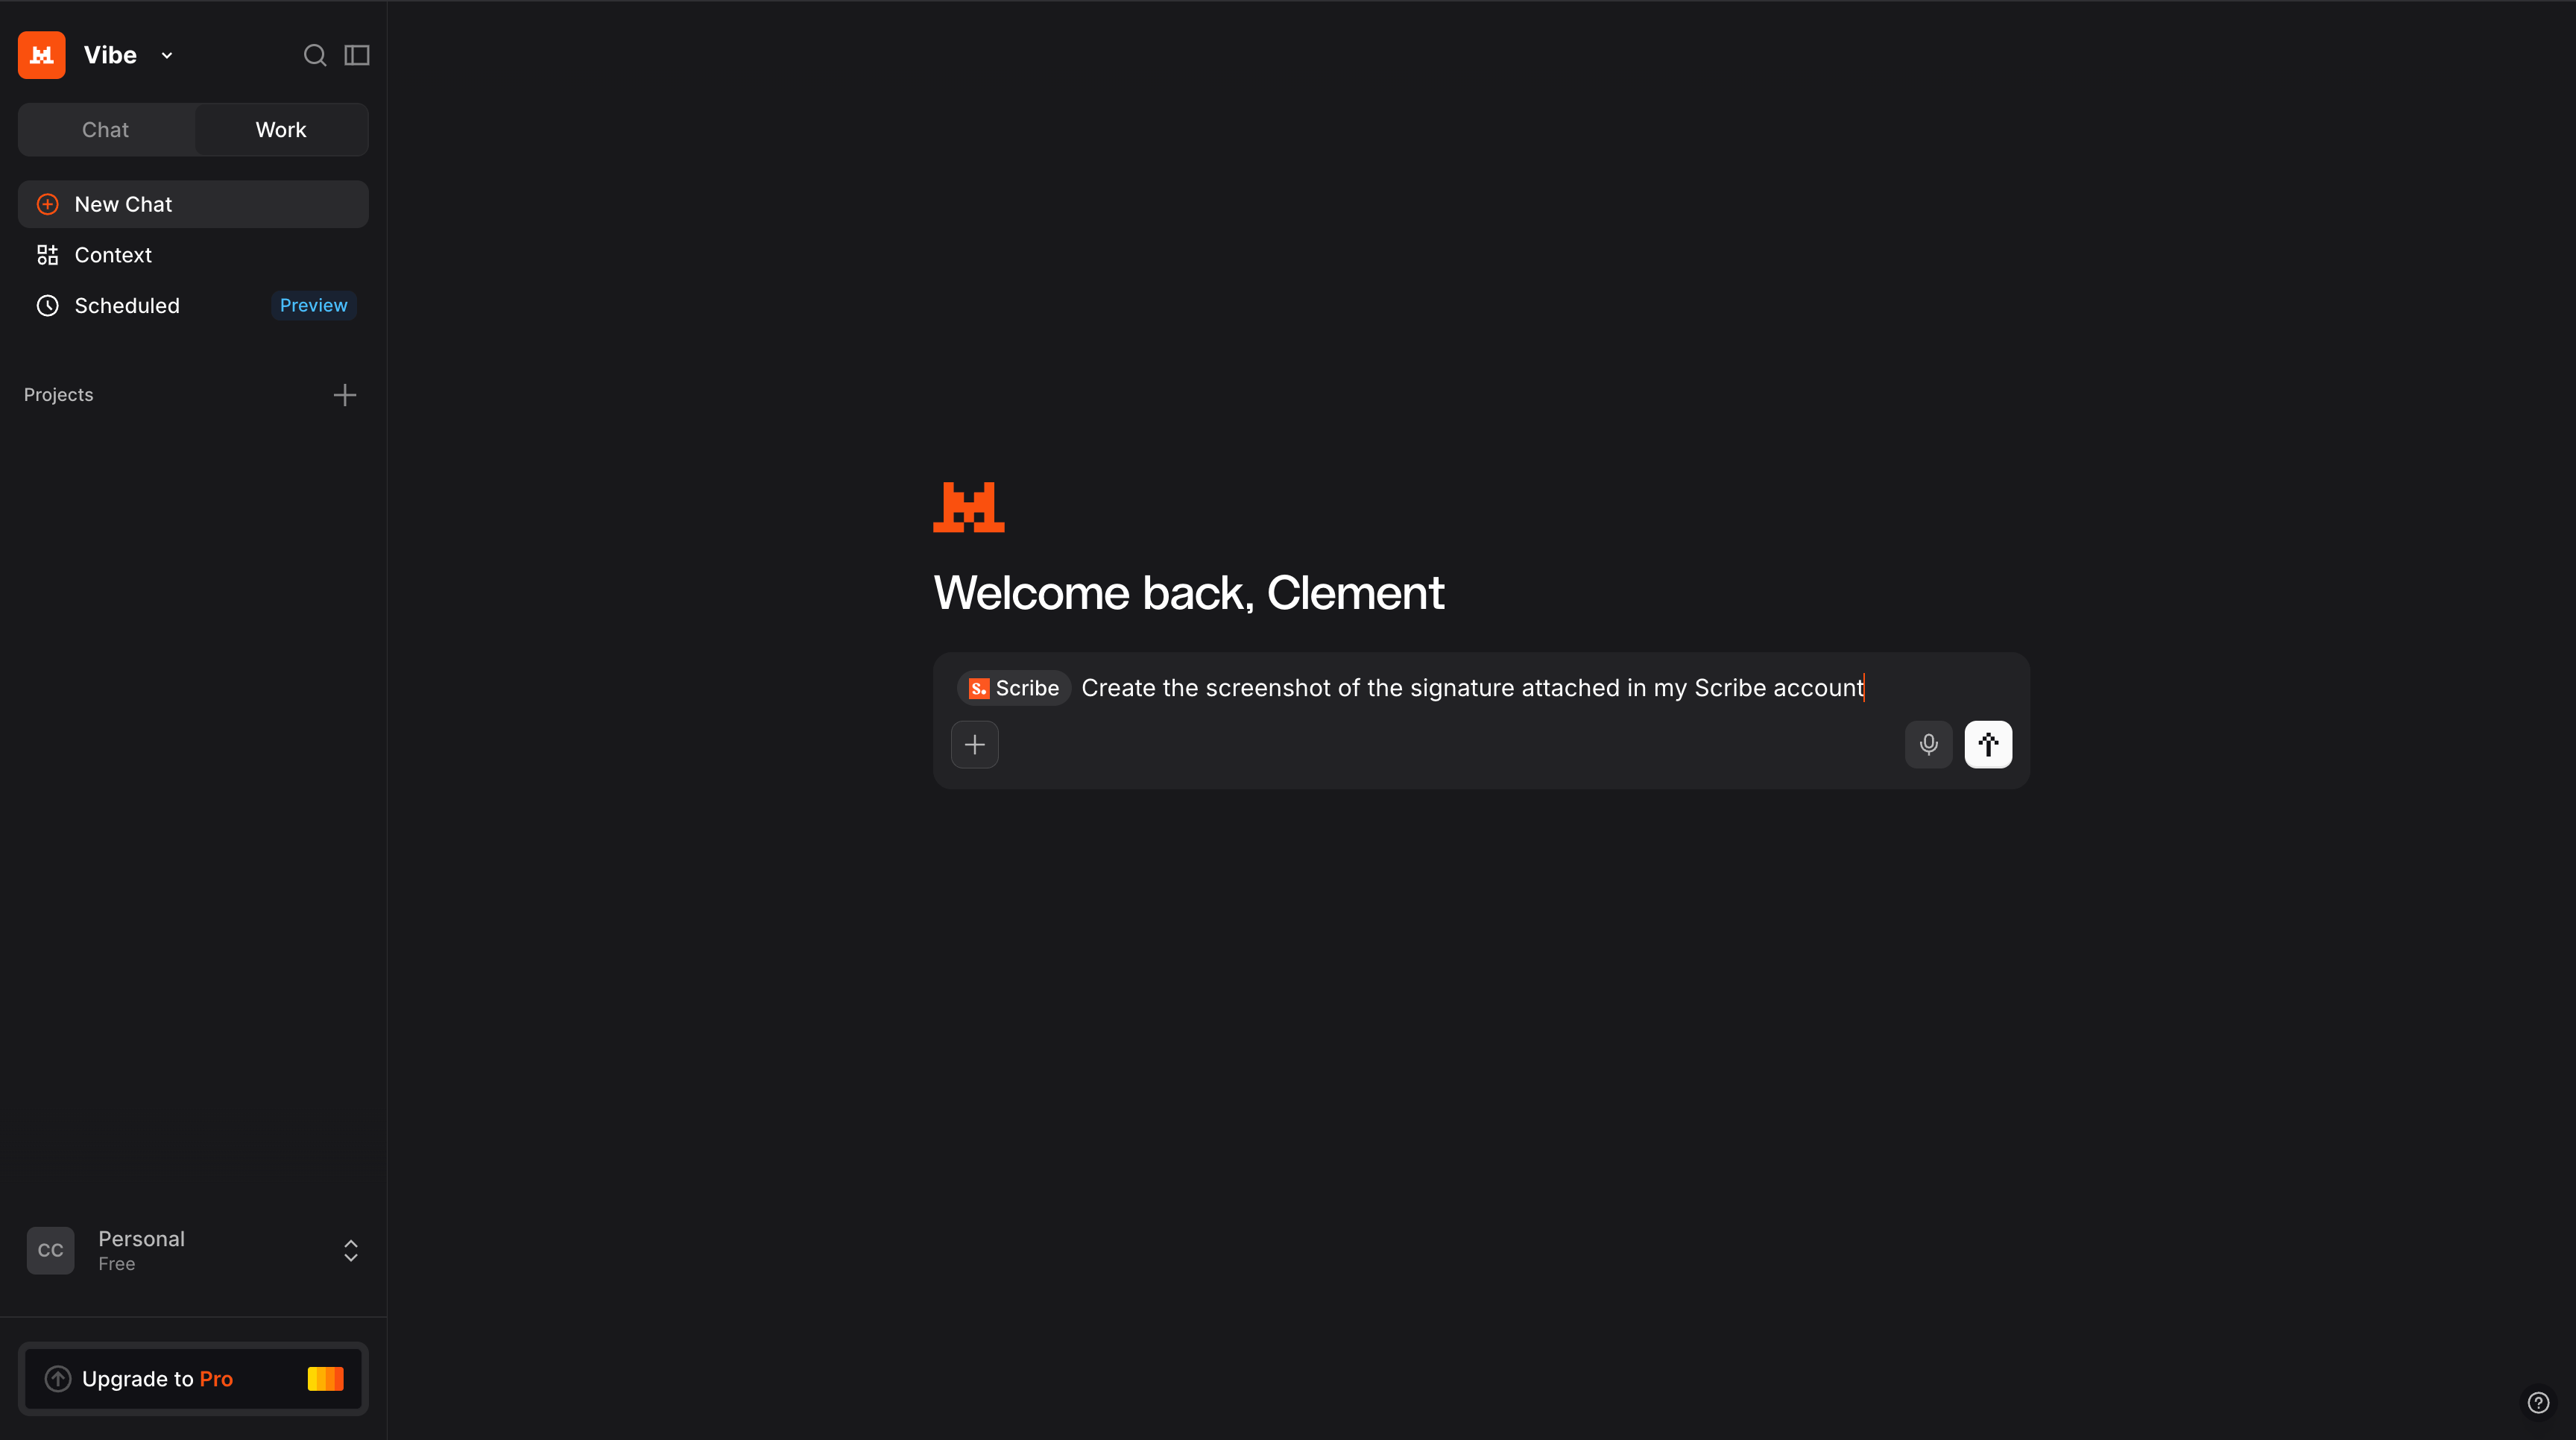
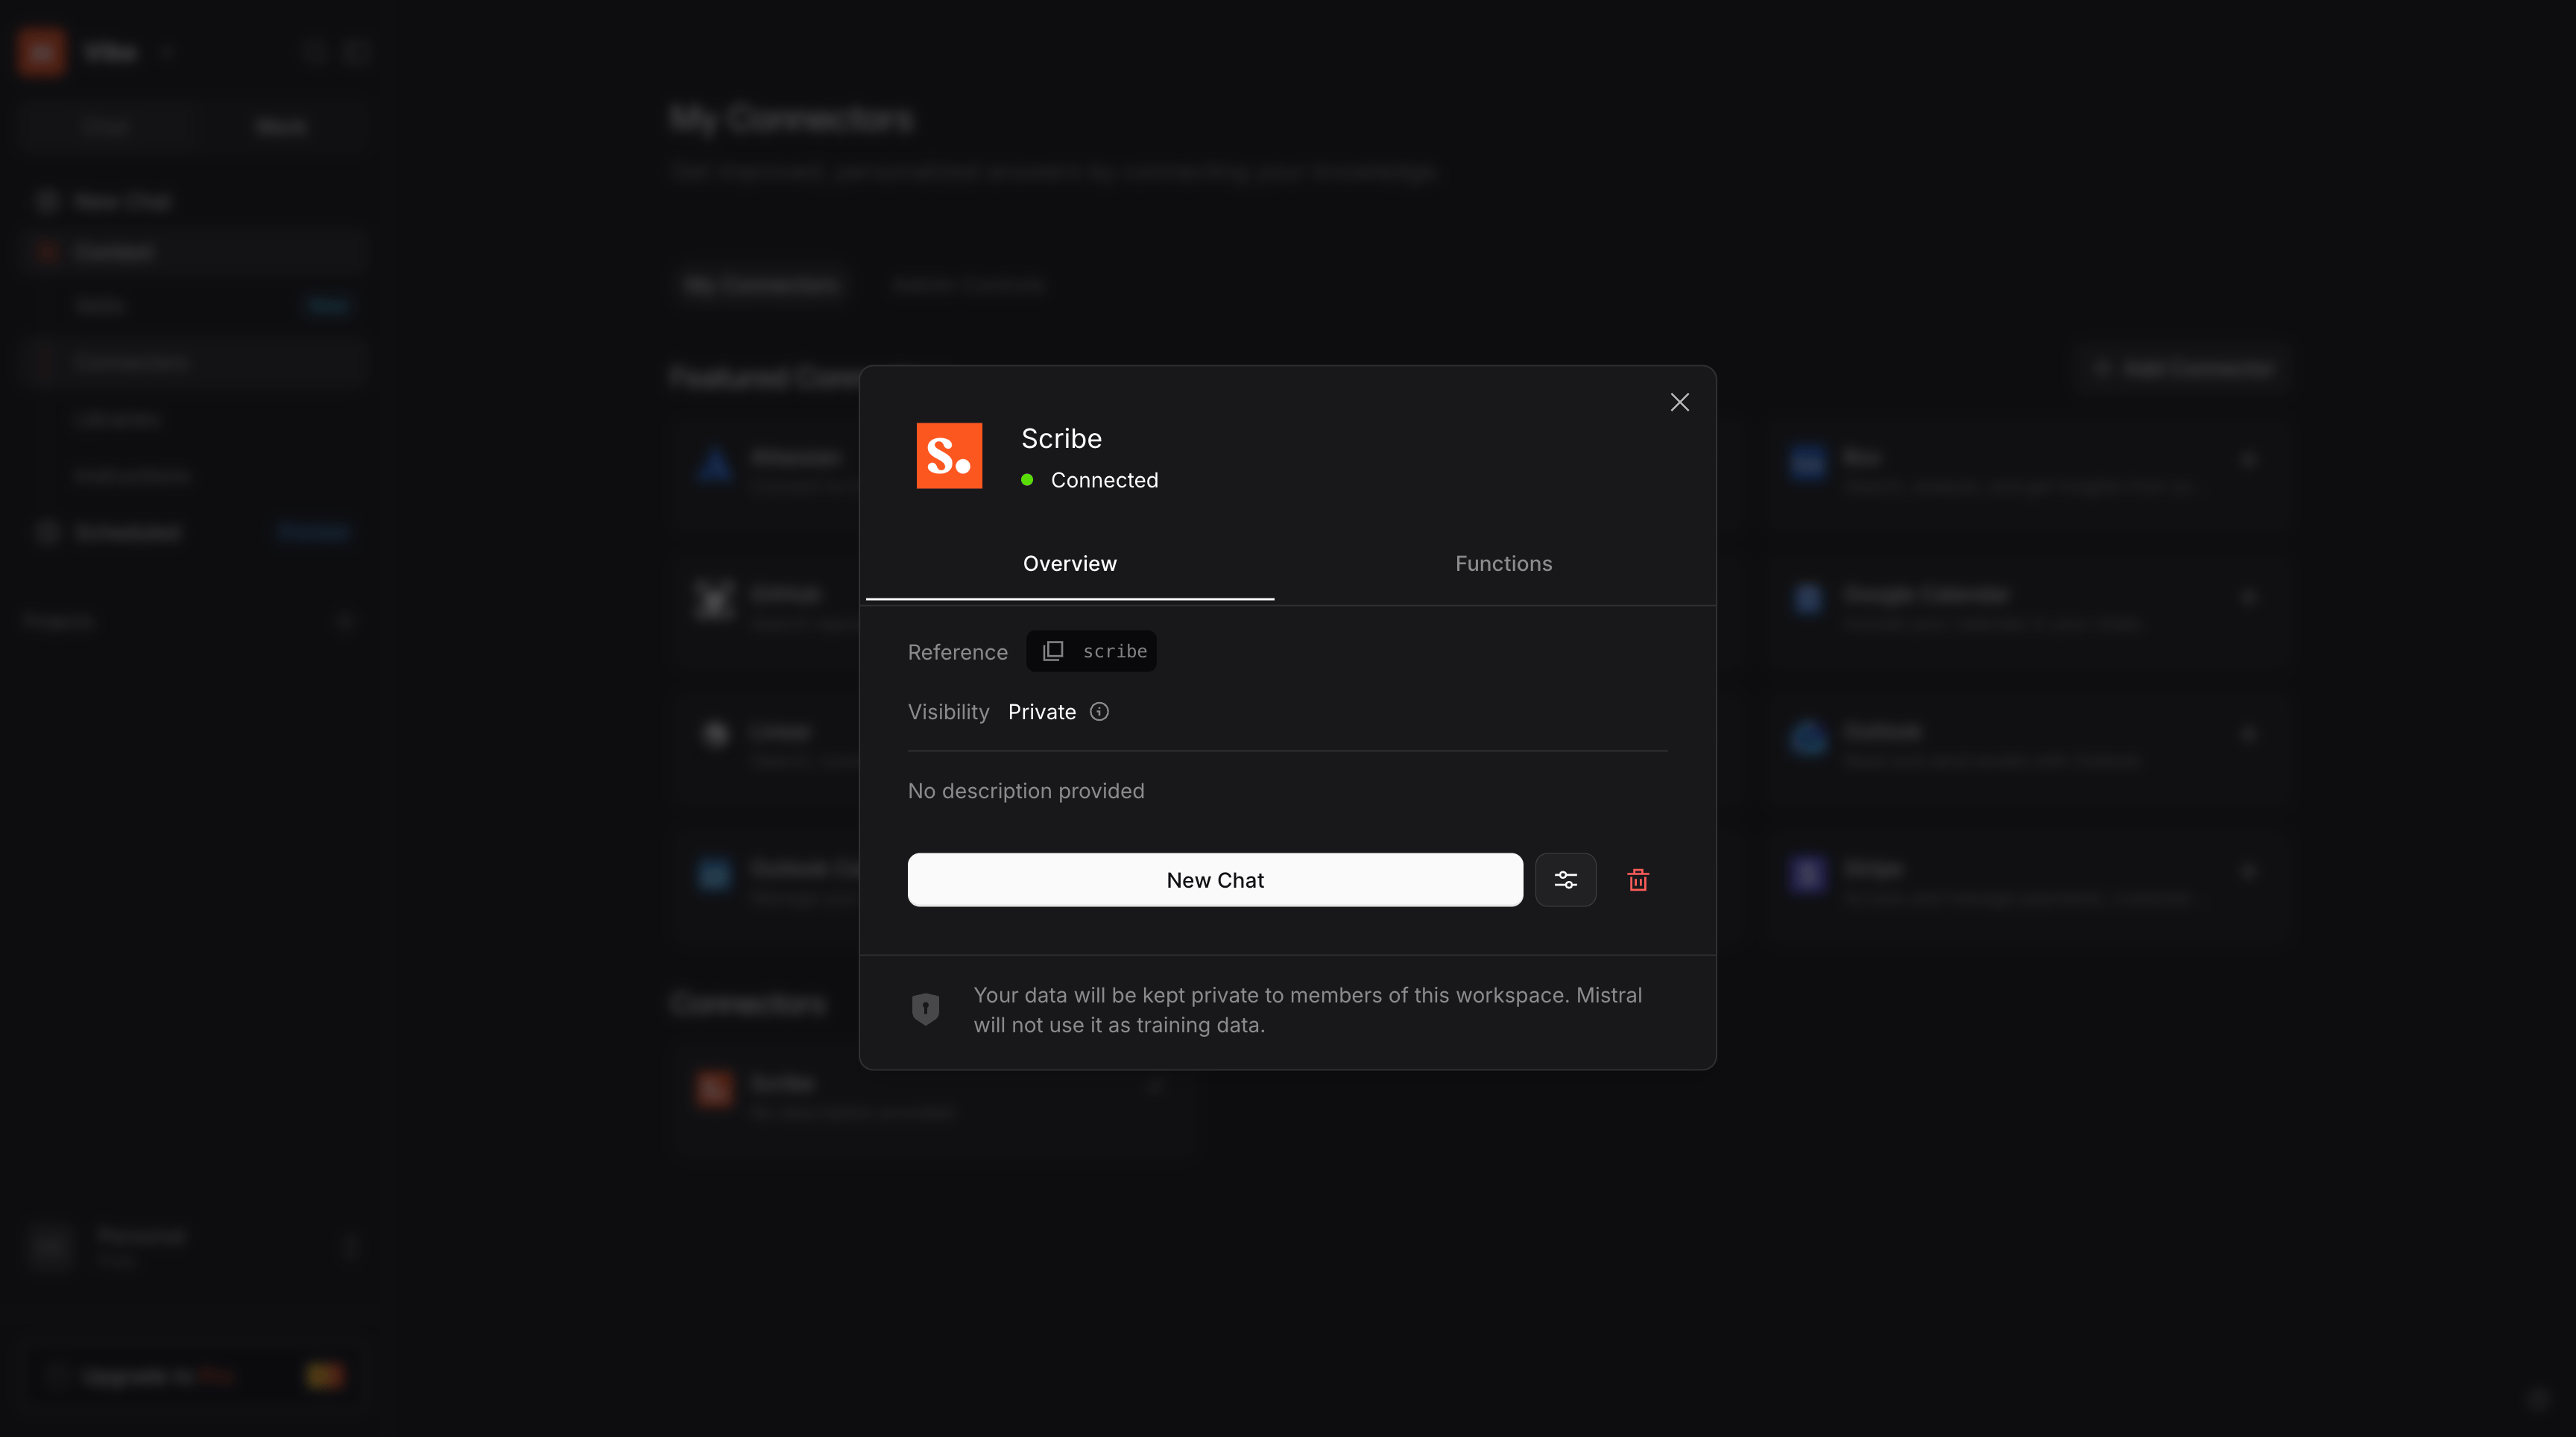 Open a new chat, select the **Scribe** connector, then ask Mistral Vibe to manage your account, from creating a signature to pulling your analytics.
 ### Connect Grok to Scribe
Requires a paid account.
1. On grok.com, open the **+** menu in the message composer, then click **Add connector**.
### Connect Grok to Scribe
Requires a paid account.
1. On grok.com, open the **+** menu in the message composer, then click **Add connector**.
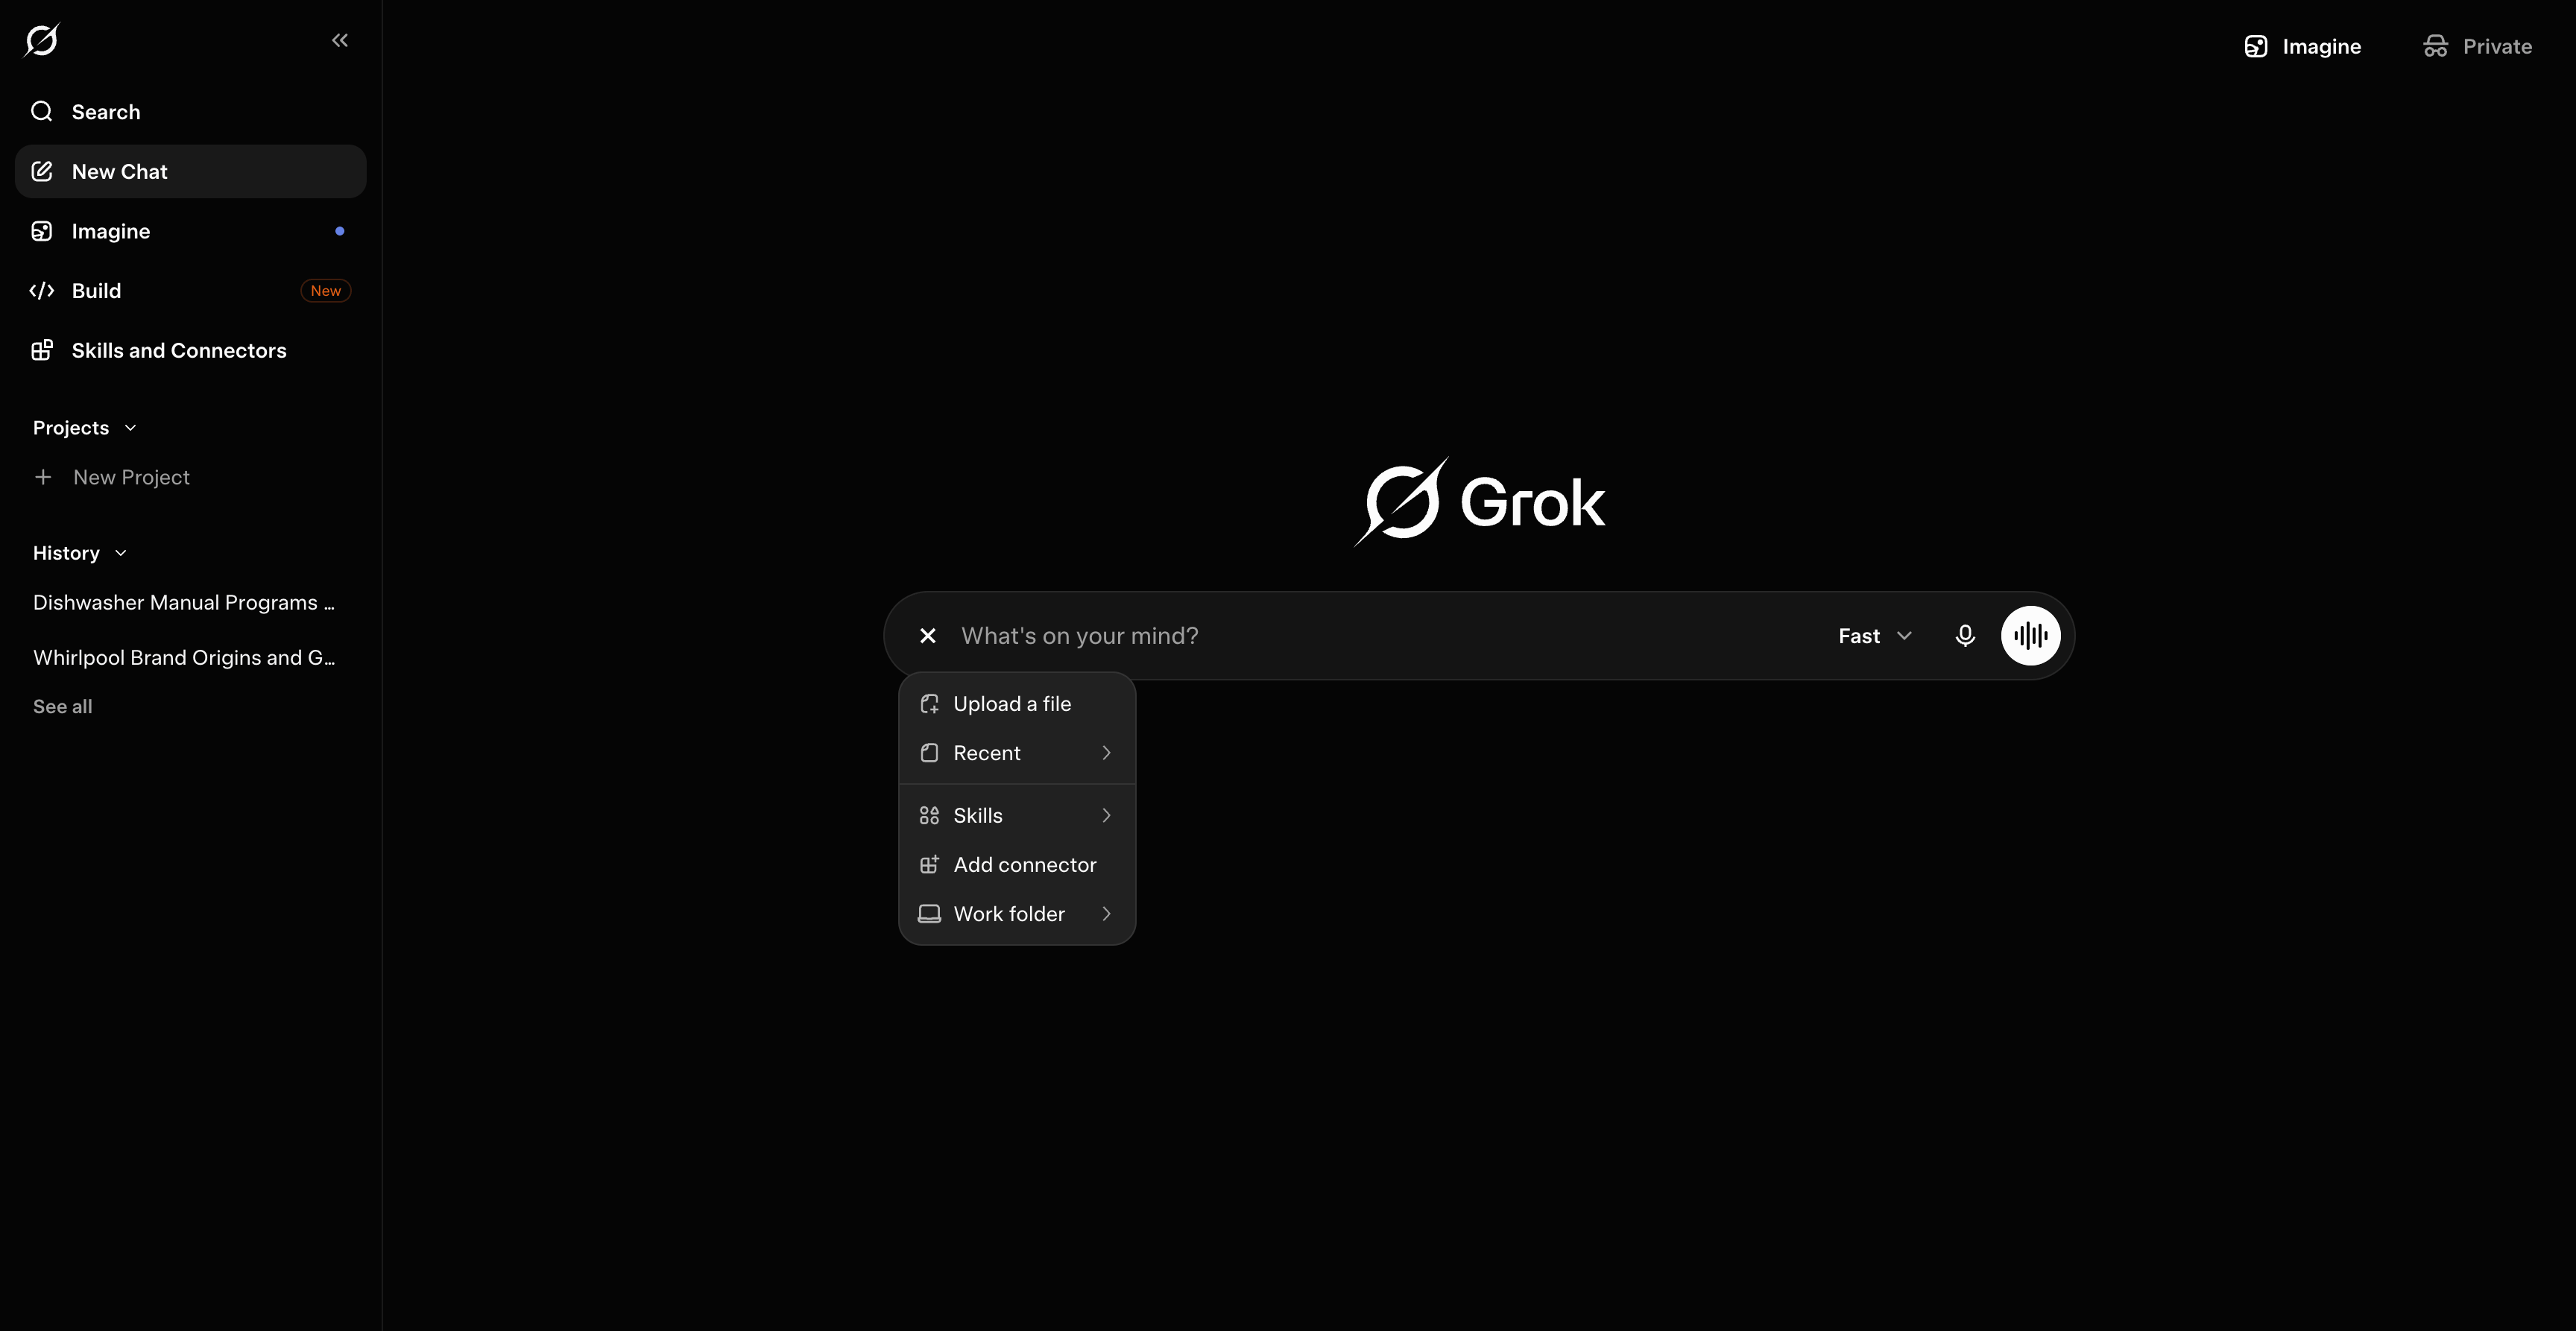 2. In the **New Connector** dialog, choose **Custom** to add your own connector.
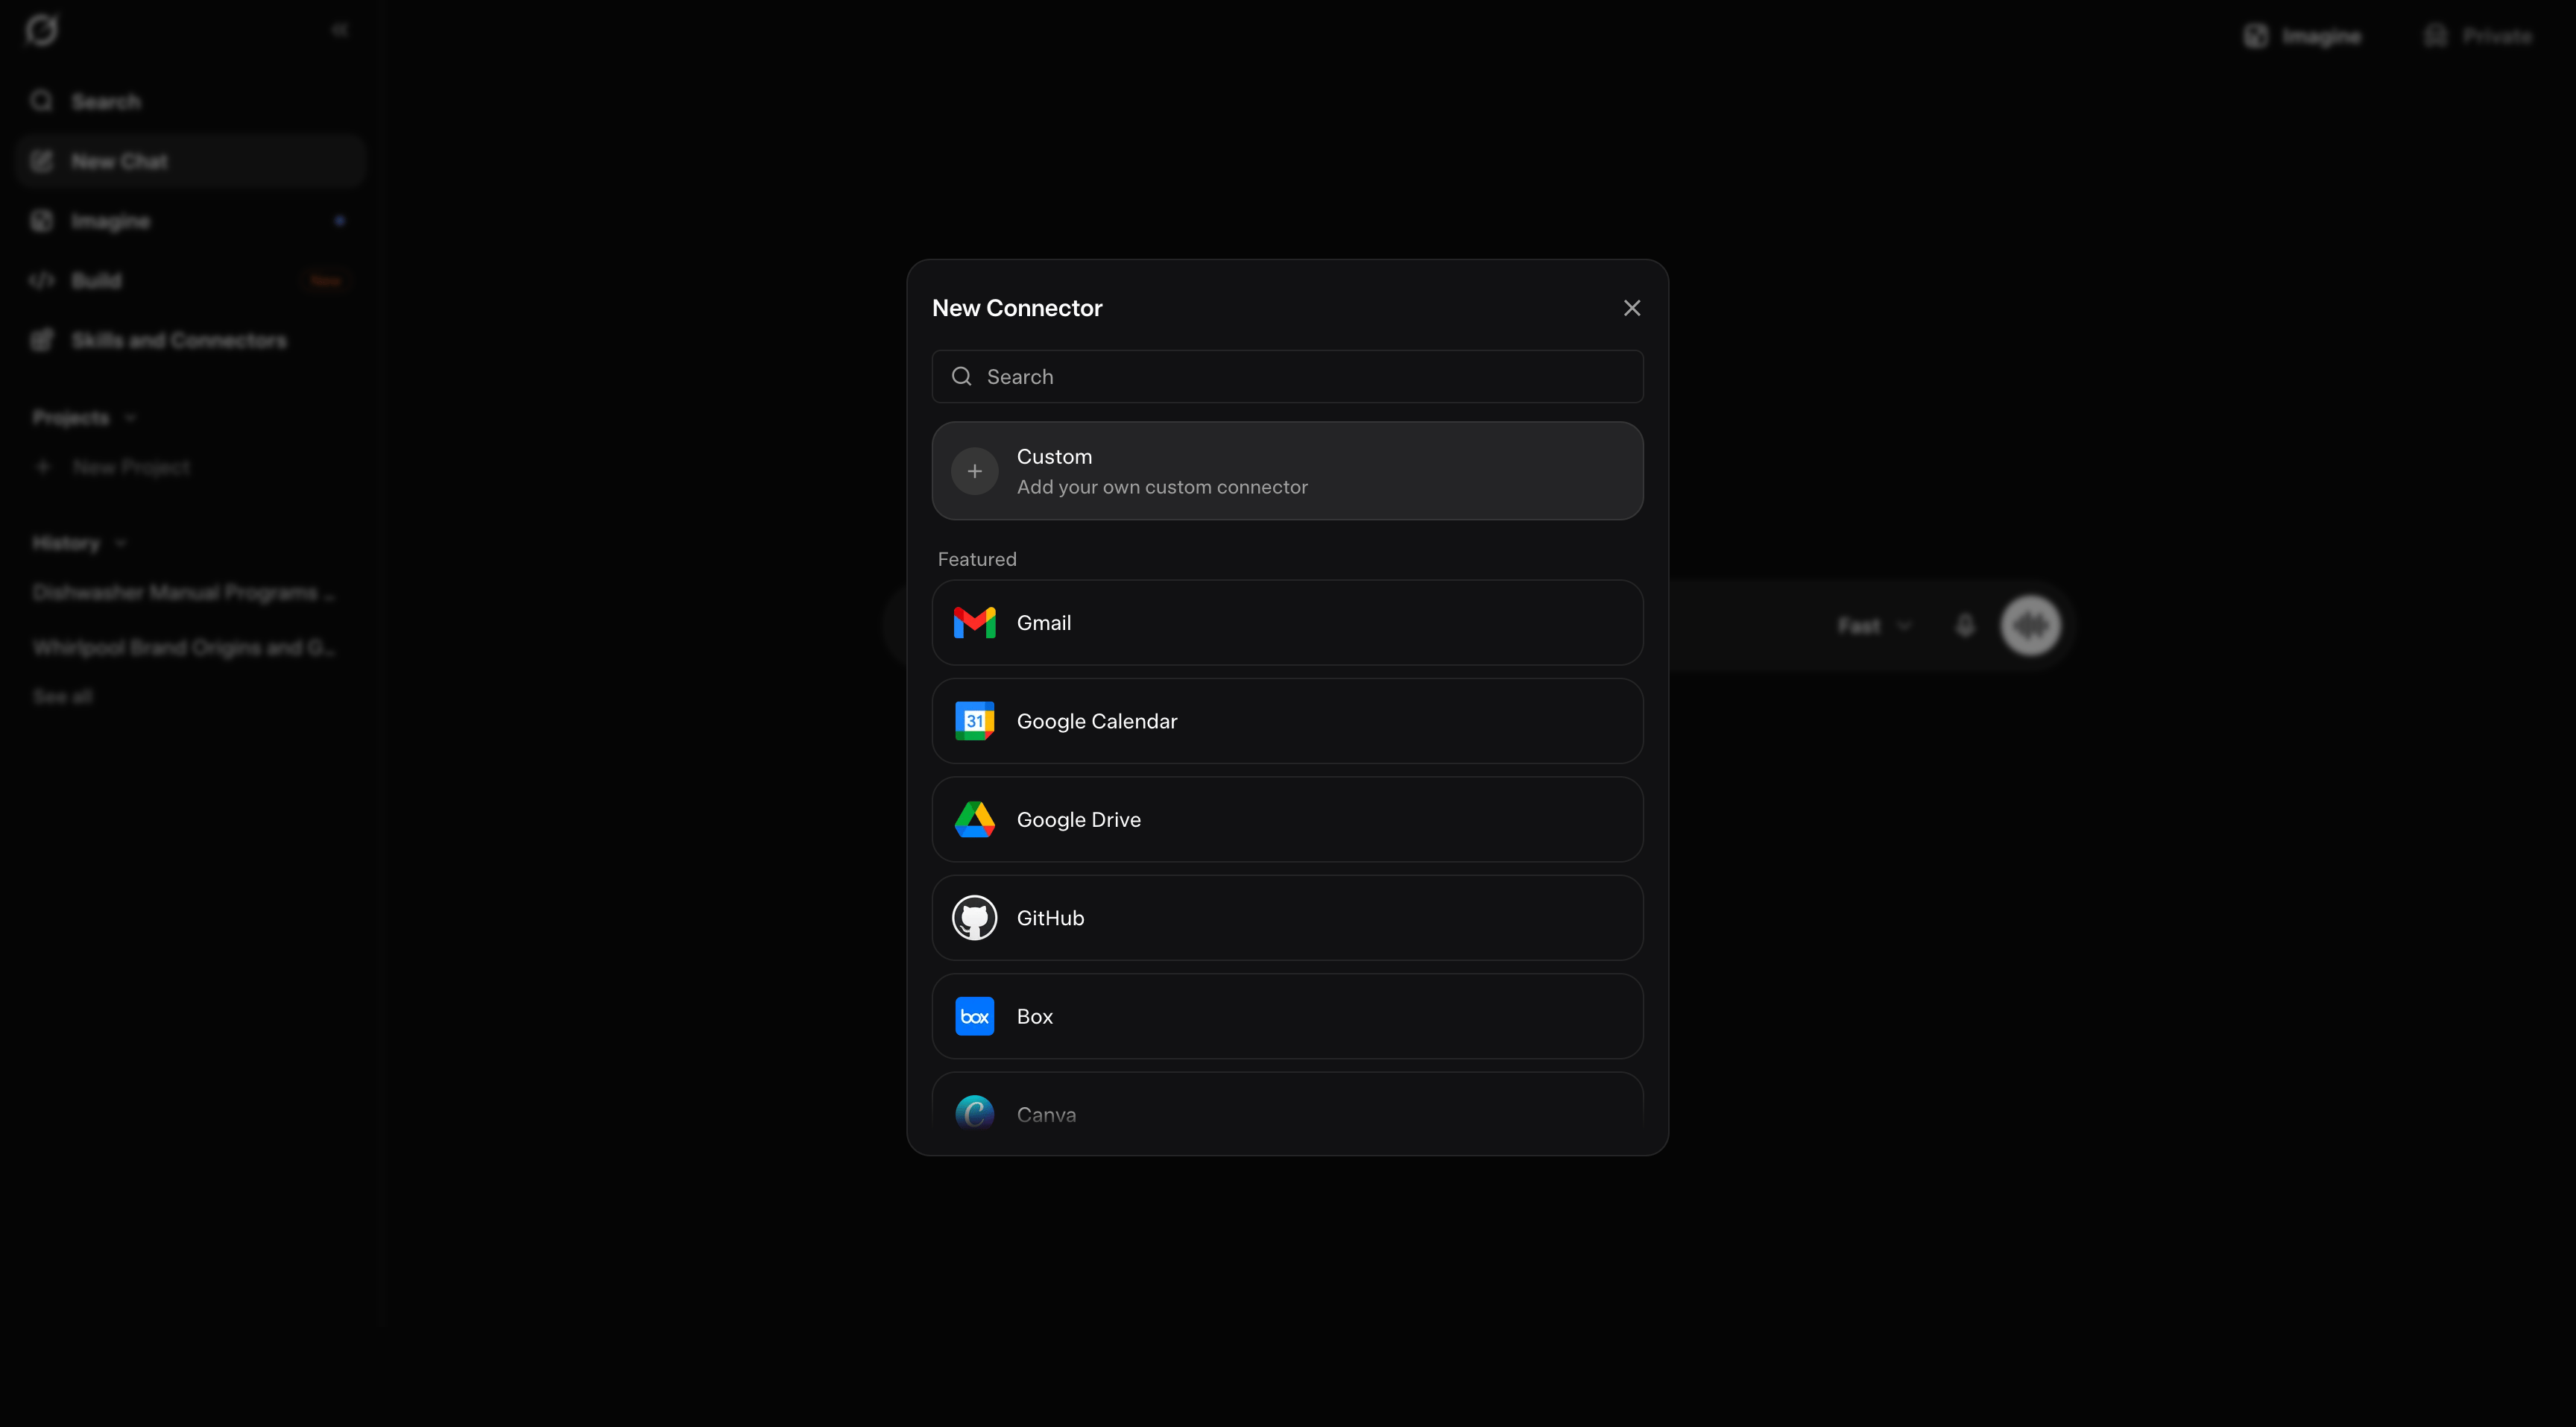 3. Name it `Scribe`, paste the URL below into **Server URL**, then click **Add Connector**:
```text theme={null}
https://mcp.scribe-mail.com/mcp
```
3. Name it `Scribe`, paste the URL below into **Server URL**, then click **Add Connector**:
```text theme={null}
https://mcp.scribe-mail.com/mcp
```
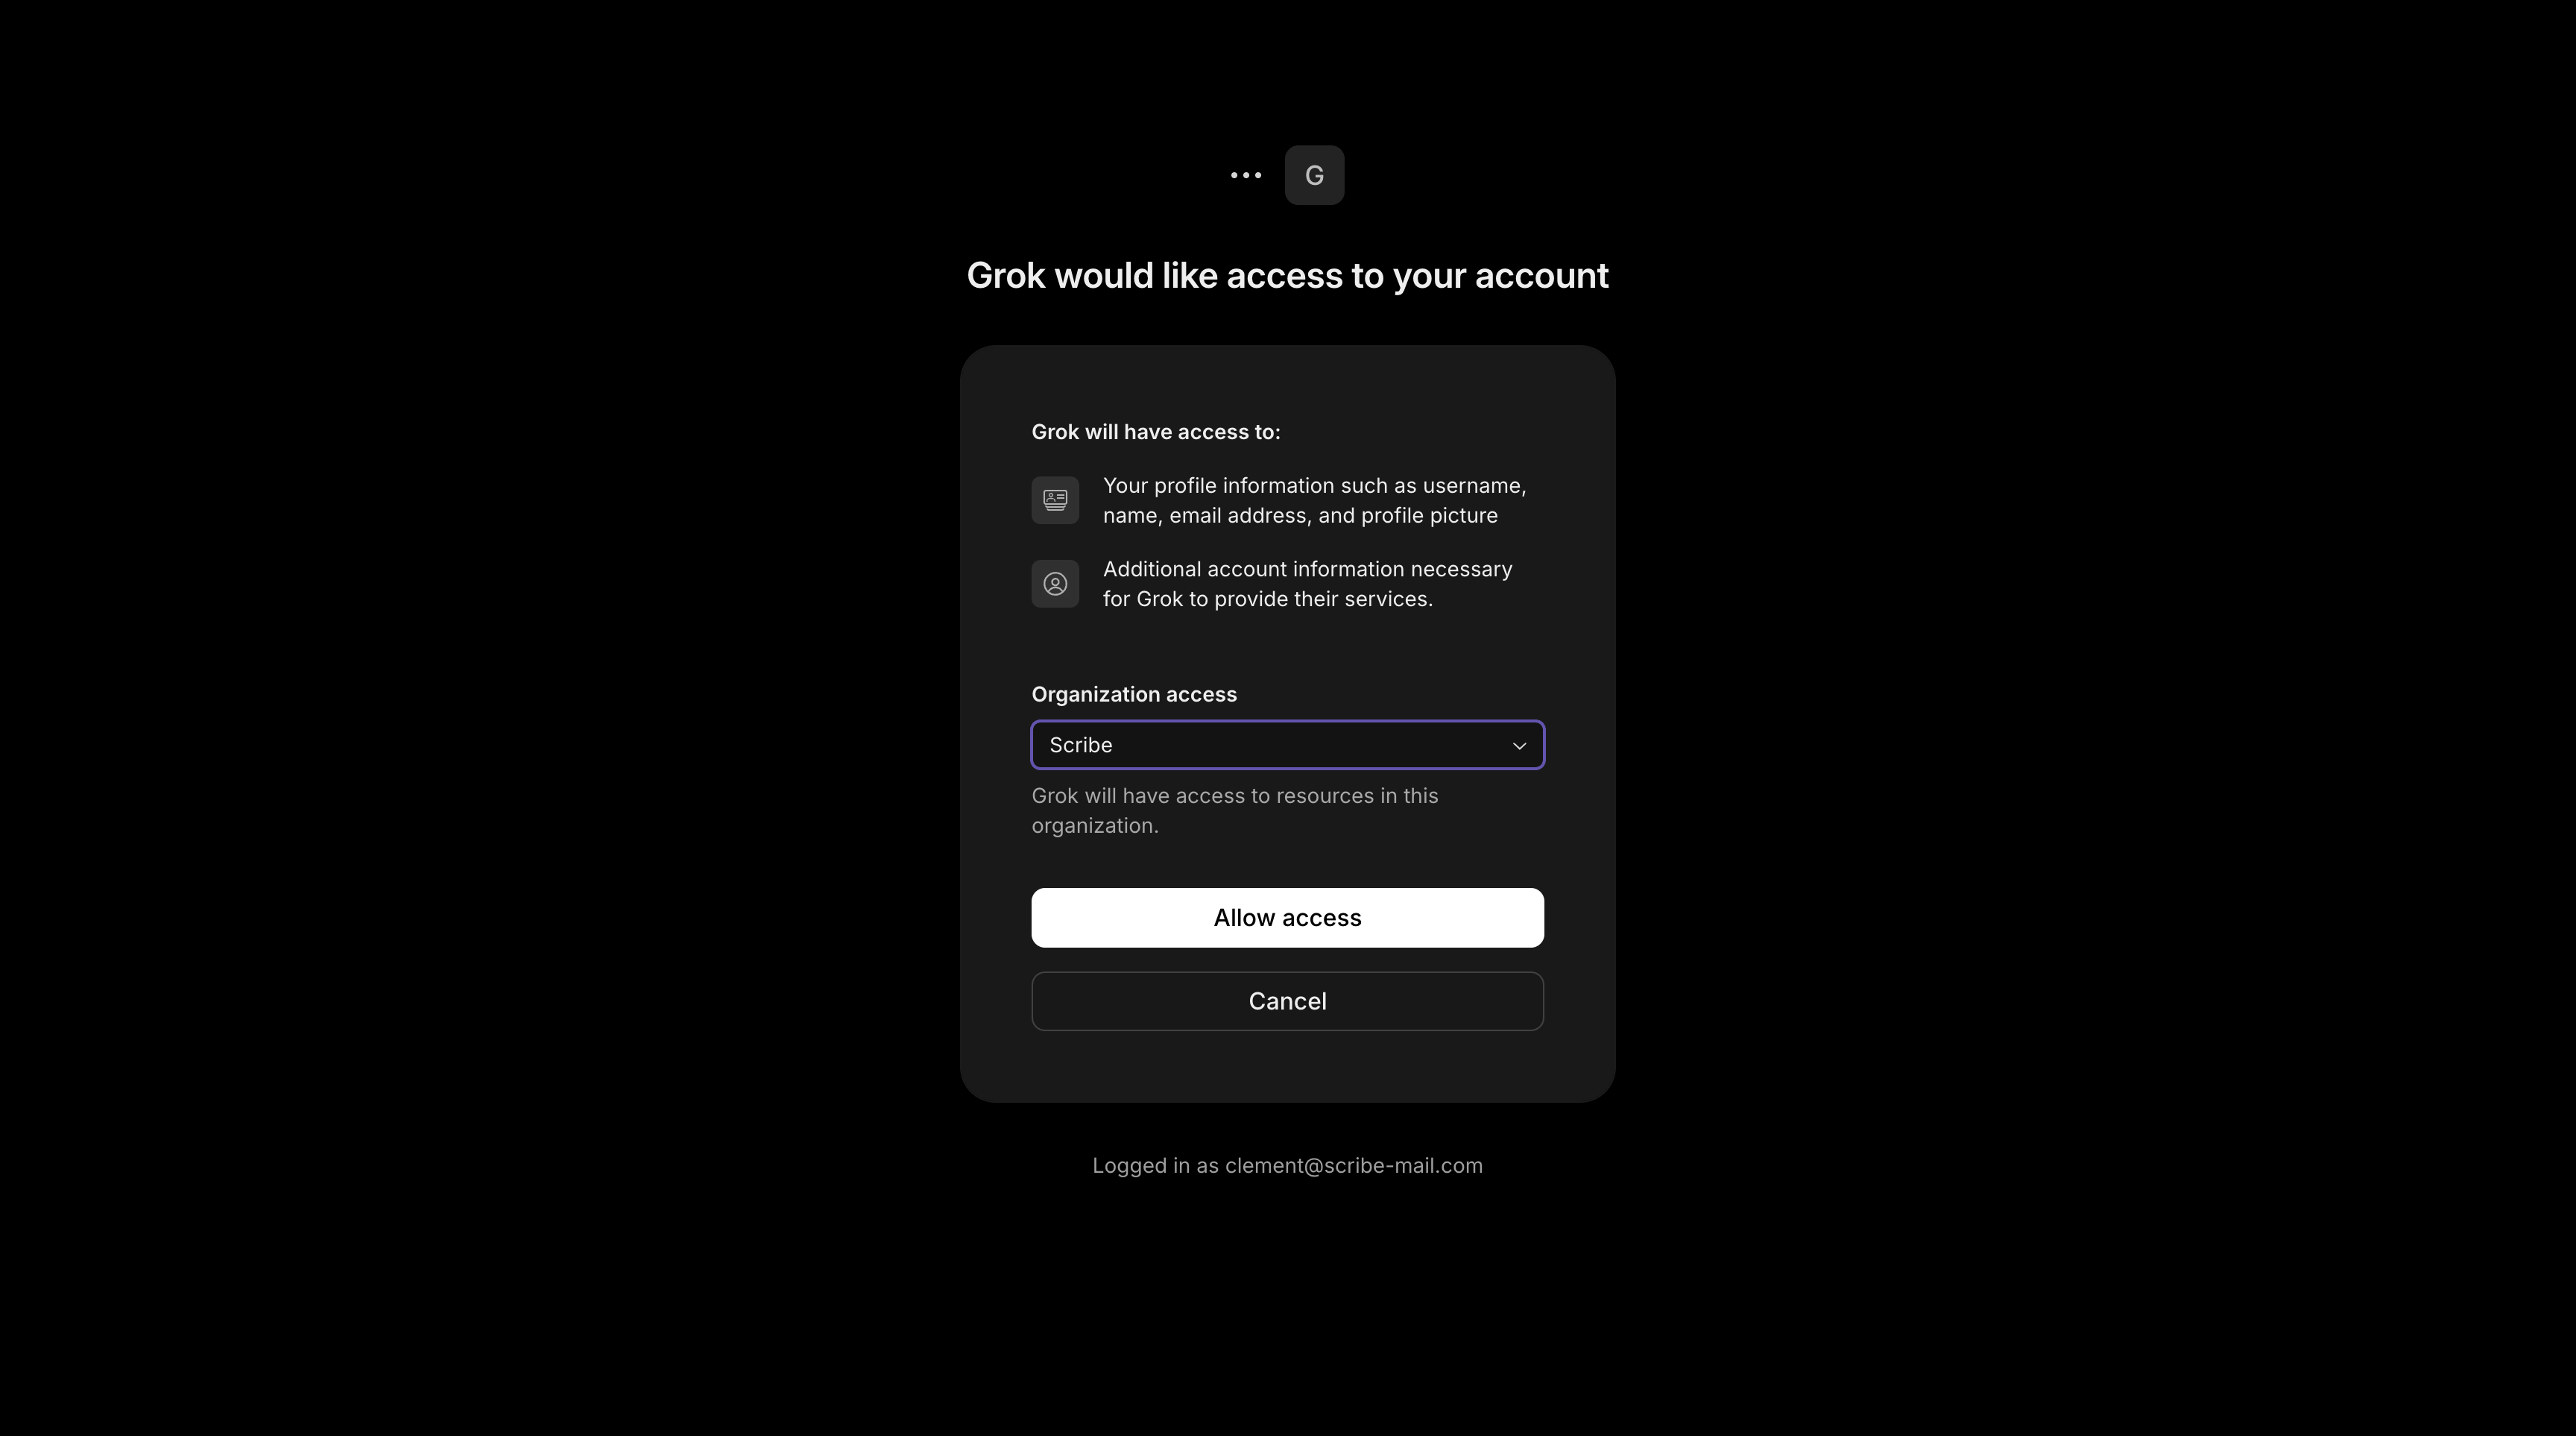
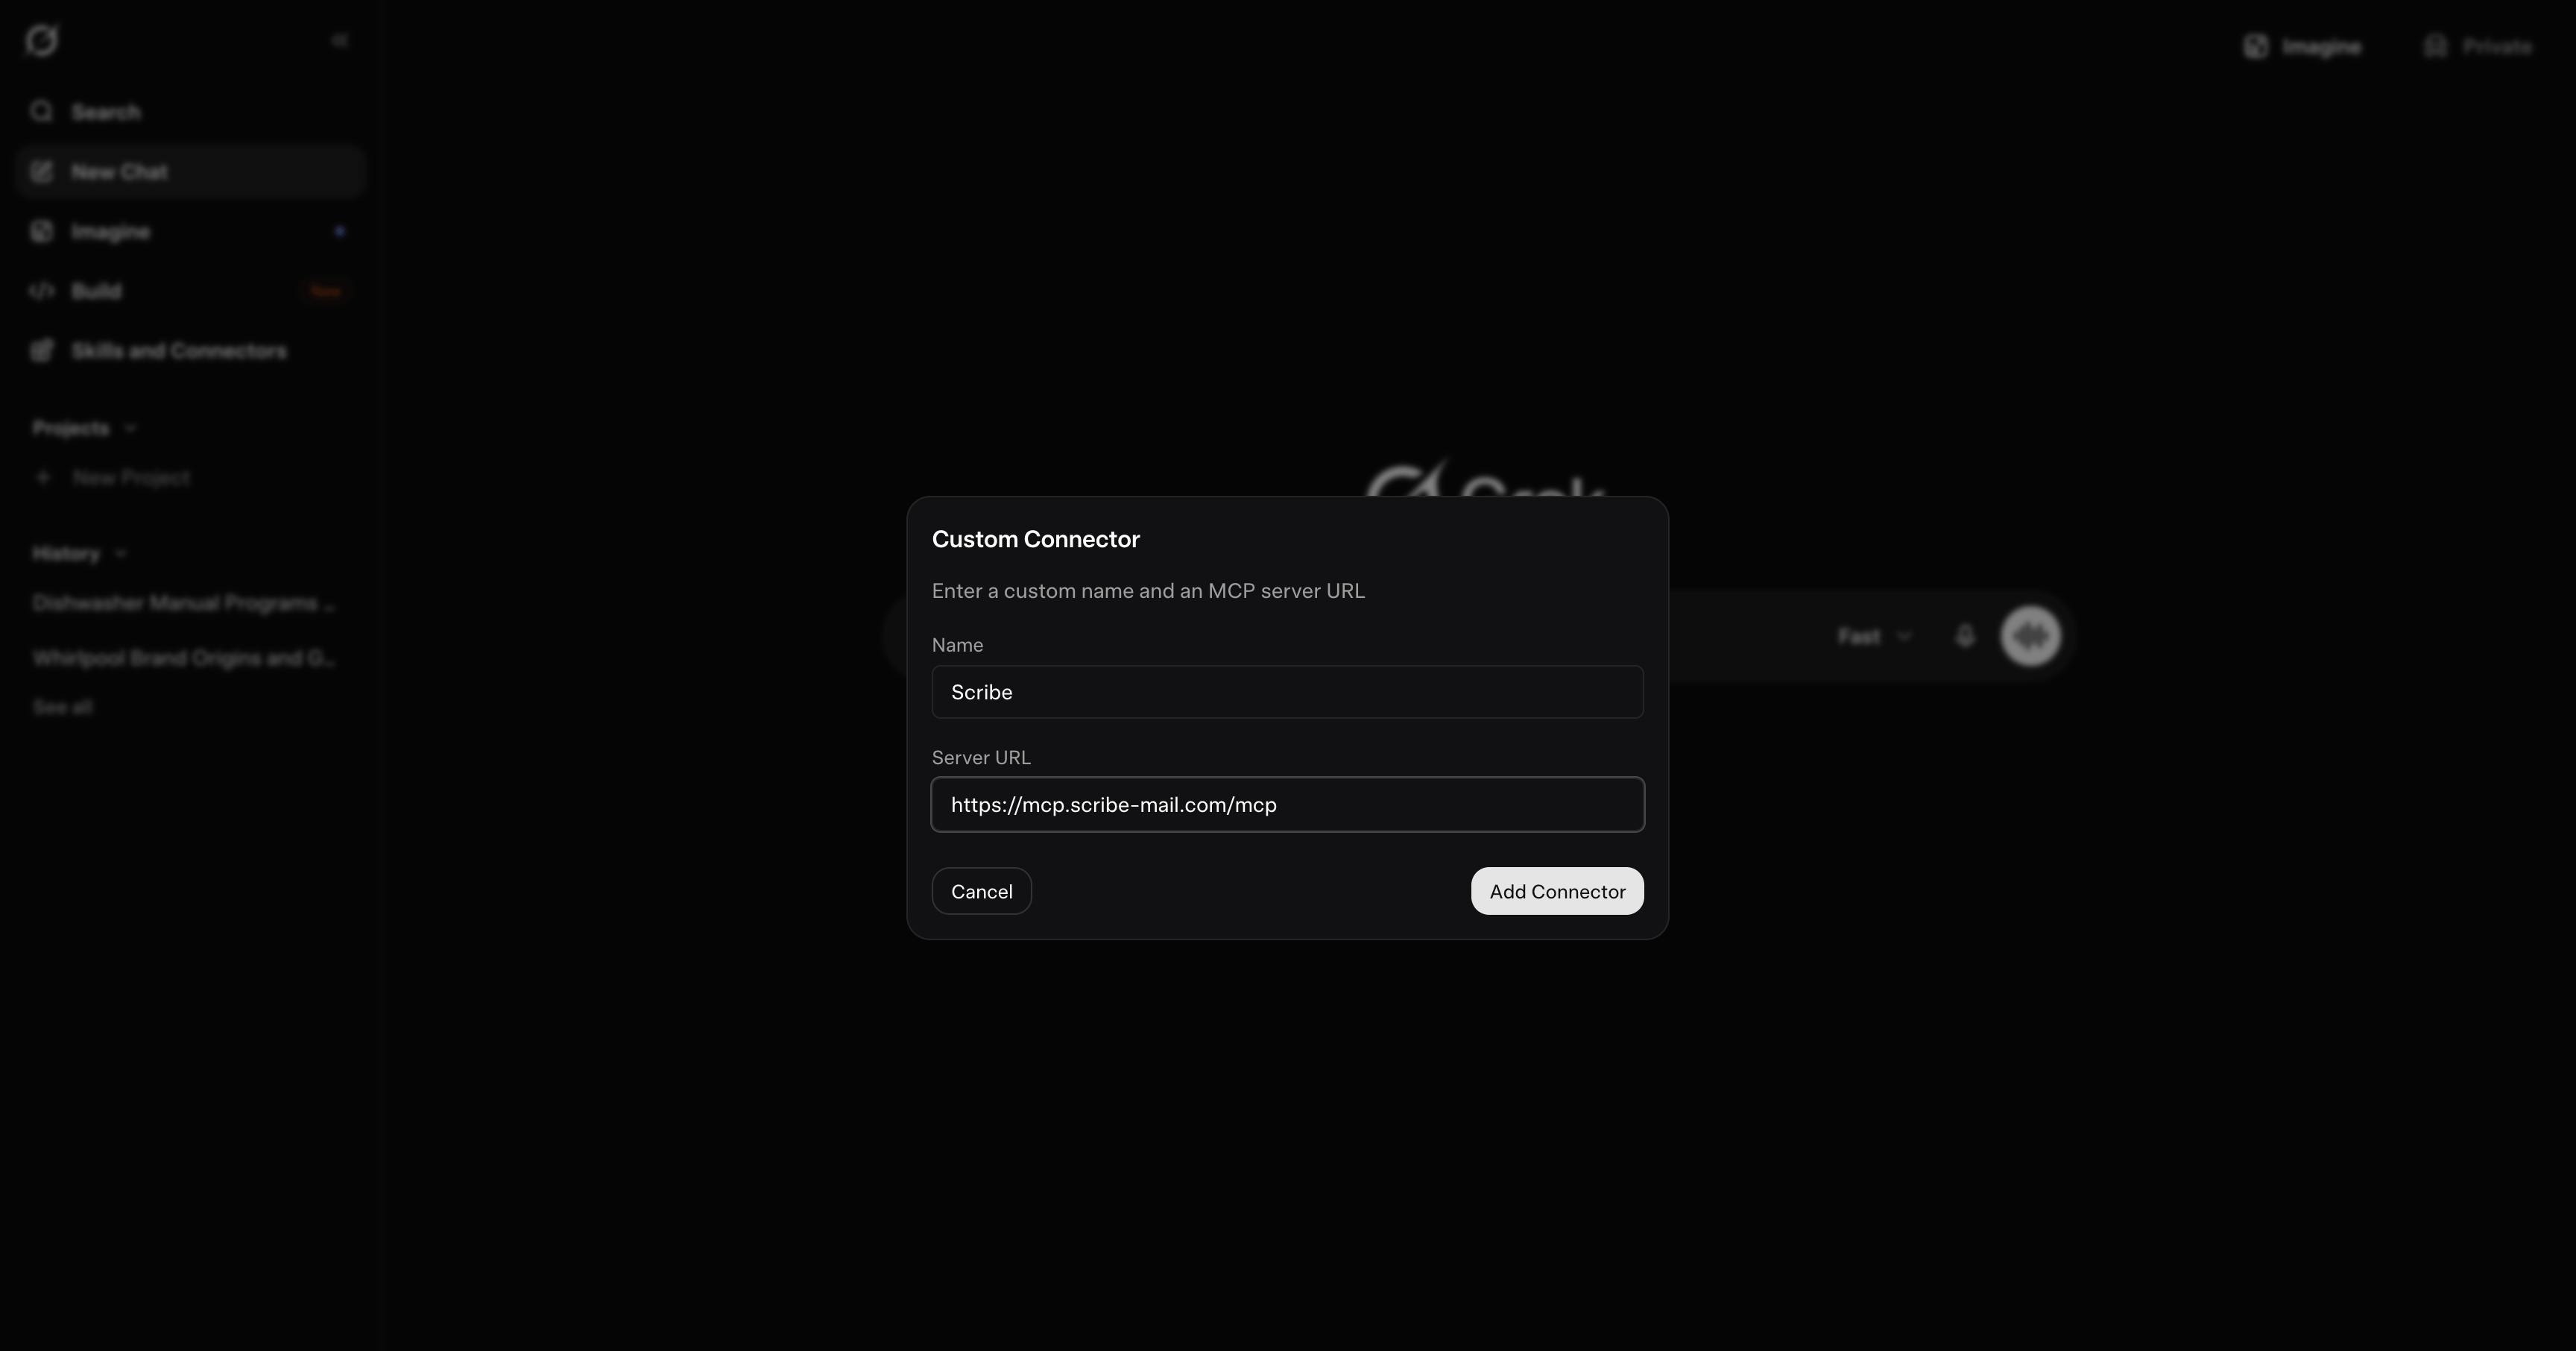 4. Sign in with your Scribe account if prompted, review the access, then click **Allow access**.
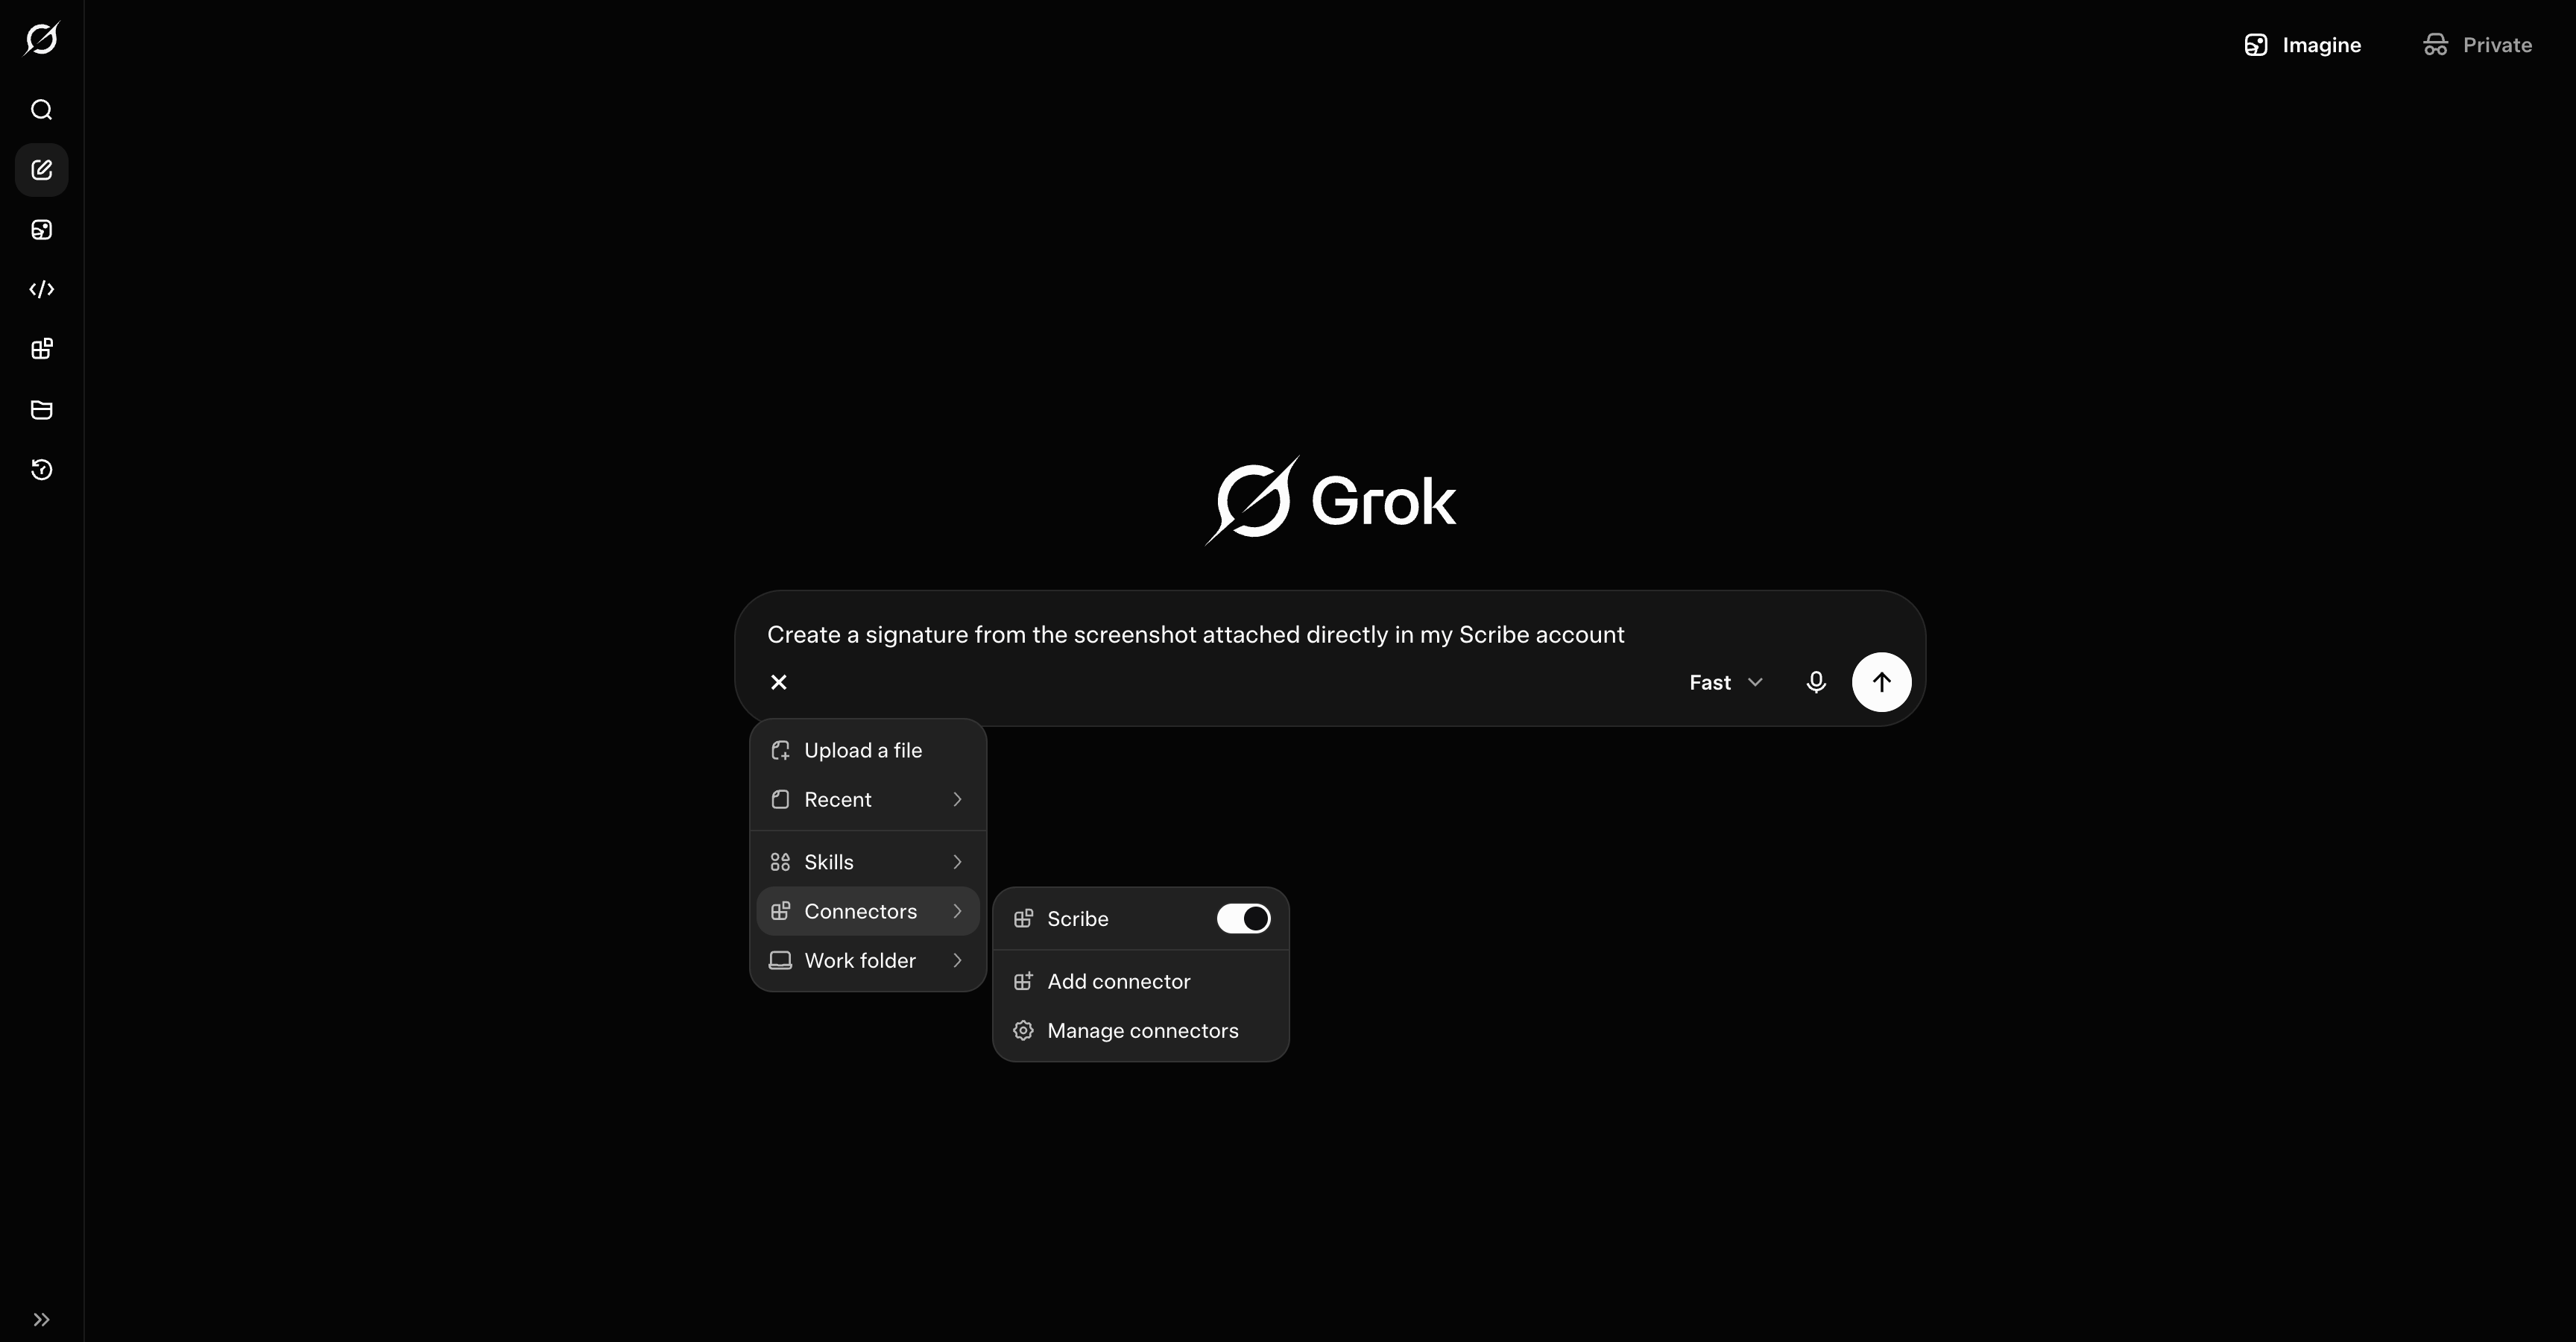
 Scribe is connected. Open the **+** menu, go to **Connectors**, enable **Scribe**, then ask Grok to manage your account, from creating a signature to pulling your analytics.
 ### Connect Gemini to Scribe
Set up by your Google Workspace admin in Gemini Enterprise, from the Google Cloud console.
1. The admin adds a custom MCP server data store and enters the URL:
```text theme={null}
https://mcp.scribe-mail.com/mcp
```
2. The admin registers an OAuth client (a client id and secret plus a redirect), then authorizes it.
3. The admin enables the Scribe tools for users.
### Connect Microsoft Copilot to Scribe
A two-role setup: an admin or maker builds a Scribe agent once in `Copilot Studio`, then the team chats with that published agent. Plain Copilot chat does not get the Scribe tools on its own.
**Prerequisites**
* A `Microsoft 365 Copilot` seat for each person who will use it
* `Copilot Studio` capacity for the person who sets it up
* Generative orchestration enabled on the agent
**Set up (admin or maker)**
These steps follow Microsoft's [Add an existing MCP server to an agent](https://learn.microsoft.com/en-us/microsoft-copilot-studio/mcp-add-existing-server-to-agent) guide, with the Scribe values filled in.
1. Open or create an agent in `Copilot Studio`, then go to **Tools**, **Add a tool**, **New tool**, **Model Context Protocol**.
2. In **Add a Model Context Protocol server**, set the **Server name** to `Scribe`, add a short **Server description**, then paste the URL into **Server URL** as a streamable endpoint:
```text theme={null}
https://mcp.scribe-mail.com/mcp
```
3. Set **Authentication** to **OAuth 2.0**, then choose **Dynamic discovery** so Copilot registers itself automatically, since Scribe supports OAuth dynamic client registration. Click **Create**, then enable the tool.
4. Enable generative orchestration if it is not already on.
5. Publish the agent.
6. Under **Channels**, make it available where the team works, in Microsoft Teams or the `Microsoft 365 Copilot` app.
**How your team uses it**
1. Open the published Scribe agent in Microsoft Teams or the `Microsoft 365 Copilot` app.
2. Manage Scribe by chatting with it.
Writes ask for confirmation before anything changes.
A tenant-wide federated connector surfaces Scribe for retrieval and grounding in Copilot chat. The published-agent route above is what enables actions like creating signatures and installing to the team.
### Connect DeepSeek to Scribe
The DeepSeek app has no built-in connector. Use Scribe through any MCP-capable client, such as Claude or Cursor, with DeepSeek selected as the model.
### Connect Qwen to Scribe
Use Qwen Code, the command-line tool. The Qwen chat app has no connector.
Add Scribe to its `settings.json` under `mcpServers`, then complete the sign-in on first connect:
```json theme={null}
{
"mcpServers": {
"scribe": {
"type": "http",
"url": "https://mcp.scribe-mail.com/mcp"
}
}
}
```
## Coding assistants
### Connect a local agent through the Scribe CLI
Install the CLI, sign in once in your browser, and serve every Scribe tool to a local agent over stdio. There is no remote connector to set up, and it works with any MCP client that can launch a command:
```bash theme={null}
npm install -g @scribemail/cli
scribe login
claude mcp add --scope user scribe -- scribe mcp
```
For clients configured with JSON (Claude Desktop, Cursor, …):
```json theme={null}
{
"mcpServers": {
"scribe": {
"command": "scribe",
"args": ["mcp"]
}
}
}
```
Every tool is also a direct shell command (`scribe signatures list`, `scribe teammates create --email jane@acme.com`, `scribe tools` for the full list), handy for scripts and agents that prefer the shell. Full guide: [Scribe CLI](/en/ai-agents/cli).
### Connect Claude Code to Scribe
Add the server, then verify it:
```bash theme={null}
claude mcp add --transport http scribe https://mcp.scribe-mail.com/mcp
claude mcp list
```
Sign in to Scribe on first use.
Prefer a local server? Install the [Scribe CLI](#connect-cli) and run `claude mcp add --scope user scribe -- scribe mcp` instead.
### Connect Cursor to Scribe
Add Scribe to `~/.cursor/mcp.json` for all projects, or `.cursor/mcp.json` for one project. Reload the window, then sign in on connect:
```json theme={null}
{
"mcpServers": {
"scribe": {
"type": "http",
"url": "https://mcp.scribe-mail.com/mcp"
}
}
}
```
Or add it in one click:
### Connect Codex to Scribe
Add the server, which writes `~/.codex/config.toml`, then sign in with OAuth:
```bash theme={null}
codex mcp add scribe --url https://mcp.scribe-mail.com/mcp
```
### Connect Hermes to Scribe
Add the server with OAuth. A browser opens for sign-in on first connect:
```bash theme={null}
hermes mcp add scribe --url https://mcp.scribe-mail.com/mcp
```
### Connect OpenClaw to Scribe
Add a `mcpServers` entry to `~/.openclaw/openclaw.json`, or use `mcporter`:
```json theme={null}
{
"mcpServers": {
"scribe": {
"type": "http",
"url": "https://mcp.scribe-mail.com/mcp"
}
}
}
```
## Next steps
Give your assistant the full Scribe workflow
Every Scribe MCP tool, grouped by area
Fix connection and tool issues
Access, data safety, supported assistants
This documentation is built and hosted on [Mintlify](https://mintlify.com), a developer documentation platform.
### Connect Gemini to Scribe
Set up by your Google Workspace admin in Gemini Enterprise, from the Google Cloud console.
1. The admin adds a custom MCP server data store and enters the URL:
```text theme={null}
https://mcp.scribe-mail.com/mcp
```
2. The admin registers an OAuth client (a client id and secret plus a redirect), then authorizes it.
3. The admin enables the Scribe tools for users.
### Connect Microsoft Copilot to Scribe
A two-role setup: an admin or maker builds a Scribe agent once in `Copilot Studio`, then the team chats with that published agent. Plain Copilot chat does not get the Scribe tools on its own.
**Prerequisites**
* A `Microsoft 365 Copilot` seat for each person who will use it
* `Copilot Studio` capacity for the person who sets it up
* Generative orchestration enabled on the agent
**Set up (admin or maker)**
These steps follow Microsoft's [Add an existing MCP server to an agent](https://learn.microsoft.com/en-us/microsoft-copilot-studio/mcp-add-existing-server-to-agent) guide, with the Scribe values filled in.
1. Open or create an agent in `Copilot Studio`, then go to **Tools**, **Add a tool**, **New tool**, **Model Context Protocol**.
2. In **Add a Model Context Protocol server**, set the **Server name** to `Scribe`, add a short **Server description**, then paste the URL into **Server URL** as a streamable endpoint:
```text theme={null}
https://mcp.scribe-mail.com/mcp
```
3. Set **Authentication** to **OAuth 2.0**, then choose **Dynamic discovery** so Copilot registers itself automatically, since Scribe supports OAuth dynamic client registration. Click **Create**, then enable the tool.
4. Enable generative orchestration if it is not already on.
5. Publish the agent.
6. Under **Channels**, make it available where the team works, in Microsoft Teams or the `Microsoft 365 Copilot` app.
**How your team uses it**
1. Open the published Scribe agent in Microsoft Teams or the `Microsoft 365 Copilot` app.
2. Manage Scribe by chatting with it.
Writes ask for confirmation before anything changes.
A tenant-wide federated connector surfaces Scribe for retrieval and grounding in Copilot chat. The published-agent route above is what enables actions like creating signatures and installing to the team.
### Connect DeepSeek to Scribe
The DeepSeek app has no built-in connector. Use Scribe through any MCP-capable client, such as Claude or Cursor, with DeepSeek selected as the model.
### Connect Qwen to Scribe
Use Qwen Code, the command-line tool. The Qwen chat app has no connector.
Add Scribe to its `settings.json` under `mcpServers`, then complete the sign-in on first connect:
```json theme={null}
{
"mcpServers": {
"scribe": {
"type": "http",
"url": "https://mcp.scribe-mail.com/mcp"
}
}
}
```
## Coding assistants
### Connect a local agent through the Scribe CLI
Install the CLI, sign in once in your browser, and serve every Scribe tool to a local agent over stdio. There is no remote connector to set up, and it works with any MCP client that can launch a command:
```bash theme={null}
npm install -g @scribemail/cli
scribe login
claude mcp add --scope user scribe -- scribe mcp
```
For clients configured with JSON (Claude Desktop, Cursor, …):
```json theme={null}
{
"mcpServers": {
"scribe": {
"command": "scribe",
"args": ["mcp"]
}
}
}
```
Every tool is also a direct shell command (`scribe signatures list`, `scribe teammates create --email jane@acme.com`, `scribe tools` for the full list), handy for scripts and agents that prefer the shell. Full guide: [Scribe CLI](/en/ai-agents/cli).
### Connect Claude Code to Scribe
Add the server, then verify it:
```bash theme={null}
claude mcp add --transport http scribe https://mcp.scribe-mail.com/mcp
claude mcp list
```
Sign in to Scribe on first use.
Prefer a local server? Install the [Scribe CLI](#connect-cli) and run `claude mcp add --scope user scribe -- scribe mcp` instead.
### Connect Cursor to Scribe
Add Scribe to `~/.cursor/mcp.json` for all projects, or `.cursor/mcp.json` for one project. Reload the window, then sign in on connect:
```json theme={null}
{
"mcpServers": {
"scribe": {
"type": "http",
"url": "https://mcp.scribe-mail.com/mcp"
}
}
}
```
Or add it in one click:
### Connect Codex to Scribe
Add the server, which writes `~/.codex/config.toml`, then sign in with OAuth:
```bash theme={null}
codex mcp add scribe --url https://mcp.scribe-mail.com/mcp
```
### Connect Hermes to Scribe
Add the server with OAuth. A browser opens for sign-in on first connect:
```bash theme={null}
hermes mcp add scribe --url https://mcp.scribe-mail.com/mcp
```
### Connect OpenClaw to Scribe
Add a `mcpServers` entry to `~/.openclaw/openclaw.json`, or use `mcporter`:
```json theme={null}
{
"mcpServers": {
"scribe": {
"type": "http",
"url": "https://mcp.scribe-mail.com/mcp"
}
}
}
```
## Next steps
Give your assistant the full Scribe workflow
Every Scribe MCP tool, grouped by area
Fix connection and tool issues
Access, data safety, supported assistants
This documentation is built and hosted on [Mintlify](https://mintlify.com), a developer documentation platform.